

If you’re craving something deliciously meaty and full of flavor, you’ve landed in the right spot. Argentine cuisine is renowned for its incredible meat dishes that bring out the best in bold seasonings and quality ingredients. From the smoky aroma of asado to the flaky goodness of empanadas, each recipe is steeped in tradition. These 13 tender Argentinian meat recipes are sure to inspire your next gathering around the grill. Let’s explore these mouthwatering dishes and elevate your culinary experience together.
Asado: The Ultimate Argentine Barbecue

Asado is more than just a meal in Argentina; it’s a cherished tradition and a social event that brings families and friends together. This method of barbecue involves grilling various cuts of beef, pork, chicken, and even lamb over an open fire or charcoal. The key to a successful asado lies in the quality of the meat, the technique used in cooking, and the camaraderie shared around the grill. The result is a smoky, flavorful feast that will make your taste buds sing and create lasting memories.
To truly experience asado, one must also appreciate the accompanying sides and sauces, such as chimichurri, a vibrant herb sauce that adds a tangy kick to the grilled meats. The process of preparing asado is an art, with each step contributing to the final outcome. Whether you’re hosting a large gathering or a small family dinner, this recipe guarantees that your asado will be a hit, allowing you to embrace the spirit of Argentine cuisine.
Ingredients (Serves 4-6)
- 3 lbs of assorted beef (short ribs, flank steak, or ribeye)
- 2 lbs of pork (chops or ribs)
- 1 lb of chicken (leg quarters or thighs)
- 2 tablespoons of coarse sea salt
- 1 tablespoon of black pepper
- 1 tablespoon of garlic powder
- 1 tablespoon of smoked paprika
- 2 tablespoons of olive oil
- Fresh herbs (rosemary and thyme) for seasoning
- 1 cup of chimichurri sauce (for serving)
Cooking Instructions
- Prepare the Marinade: In a small bowl, mix the olive oil, garlic powder, smoked paprika, black pepper, and a generous amount of coarse sea salt. This will be your marinade for the meat. Rub this mixture all over the assorted cuts of meat to guarantee they’re well coated. Allow the meat to marinate for at least 1 hour at room temperature, or refrigerate overnight for deeper flavor.
- Set Up the Grill: Prepare your grill for direct and indirect heat. If you’re using a charcoal grill, light the charcoal and let it burn until it’s covered with a light ash. If you’re using a wood fire, let the wood burn down until you have a bed of hot coals. For gas grills, preheat on high and then adjust to medium heat.
- Grill the Meat: Start with the beef, as it takes the longest to cook. Place the beef cuts directly over the heat to sear them for about 4-5 minutes on each side, then move them to the cooler part of the grill. For pork and chicken, also sear for a few minutes before moving them to indirect heat. Cooking times will vary: beef is typically medium-rare at 130-135°F, pork should reach an internal temperature of 145°F, and chicken should be cooked to 165°F.
- Monitor the Cooking: Use a meat thermometer to verify your meats are cooked to the desired doneness. Turn the meats occasionally and baste them with any remaining marinade or olive oil to keep them moist and flavorful.
- Rest the Meat: Once the meats are cooked, remove them from the grill and let them rest for about 10 minutes. This allows the juices to redistribute, guaranteeing a juicy and tender bite.
- Serve: Slice the meats against the grain and arrange them on a large platter. Serve with chimichurri on the side, allowing everyone to add their preferred amount to their portions.
Extra Tips
When cooking asado, using high-quality meat is essential for the best flavor and texture. If possible, visit a local butcher to source fresh, grass-fed beef or organic poultry.
Don’t rush the cooking process; allow the fire to maintain a steady heat, as cooking the meats slowly will yield the most tender results. Finally, enjoy the experience! Asado is as much about the gathering and sharing with loved ones as it’s about the food itself.
Empanadas: Savory Meat Pockets
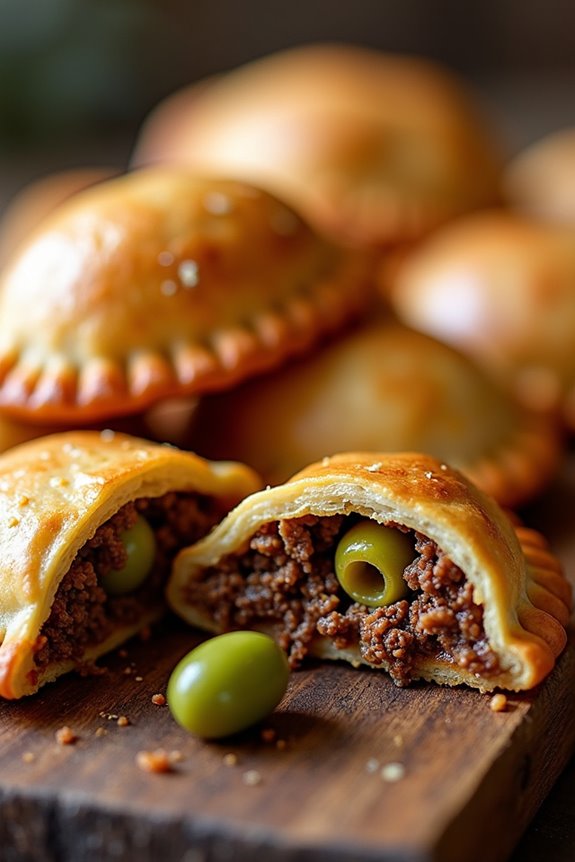
Empanadas are a beloved staple in Argentinian cuisine, known for their crispy golden crust and flavorful filling. These savory meat pockets can be found at street vendors, family gatherings, and festive occasions throughout Argentina. Traditionally, empanadas are filled with a mixture of seasoned ground meat, onions, and spices, all encased in a flaky pastry that’s either baked or fried to perfection. Each bite offers a delightful combination of textures and flavors that make them irresistible.
Making empanadas at home is a rewarding experience that allows you to customize the filling to suit your taste. The dough is relatively easy to prepare, and you can experiment with various fillings, including beef, chicken, or even vegetables for a vegetarian option. In this recipe, we’ll focus on the classic beef empanadas, perfect for serving 4-6 people. Let’s explore the ingredients and cooking instructions to create these delicious treats.
Ingredients
- 2 cups all-purpose flour
- 1/2 cup unsalted butter, chilled and cubed
- 1/2 teaspoon salt
- 1/4 cup cold water
- 1 pound ground beef
- 1 medium onion, finely chopped
- 2 cloves garlic, minced
- 1 teaspoon ground cumin
- 1 teaspoon paprika
- 1/2 teaspoon black pepper
- 1/2 teaspoon salt (for filling)
- 1/4 cup green olives, chopped (optional)
- 1 egg, beaten (for egg wash)
Cooking Instructions
- Prepare the Dough: In a large mixing bowl, combine the flour and salt. Add the chilled, cubed butter and use your fingers or a pastry cutter to mix until the mixture resembles coarse crumbs. Gradually add the cold water, mixing until the dough comes together. Form the dough into a ball, wrap it in plastic wrap, and refrigerate for at least 30 minutes.
- Cook the Filling: In a large skillet over medium heat, add a splash of oil and sauté the chopped onion until translucent, about 5 minutes. Add the minced garlic and cook for an additional minute. Then, add the ground beef to the skillet, breaking it apart with a spoon. Cook until browned and fully cooked, about 7-10 minutes. Stir in the cumin, paprika, black pepper, and salt. If using, add the chopped olives, and mix well. Remove from heat and let the filling cool.
- Roll Out the Dough: Once the dough has chilled, remove it from the refrigerator. On a lightly floured surface, roll out the dough to about 1/8 inch thickness. Use a round cutter (about 4-5 inches in diameter) to cut out circles of dough.
- Fill the Empanadas: Place a tablespoon of the beef filling in the center of each dough circle. Be careful not to overfill, as this could cause the empanadas to burst while cooking. Fold the dough over the filling to create a half-moon shape. Press the edges together to seal, then crimp the edges with a fork or your fingers to guarantee they’re tightly sealed.
- Prepare for Baking: Preheat your oven to 375°F (190°C). Line a baking sheet with parchment paper. Place the filled empanadas on the prepared baking sheet. Brush the tops with the beaten egg to give them a golden color when baked.
- Bake the Empanadas: Bake in the preheated oven for 20-25 minutes, or until the empanadas are golden brown and cooked through. Remove from the oven and allow to cool slightly before serving.
Extra Tips
When making empanadas, feel free to customize the filling according to your preferences. You can experiment with different meats, like chicken or pork, or add vegetables for a vegetarian option. If you prefer a crispy texture, frying the empanadas in hot oil is another option.
Additionally, serving them with chimichurri sauce or a spicy salsa can elevate the dish and add extra flavor. Always verify the filling is cooled before filling the dough to prevent the empanadas from becoming soggy. Enjoy your homemade empanadas with family and friends!
Milanesa: Breaded and Fried Meat Cutlets
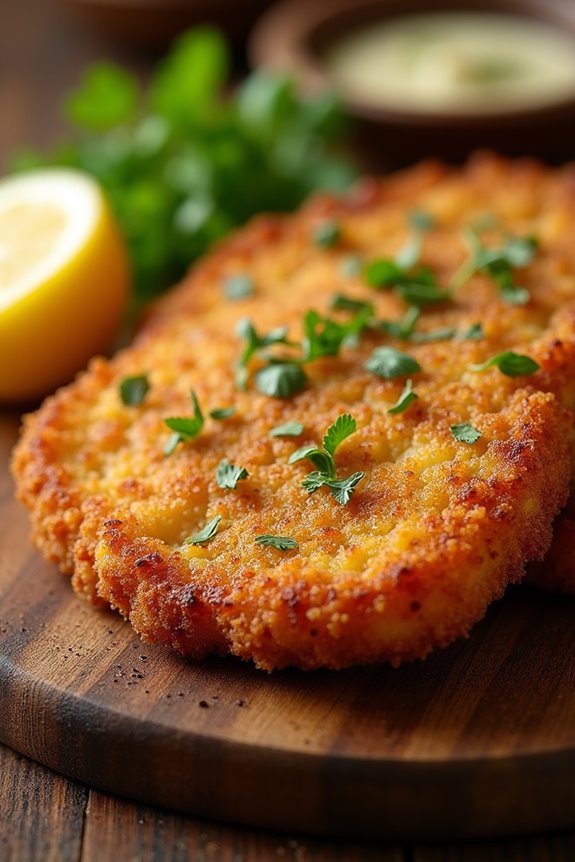
Milanesa is a beloved dish in Argentina, often served in homes and restaurants alike. This classic recipe consists of thinly sliced meat, typically beef or chicken, which is breaded and fried to golden perfection. The dish isn’t just a meal; it’s a cultural staple that brings families together around the dinner table. Traditionally accompanied by mashed potatoes, salad, or even in a sandwich, milanesa is versatile and delicious, making it a favorite among both adults and children.
To prepare milanesa, the meat is first tenderized and then coated in breadcrumbs, creating a crispy exterior that contrasts beautifully with the tender meat inside. The cooking process is straightforward but requires attention to detail for the best results. Whether you’re making it for a special occasion or a casual weeknight dinner, milanesa is sure to impress.
Ingredients (serving size: 4-6 people):
- 4-6 thin beef or chicken cutlets (about 1 pound)
- 1 cup all-purpose flour
- 2 large eggs
- 1 cup breadcrumbs (preferably fresh)
- 1 teaspoon garlic powder
- 1 teaspoon onion powder
- 1 teaspoon salt
- 1/2 teaspoon black pepper
- 1/2 cup vegetable oil (for frying)
- Lemon wedges (optional, for serving)
- Fresh parsley, chopped (optional, for garnish)
Cooking Instructions:
- Prepare the Meat: Start by tenderizing the meat cutlets. If using beef, you can gently pound the meat with a meat mallet or rolling pin until it’s about 1/4 inch thick. This step guarantees the meat cooks evenly and remains tender.
- Set Up Breading Stations: In three separate shallow dishes, place the flour in the first dish, whisk the eggs in the second, and combine the breadcrumbs, garlic powder, onion powder, salt, and black pepper in the third. This setup will make the breading process efficient.
- Bread the Cutlets: Take one cutlet and dredge it in the flour, making sure to coat it evenly. Shake off any excess flour, then dip it into the beaten eggs, allowing any excess egg to drip off. Finally, coat the cutlet in the breadcrumb mixture, pressing gently to confirm the breadcrumbs adhere well. Repeat this process for all the cutlets.
- Heat the Oil: In a large frying pan, heat the vegetable oil over medium-high heat. You want enough oil to cover the bottom of the pan—about 1/4 inch deep. To test if the oil is hot enough, drop a small piece of bread into the oil; it should sizzle and turn golden brown in about 30 seconds.
- Fry the Cutlets: Carefully place the breaded cutlets into the hot oil, working in batches if necessary to avoid overcrowding the pan. Fry each cutlet for about 3-4 minutes on each side or until they’re golden brown and cooked through. Use tongs to flip them gently.
- Drain and Serve: Once cooked, remove the cutlets from the oil and place them on a plate lined with paper towels to absorb any excess oil. Serve the milanesa hot, garnished with chopped parsley and lemon wedges on the side for an added zing.
Extra Tips: When preparing milanesa, consider using fresh breadcrumbs for a better texture and flavor. You can also experiment with different seasonings by adding paprika, dried oregano, or even grated cheese to the breadcrumb mixture for a unique twist.
For a healthier option, try baking the breaded cutlets in a preheated oven at 400°F (200°C) for about 20-25 minutes, flipping halfway through, until they’re crispy and cooked through. Enjoy your milanesa with a fresh salad or as a sandwich for a delicious meal!
Choripán: Sausage Sandwich With Chimichurri
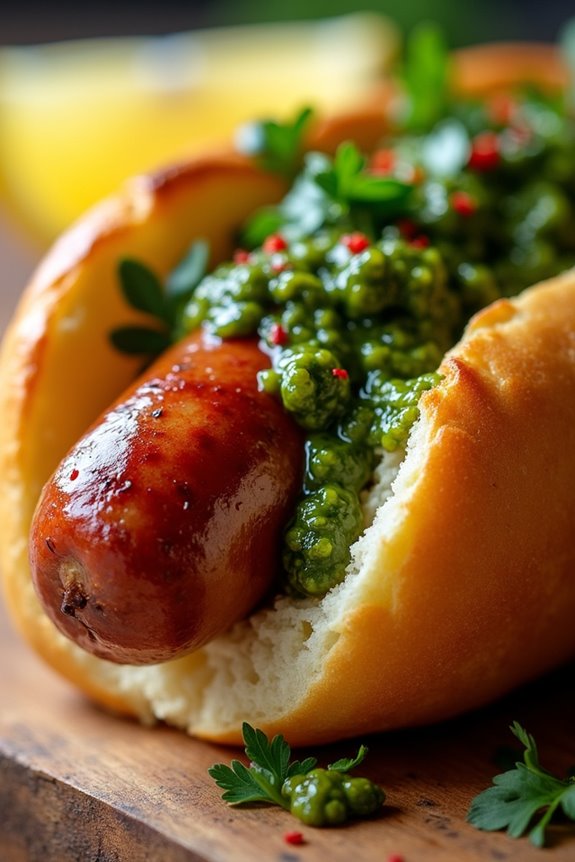
Choripán is a beloved street food in Argentina, celebrated for its simple yet flavorful combination of grilled chorizo sausage and fresh chimichurri sauce, all served in a crusty bread roll. This dish isn’t only a staple at barbecues but also a favorite for football matches and street fairs.
The delightful balance of the smoky sausage and the vibrant, herbaceous chimichurri makes every bite an explosion of flavor that transports you straight to the streets of Buenos Aires.
Making choripán at home is a rewarding experience that allows you to enjoy a taste of Argentina no matter where you are. The key to a great choripán is the quality of the chorizo and the freshness of the chimichurri. This dish is perfect for gatherings, serving 4-6 people, and can be easily customized with additional toppings like pickled onions, spicy peppers, or even avocado for added richness.
Ingredients for 4-6 servings:
- 4-6 fresh chorizo sausages
- 4-6 crusty rolls (like baguettes or ciabatta)
- 1 cup fresh parsley, finely chopped
- 4 garlic cloves, minced
- 1/2 cup olive oil
- 1/4 cup red wine vinegar
- 1 teaspoon red pepper flakes (optional)
- Salt and pepper to taste
- Lemon wedges for serving (optional)
Cooking Instructions:
- Prepare the Chimichurri: In a medium bowl, combine the finely chopped parsley, minced garlic, olive oil, red wine vinegar, red pepper flakes (if using), salt, and pepper. Stir well to combine all ingredients. Let the chimichurri sit for at least 30 minutes to allow the flavors to meld together. This can also be made a few hours ahead of time and refrigerated.
- Grill the Chorizo: Preheat your grill to medium-high heat. Place the chorizo sausages on the grill and cook for about 10-15 minutes, turning occasionally, until they’re browned and cooked through. The internal temperature should reach 160°F (70°C). If you prefer, you can also cook the sausages in a skillet over medium heat until browned.
- Prepare the Rolls: While the sausages are grilling, slice the crusty rolls in half lengthwise. If desired, you can lightly toast them on the grill for a few minutes to add extra crunch and flavor.
- Assemble the Choripán: Once the sausages are cooked, remove them from the grill. Place one sausage in each roll, then generously drizzle or spoon the chimichurri sauce over the sausage.
- Serve: Serve the choripán immediately with lemon wedges on the side for a fresh squeeze of citrus if desired.
Extra Tips: When making choripán, feel free to adjust the chimichurri to your taste by adding more garlic or adjusting the acidity with additional vinegar or lemon juice. For a twist, you can experiment with different types of sausages, such as spicy or smoked varieties, to add your personal flair.
Provoleta: Grilled Provolone Cheese

Provoleta is a delightful Argentinian appetizer that showcases the rich flavors of provolone cheese, perfectly grilled to achieve a melty, gooey texture with a crispy, golden-brown exterior. This dish is often served as a starter during asados (barbecues), making it a perfect way to kick off any meal.
The simplicity of the ingredients allows the natural flavors of the cheese to shine, while the addition of herbs and spices enhances the overall experience. Whether you’re hosting a barbecue or simply looking for a tasty snack, provoleta is sure to impress your guests.
To prepare provoleta, it’s imperative to use high-quality provolone cheese that’s suitable for grilling. The cheese should be thick enough to withstand the heat without falling apart. Traditionally, it’s cooked in a cast-iron skillet or on a grill, allowing it to develop a beautiful crust while remaining soft and melty on the inside.
Served with crusty bread and a drizzle of olive oil or a sprinkle of oregano, provoleta is a dish that brings the essence of Argentinian cuisine right to your table.
Ingredients (Serves 4-6)
- 1 large wheel of provolone cheese (about 1 pound)
- 2 tablespoons olive oil
- 1 teaspoon dried oregano
- 1 teaspoon crushed red pepper flakes (optional)
- Freshly ground black pepper to taste
- Crusty bread, for serving
Cooking Instructions
- Prepare the Cheese: Begin by taking the wheel of provolone cheese out of its packaging. If it has a rind, trim it down to about 1/4 inch thick, as this will help it retain its shape while grilling. Cut the cheese into a thick round about 1 inch in height if not using a full wheel.
- Preheat the Grill or Skillet: Preheat your grill to medium-high heat, or place a cast-iron skillet on the stove over medium heat. If you’re using a skillet, make sure it’s well-seasoned to prevent sticking.
- Season the Cheese: Brush both sides of the cheese with olive oil. This not only adds flavor but also helps to create a nice crust. Sprinkle the dried oregano and crushed red pepper flakes (if using) over the top, followed by a few cracks of black pepper.
- Grill the Cheese: Place the cheese directly onto the hot grill or in the skillet. Cook for about 5-7 minutes until the underside is golden brown and crispy. If using a skillet, you may want to cover it with a lid to help the cheese melt evenly.
- Flip and Finish: Carefully flip the cheese using a spatula. Cook for an additional 3-5 minutes, allowing the second side to develop a golden crust and the cheese to become gooey. Keep an eye on the cheese to prevent burning.
- Serve Immediately: Once the cheese is beautifully melted and golden, remove it from the grill or skillet. Serve hot, accompanied by slices of crusty bread for dipping. You can drizzle a little extra olive oil over the top for added flavor.
Extra Tips
When making provoleta, it’s crucial to keep an eye on the cooking time to guarantee you achieve the perfect melt without overcooking.
If you want to add more depth of flavor, consider incorporating fresh herbs like thyme or rosemary along with the oregano. Additionally, serving with a side of chimichurri sauce can elevate the dish even further, adding a burst of freshness that pairs wonderfully with the rich, melted cheese.
Enjoy this delightful dish with friends and family for a true Argentinian culinary experience!
Bife De Chorizo: Ribeye Steak
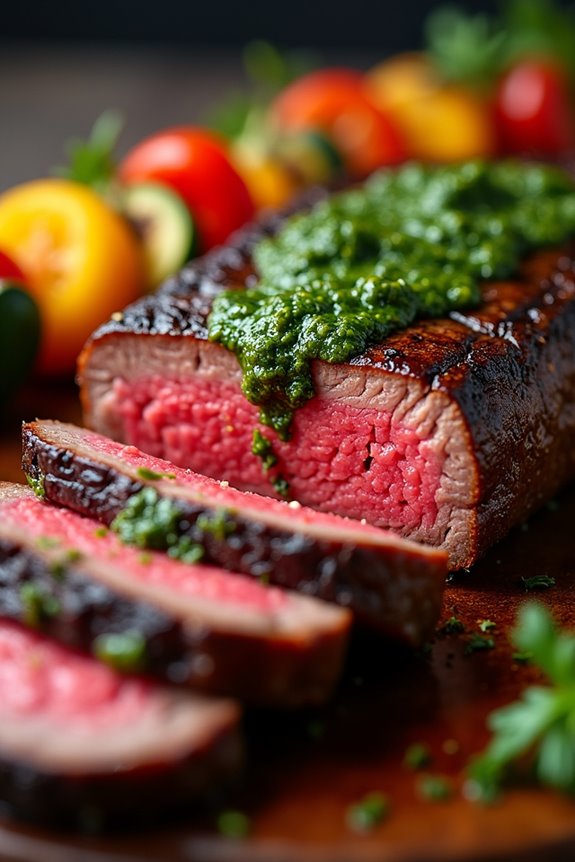
Bife de Chorizo, a classic Argentinian dish, showcases the rich and flavorful ribeye steak, known for its tenderness and marbling. This cut is perfect for grilling, making it a favorite in Argentine asados (barbecues). The secret to a perfect Bife de Chorizo lies in the quality of the meat, as well as the simplicity of the seasoning, allowing the natural flavors to shine through.
Traditionally, this dish is served with chimichurri sauce, a vibrant and herby condiment that complements the steak beautifully.
To prepare Bife de Chorizo, you’ll want to verify that your steak is at room temperature before cooking, as this guarantees even cooking. The cooking method can vary, but grilling is the most popular approach in Argentina. You can achieve a deliciously charred exterior while keeping the inside juicy and flavorful. Serve this dish with a side of grilled vegetables or potatoes, and perhaps a nice glass of Malbec to enhance your dining experience.
Ingredients (Serving Size: 4-6 people)
- 2-3 pounds of Bife de Chorizo (ribeye steak)
- Salt (preferably coarse sea salt)
- Freshly ground black pepper
- Olive oil (optional)
- Chimichurri sauce (for serving)
Cooking Instructions
- Prepare the Steak: Take the Bife de Chorizo out of the refrigerator and let it sit at room temperature for about 30-60 minutes before cooking. This step is vital for even cooking and helps achieve a perfect medium-rare.
- Season the Steak: Generously season both sides of the steak with coarse sea salt and freshly ground black pepper. If desired, you can lightly drizzle olive oil on the steak, but it’s not necessary as the fat in the ribeye will render while cooking.
- Preheat the Grill: Preheat your grill to high heat (around 450°F to 500°F). If using a charcoal grill, verify the coals are evenly distributed. A hot grill is essential for getting a nice sear on the steak.
- Grill the Steak: Place the seasoned Bife de Chorizo on the grill. Cook for about 5-7 minutes on one side without moving it to develop a good crust. Flip the steak using tongs and cook for another 5-7 minutes for medium-rare. Adjust the cooking time if you prefer your steak more or less done.
- Rest the Steak: Once cooked to your desired doneness, remove the steak from the grill and transfer it to a cutting board. Cover it loosely with aluminum foil and let it rest for about 10 minutes. Resting allows the juices to redistribute, guaranteeing a juicy steak.
- Slice and Serve: After resting, slice the Bife de Chorizo against the grain into thick slices. Serve with a generous drizzle of chimichurri sauce on top and enjoy with your favorite sides.
Extra Tips
When cooking Bife de Chorizo, selecting high-quality beef is key; look for well-marbled ribeye steaks from a reputable butcher.
Additionally, resist the urge to poke or press down on the steak while it’s grilling, as this can release natural juices, leading to a drier steak.
Finally, always let the steak rest before slicing to maintain its juiciness, and feel free to experiment with different seasonings or marinades to suit your taste preferences. Enjoy your Argentine culinary experience!
Matambre: Flank Steak With a Twist
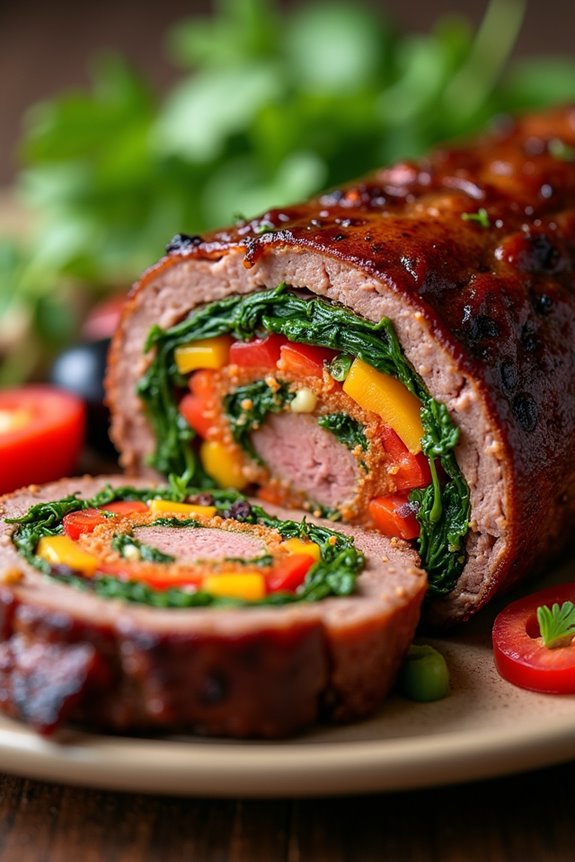
Matambre, a traditional Argentinian dish, is a delicious and versatile flank steak that showcases the rich flavors of South American cuisine. This dish isn’t only popular for its tenderness but also for its unique preparation, which often includes a stuffing of vegetables, herbs, and spices. The name “matambre” translates to “to kill hunger,” and it truly lives up to its title by being both hearty and satisfying.
When prepared correctly, matambre can serve as the centerpiece of a family meal or a festive gathering, offering an experience that combines the art of grilling with the joy of sharing food. The beauty of matambre lies in its ability to adapt to various palates and preferences, making it a perfect dish for any occasion.
Whether you choose to grill it over an open flame or roast it in the oven, the key to a successful matambre lies in the marinade and stuffing. These elements not only add depth of flavor but also enhance the overall presentation of the dish. Enjoy this Argentinian classic as you explore the delightful fusion of tastes and textures that matambre brings to your table.
Ingredients (serving size: 4-6 people):
- 2 pounds flank steak
- 1 cup cooked spinach, chopped
- 1 cup bell peppers, diced (red, yellow, or green)
- 1 cup carrots, grated
- 1 cup onion, finely chopped
- 2 cloves garlic, minced
- 1/2 cup parsley, chopped
- 1/2 cup olives, pitted and chopped
- 1/4 cup olive oil
- 1 tablespoon red wine vinegar
- 1 teaspoon paprika
- 1 teaspoon cumin
- Salt and black pepper, to taste
- Kitchen twine or toothpicks for securing the roll
Cooking Instructions:
- Prepare the Marinade: In a bowl, combine olive oil, red wine vinegar, paprika, cumin, salt, and black pepper. Mix well to create a marinade. This mixture will infuse the flank steak with flavor and tenderize the meat.
- Marinate the Flank Steak: Place the flank steak in a large dish or resealable bag and pour the marinade over it. Confirm the steak is evenly coated. Cover and refrigerate for at least 2 hours, preferably overnight, to allow the flavors to penetrate the meat.
- Prepare the Filling: In a skillet over medium heat, sauté onions and garlic until translucent. Then, add the diced bell peppers and grated carrots, cooking until softened. Stir in the chopped spinach and olives, cooking for another 2-3 minutes. Remove from heat and mix in chopped parsley. Allow the filling to cool slightly.
- Stuff the Flank Steak: Lay the marinated flank steak on a clean cutting board, with the grain running horizontally. Spread the vegetable filling evenly over the steak, leaving a small border around the edges. Carefully roll the steak from one end to the other, tucking in the filling as you go.
- Secure the Roll: Using kitchen twine or toothpicks, secure the rolled flank steak to hold the filling in place. This step is vital to prevent the stuffing from spilling out during cooking.
- Cook the Matambre: Preheat a grill or oven to medium-high heat. If grilling, cook the matambre for about 20-25 minutes, turning occasionally until it reaches your desired level of doneness. If roasting, place in a preheated oven at 375°F (190°C) for about 30-35 minutes. Use a meat thermometer to confirm it reaches an internal temperature of 145°F (63°C) for medium-rare.
- Rest and Slice: Once cooked, remove the matambre from the heat and let it rest for 10 minutes. This allows the juices to redistribute, confirming a moist and flavorful steak. After resting, slice the matambre into thin rounds for serving.
Extra Tips: When preparing matambre, feel free to experiment with the stuffing ingredients. You can add cheese, nuts, or different herbs to customize the flavor profile to your liking. Additionally, letting the meat marinate overnight will greatly enhance the taste.
Always slice against the grain to confirm tenderness and make the dish visually appealing. Serve with chimichurri sauce for that authentic Argentinian touch!
Lomo a La Plancha: Grilled Tenderloin
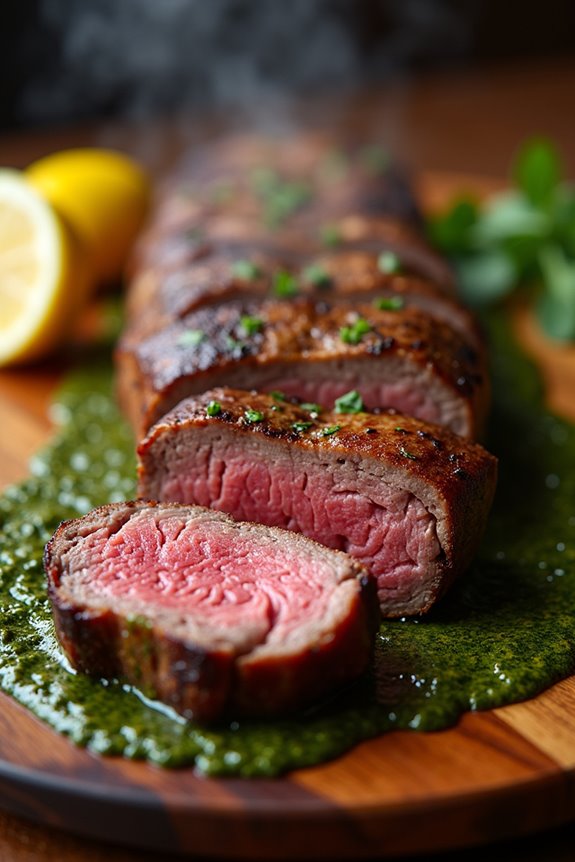
Lomo a La Plancha, or Grilled Tenderloin, is a classic Argentinian dish that captures the essence of the country’s love for high-quality beef. This dish showcases the tender, flavorful cuts of beef that Argentina is renowned for, specifically the tenderloin, which is known for its buttery texture and mild flavor. Cooking it on a flat grill (plancha) allows for a perfect sear, enhancing the meat’s natural flavors while guaranteeing it remains juicy and tender.
Served with simple yet delicious sides, this dish is a celebration of both the beef and the grilling technique.
When preparing Lomo a La Plancha, it’s vital to choose the best quality beef available. The key to this dish lies not just in the cooking method but also in the seasoning. A simple rub of salt and pepper allows the beef’s natural flavors to shine through. Accompany this dish with traditional Argentinian chimichurri sauce, a vibrant mix of herbs and garlic, to elevate the meal even further. With the right ingredients and a bit of technique, you can create an authentic Argentinian experience right in your kitchen.
Ingredients (Serves 4-6):
- 2 lbs beef tenderloin
- 2 tablespoons olive oil
- 1 tablespoon coarse sea salt
- 1 teaspoon freshly ground black pepper
- 4 cloves garlic, minced
- 1 tablespoon fresh rosemary, chopped
- 1 tablespoon fresh thyme, chopped
- Lemon wedges (for serving)
Cooking Instructions:
- Prepare the Marinade: In a small bowl, combine the olive oil, minced garlic, chopped rosemary, and thyme. This mixture will act as a marinade that infuses the tenderloin with flavor. Set it aside while you prepare the meat.
- Season the Tenderloin: Take the beef tenderloin and trim any excess fat if necessary. Pat it dry with paper towels to guarantee a good sear. Rub the marinade all over the tenderloin, making sure it’s evenly coated. Then, season generously with coarse sea salt and freshly ground black pepper.
- Preheat the Grill: Preheat your grill or flat top (plancha) to medium-high heat. You want a hot surface to achieve a beautiful sear on the meat. If using a plancha indoors, ensure proper ventilation.
- Grill the Tenderloin: Place the seasoned tenderloin on the hot grill. Cook for about 4-6 minutes on each side for medium-rare, depending on the thickness of the meat. Use tongs to turn the meat, avoiding piercing it to keep the juices locked in.
- Check for Doneness: To guarantee the meat is cooked to your desired level, use a meat thermometer. For medium-rare, the internal temperature should be about 135°F (57°C). If you prefer it medium, aim for 145°F (63°C).
- Rest the Meat: Once the tenderloin reaches your desired doneness, remove it from the grill and let it rest on a cutting board for about 5-10 minutes. This resting period allows the juices to redistribute throughout the meat, guaranteeing every bite is tender and juicy.
- Slice and Serve: After resting, slice the tenderloin against the grain into thick slices. Serve with chimichurri sauce and lemon wedges on the side for an extra burst of flavor.
Extra Tips:
For the best results, make sure to let your beef tenderloin come to room temperature before grilling. This guarantees even cooking throughout the meat.
Additionally, feel free to experiment with different herbs in the marinade, such as parsley or oregano, to personalize the flavor to your liking.
Finally, always let the meat rest after cooking; this is vital for achieving that perfectly juicy tenderloin. Enjoy your authentic Argentinian experience!
Picanha: Brazilian-Argentinian Style Rump Cap

Picanha, a popular cut of beef in Brazil and Argentina, is known for its rich flavor, tenderness, and characteristic fat cap that adds a unique depth to the meat when cooked. This cut is often grilled over an open flame, allowing the fat to render beautifully and create a juicy, flavorful experience that’s quintessential to South American barbecue.
While the traditional preparation emphasizes simplicity, a few techniques can elevate the dish, such as marinating or seasoning before grilling, which enhances the flavor profile.
Cooking picanha isn’t only about the meat but also about the experience. It’s often enjoyed during gatherings with family and friends, making it a social dish that brings people together. Whether skewered or grilled whole, this rump cap can be served with chimichurri, a vibrant sauce that complements the beef perfectly.
With the right approach and respect for the ingredients, your picanha will become a centerpiece of any meal.
Ingredients (Serves 4-6):
- 2 to 3 pounds picanha (rump cap)
- 2 tablespoons coarse sea salt
- 1 tablespoon black pepper
- 1 tablespoon garlic powder (optional)
- 1 tablespoon olive oil (optional)
- Fresh chimichurri sauce (for serving)
- Lemon wedges (for serving)
Cooking Instructions:
1. Preparation of the Meat: Start by selecting a high-quality picanha cut. Trim any excessive silver skin, but leave a generous fat cap, as this will render during cooking and keep the meat moist and flavorful.
Score the fat in a crosshatch pattern, being careful not to cut into the meat itself.
2. Seasoning: Generously season the picanha with coarse sea salt, black pepper, and garlic powder if desired. Rub the seasoning into the meat, ensuring it adheres well.
Allow the seasoned meat to rest at room temperature for about 30 minutes to enhance flavor and tenderness.
3. Grilling Setup: Preheat your grill to high heat. If using charcoal, allow the coals to become ashen. If using a gas grill, set it to high.
For best results, set up for direct grilling. If using skewers, cut the picanha into thick slices (about 2 inches) and thread onto skewers with the fat side facing up.
4. Grilling the Picanha: Place the picanha (whole or skewered) on the hot grill. Grill for about 4-6 minutes per side for medium-rare, turning occasionally to create a nice crust.
Use a meat thermometer to check for doneness; aim for an internal temperature of 130°F (54°C) for medium-rare.
5. Resting: Once the picanha has reached your desired doneness, remove it from the grill and let it rest for at least 10-15 minutes.
This is vital as it allows the juices to redistribute throughout the meat, ensuring maximum flavor and tenderness.
6. Slicing and Serving: After resting, slice the picanha against the grain into thin pieces. Serve it with fresh chimichurri sauce and lemon wedges on the side for an extra burst of flavor.
Extra Tips:
When cooking picanha, it’s important to monitor the grilling temperature closely. Avoid overcooking, as this cut is best enjoyed medium-rare to maintain its juiciness and flavor.
Additionally, experimenting with different marinades or spices can give a unique twist to the classic preparation; however, simplicity often yields the best results.
Always serve with a vibrant chimichurri, as its fresh herbs and acidity beautifully complement the rich meat. Enjoy the process and the delicious flavors that come from this authentic Argentinian dish!
Carbonada: Hearty Meat and Vegetable Stew
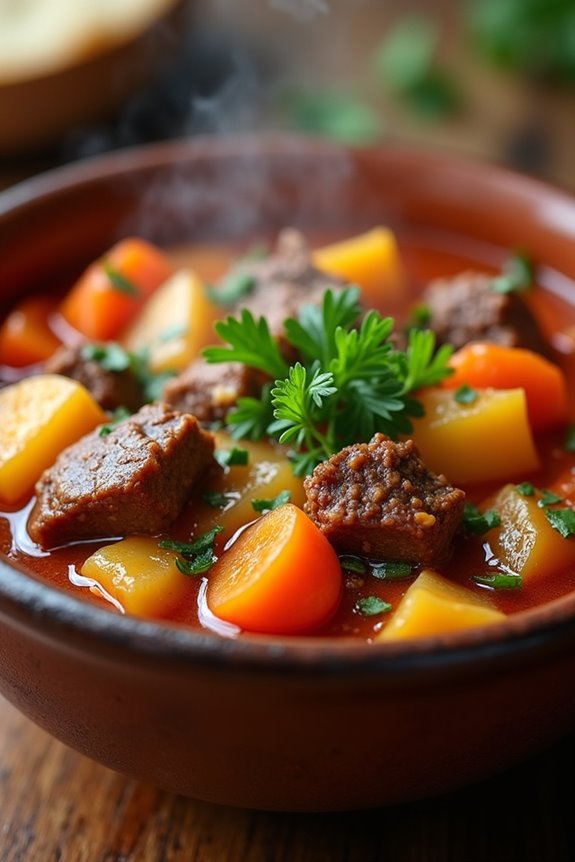
Carbonada is a traditional Argentinian dish that embodies the country’s rich culinary heritage, making it perfect for family gatherings or cozy dinners. This hearty stew is a delightful combination of tender meat, seasonal vegetables, and aromatic spices that create a warm, comforting meal.
Often enjoyed during the colder months, Carbonada showcases the flavors of Argentina, blending influences from Indigenous and European cooking styles. The essence of Carbonada lies in its simplicity and the quality of its ingredients.
It typically includes chunks of beef, potatoes, carrots, and squash, simmered to perfection in a flavorful broth. The dish can be easily customized with your favorite vegetables or spices, making it a versatile option for any occasion.
Whether served with crusty bread or over rice, Carbonada is sure to satisfy and warm the soul.
Ingredients (Serves 4-6)
- 2 lbs beef chuck, cut into 1-inch cubes
- 2 tablespoons olive oil
- 1 large onion, chopped
- 4 cloves garlic, minced
- 4 medium potatoes, peeled and diced
- 2 carrots, sliced
- 1 medium zucchini, diced
- 1 cup butternut squash, diced
- 1 bell pepper, chopped
- 4 cups beef broth
- 1 can (14 oz) diced tomatoes (with juices)
- 1 teaspoon ground cumin
- 1 teaspoon smoked paprika
- Salt and pepper to taste
- Fresh parsley, chopped (for garnish)
Cooking Instructions
- Sear the Meat: In a large pot or Dutch oven, heat the olive oil over medium-high heat. Add the beef cubes in batches, making sure not to overcrowd the pot. Sear the meat until browned on all sides, which will enhance the flavor of the stew. Remove the browned meat and set aside.
- Sauté Aromatics: In the same pot, add the chopped onion and sauté for about 5 minutes until it becomes translucent. Add the minced garlic and cook for an additional minute, stirring frequently to prevent burning.
- Combine Ingredients: Return the seared beef to the pot. Add the diced potatoes, sliced carrots, zucchini, butternut squash, and bell pepper. Stir well to combine all the ingredients.
- Add Liquids and Seasoning: Pour in the beef broth and canned tomatoes (with their juices). Season with ground cumin, smoked paprika, salt, and pepper. Stir the mixture to guarantee that all the ingredients are evenly distributed.
- Simmer the Stew: Bring the stew to a boil, then reduce the heat to low. Cover the pot and let it simmer for about 1.5 to 2 hours, or until the meat is tender and the vegetables are cooked through. Stir occasionally to prevent sticking and guarantee even cooking.
- Garnish and Serve: Once cooked, taste and adjust seasoning if necessary. Serve the Carbonada hot, garnished with fresh parsley. It pairs wonderfully with crusty bread or over a bed of rice.
Extra Tips
For an added depth of flavor, consider marinating the beef overnight with garlic, herbs, and a splash of red wine. This won’t only tenderize the meat but also infuse it with delicious aromas.
Additionally, you can experiment with different vegetables based on what’s in season or what you have on hand. If you prefer a slightly thicker stew, you can add a tablespoon of cornstarch mixed with water during the last 10 minutes of cooking.
Enjoy your Carbonada with a glass of Malbec for a true Argentinian experience!
Locro: Traditional Argentine Stew

Locro is a hearty and traditional Argentine stew that holds a special place in the hearts of many Argentinians. Typically enjoyed during national holidays like May Revolution Day, this dish is a comforting blend of flavors and ingredients that reflect the country’s rich culinary heritage.
With roots tracing back to the indigenous peoples of Argentina, locro has evolved over the years, incorporating various meats, vegetables, and spices, making it a beloved staple in Argentine cuisine. This stew isn’t only satisfying but also a celebration of community and togetherness.
It’s often shared among family and friends during festive occasions, representing a warm gathering around the table. The mix of textures from the beans, corn, and various meats creates a delightful experience, while the spices add depth and warmth.
Making locro may take some time, but the end result is a deliciously comforting meal that’s worth every minute of preparation.
Ingredients (Serves 4-6 people)
- 1 cup dried white beans
- 1 cup hominy corn
- 1 large onion, chopped
- 2 cloves garlic, minced
- 1 red bell pepper, chopped
- 1 carrot, diced
- 2 medium potatoes, diced
- 1 lb beef brisket, cut into chunks
- 1 lb pork shoulder, cut into chunks
- 1 chorizo sausage, sliced
- 4 cups beef broth
- 1 teaspoon smoked paprika
- 1 teaspoon cumin
- Salt and pepper to taste
- Fresh parsley for garnish
Cooking Instructions
- Soak the Beans and Corn: Begin by soaking the dried white beans and hominy corn in separate bowls of water overnight. This helps to soften them and reduces the cooking time. Drain and rinse them before using them in the stew.
- Prepare the Meats: In a large pot, heat a tablespoon of oil over medium-high heat. Add the beef brisket and pork shoulder, browning them on all sides for about 5-7 minutes. This adds flavor to the stew, so don’t skip this step!
- Sauté Vegetables: Once the meat is browned, add the chopped onion, garlic, red bell pepper, and carrot to the pot. Sauté the vegetables for about 5 minutes until they’re softened and fragrant.
- Add Remaining Ingredients: Stir in the diced potatoes, soaked beans, hominy corn, sliced chorizo, beef broth, smoked paprika, cumin, salt, and pepper. Mix everything well to combine the ingredients and flavors.
- Cook the Stew: Bring the mixture to a boil, then reduce the heat to low. Cover the pot and let it simmer for about 2-3 hours, stirring occasionally. This slow cooking allows the flavors to meld together beautifully and the meats to become tender.
- Check for Doneness: After 2 hours, check the beans and corn to verify they’re cooked through. The meats should be tender and easily pull apart. If necessary, adjust the seasoning with more salt and pepper.
- Serve: Once everything is cooked, ladle the locro into bowls and garnish with fresh parsley. Serve hot, accompanied by crusty bread or traditional Argentine tortillas.
Extra Tips
When preparing locro, feel free to customize the recipe by adding other ingredients like squash or different types of sausages based on your preference.
Make sure to allow ample time for the stew to simmer, as this is essential for developing its rich flavor. Leftovers can be refrigerated and often taste even better the next day, as the flavors continue to deepen.
If you prefer a thicker stew, you can mash some of the potatoes or beans during cooking to achieve your desired consistency. Enjoy the process and the delicious results!
Beef Short Ribs With Red Wine Sauce
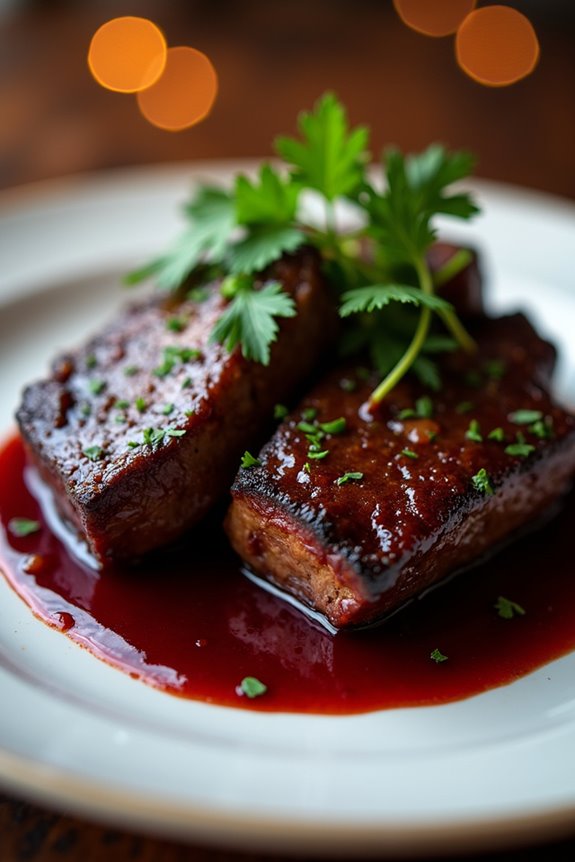
Beef Short Ribs with Red Wine Sauce is a classic Argentinian dish that embodies the rich flavors of the region, perfect for those who appreciate hearty, savory meals. The combination of tender, slow-cooked beef short ribs paired with a luscious red wine sauce creates a dish that’s both comforting and elegant.
Traditionally enjoyed with a side of creamy polenta or roasted vegetables, this dish is ideal for gatherings or special occasions. Cooking these beef short ribs requires patience, as they benefit from a long, slow braise that allows the flavors to meld beautifully. The result is a melt-in-your-mouth experience that will impress your family and friends.
Whether served for a weekend dinner or a festive celebration, Beef Short Ribs with Red Wine Sauce is sure to become a favorite in your culinary repertoire.
Ingredients (Serves 4-6):
- 4 lbs beef short ribs
- Salt and black pepper, to taste
- 2 tablespoons olive oil
- 1 large onion, chopped
- 2 carrots, chopped
- 2 celery stalks, chopped
- 4 cloves garlic, minced
- 2 cups red wine (preferably Malbec)
- 2 cups beef broth
- 1 tablespoon tomato paste
- 1 teaspoon dried thyme
- 1 bay leaf
- Fresh parsley, for garnish
Cooking Instructions:
- Prepare the Short Ribs: Start by seasoning the beef short ribs generously with salt and black pepper. This helps to enhance the meat’s natural flavors and create a flavorful crust when seared.
- Sear the Ribs: In a large Dutch oven or heavy pot, heat the olive oil over medium-high heat. Once hot, add the short ribs in batches, ensuring not to overcrowd the pot. Sear each side for about 3-4 minutes until nicely browned. This step is essential as it adds depth to the overall flavor of the dish. Remove the ribs from the pot and set them aside.
- Sauté the Vegetables: In the same pot, add the chopped onion, carrots, and celery. Sauté for about 5-7 minutes until the vegetables are softened and the onions are translucent. Then, add the minced garlic and cook for an additional minute, stirring frequently to prevent burning.
- Deglaze the Pot: Pour in the red wine, scraping the bottom of the pot with a wooden spoon to lift any browned bits. This deglazing process adds even more flavor to the sauce. Allow the wine to simmer for about 5 minutes, reducing slightly.
- Add Remaining Ingredients: Return the seared short ribs to the pot. Add the beef broth, tomato paste, dried thyme, and bay leaf. Stir everything to combine, ensuring the ribs are submerged in the liquid.
- Braise the Ribs: Bring the mixture to a gentle boil, then cover the pot with a lid and reduce the heat to low. Allow the short ribs to braise for about 2.5 to 3 hours, or until the meat is tender and falling off the bone. Check occasionally and add more broth if necessary to keep the liquid level consistent.
- Serve the Dish: Once the short ribs are tender, remove them from the pot and set aside. Strain the sauce to remove the vegetables and bay leaf, then return the sauce to the pot and simmer for an additional 10-15 minutes to thicken. Serve the short ribs warm, drizzled with the red wine sauce and garnished with fresh parsley.
Extra Tips:
For an extra layer of flavor, consider marinating the short ribs in the red wine for a few hours or overnight before cooking. This not only enhances the taste but also tenderizes the meat.
Additionally, feel free to customize the sauce by adding mushrooms or bacon for a different twist. Pairing this dish with a full-bodied red wine will elevate your dining experience even further. Enjoy your culinary journey into Argentinian cuisine!
Picada: Argentine Meat and Cheese Platter
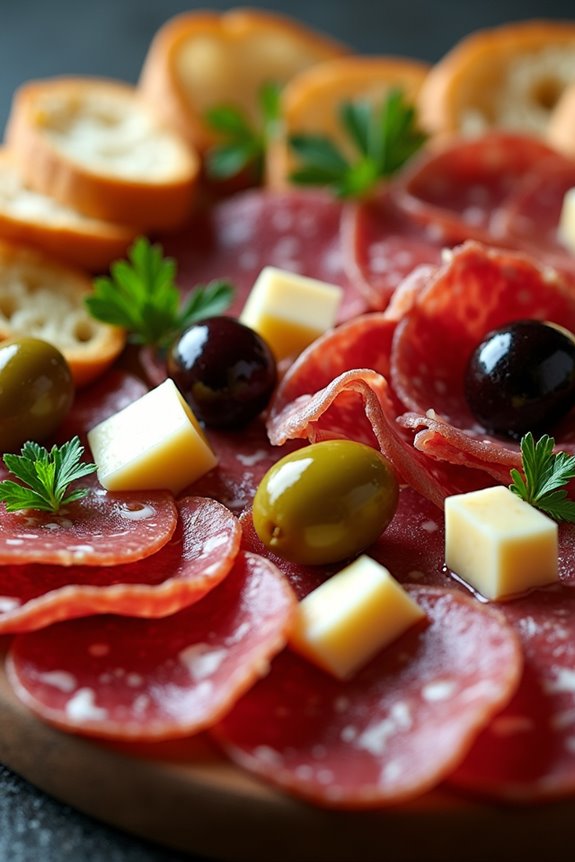
Picada is a beloved Argentine tradition that brings friends and family together over a delightful spread of cured meats, cheeses, olives, and bread. This dish reflects the country’s rich culinary heritage, combining various flavors and textures that entice the palate.
Perfect for gatherings or as an appetizer before a hearty meal, the Picada isn’t just about the food; it’s about sharing moments and enjoying good company.
This vibrant platter showcases the finest Argentinian meats, including chorizo and salami, paired with a selection of local cheeses such as queso fresco and aged provolone. Accompanied by olives, pickles, and crunchy bread, a Picada is versatile and can be adjusted according to your preferences and the availability of ingredients.
Whether served at a festive occasion or a casual get-together, it’s a dish that invites everyone to indulge in the communal spirit of dining.
Ingredients (Serves 4-6):
- 200g chorizo (sliced)
- 200g salami (sliced)
- 200g prosciutto (sliced)
- 150g queso fresco (cubed)
- 150g aged provolone cheese (cubed)
- 100g olives (green and black mixed)
- 100g pickles (gherkin or dill)
- 1 baguette or crusty bread (sliced)
- Fresh parsley (for garnish)
- Extra virgin olive oil (for drizzling)
- Balsamic vinegar (optional, for dipping)
Cooking Instructions:
- Prepare the Ingredients: Start by gathering all your ingredients. Slice the chorizo, salami, and prosciutto into bite-sized pieces. Cube the queso fresco and aged provolone. Confirm the olives and pickles are ready for serving, and slice the baguette or crusty bread into rounds.
- Arrange the Platter: On a large serving platter or board, begin to artfully arrange the sliced meats. Place the chorizo, salami, and prosciutto in sections, allowing for visual appeal and easy access.
- Add the Cheeses: Next, create small sections for the queso fresco and provolone. This will provide a beautiful contrast to the meats and add a creamy texture to the platter.
- Incorporate Olives and Pickles: Fill in the gaps on the platter with the mixed olives and pickles. This adds a salty and tangy component that complements the richness of the meats and cheeses.
- Serve with Bread: Finally, position the sliced baguette or crusty bread around the platter. This allows guests to create their own combinations of meats and cheeses, making the experience interactive and fun.
- Garnish and Drizzle: Finish off your Picada by sprinkling fresh parsley over the platter for a pop of color. If desired, drizzle a little extra virgin olive oil over the cheeses and meats for added flavor. Balsamic vinegar can also be offered on the side for dipping.
Extra Tips:
When preparing a Picada, consider using a variety of meats and cheeses to cater to different tastes. Feel free to include local specialties or ingredients that are available in your area.
Additionally, presentation is key! Use an attractive platter or board, and arrange the ingredients in a way that encourages sharing. You can also add nuts, dried fruits, or even some homemade dips to enhance the platter further.
Enjoy the experience of creating a beautiful spread that not only tastes wonderful but also looks appealing.