

When I think of Argentina, my mind instantly goes to the vibrant flavors that fill its kitchens. Each dish carries a story of tradition and community. From the smoky allure of asado to the flaky goodness of empanadas, these recipes are all about celebrating culture. They’re more than just meals; they’re moments that bring people together. Let’s explore some authentic Argentinian recipes that might just inspire your next culinary adventure.
Asado: The Heart of Argentine Grilling

Asado is more than just a meal in Argentina; it’s a cultural experience that brings family and friends together around an open fire. This traditional grilling method showcases a variety of meats, often accompanied by chimichurri sauce and a selection of sides. The process of preparing asado is as important as the final dish, emphasizing the importance of community, patience, and respect for quality ingredients.
Whether you’re using a grill or an open flame, the essence of asado lies in its simplicity and the flavors of high-quality meat. To create an authentic asado, you’ll typically include cuts of beef, pork, and sometimes lamb, all seasoned just right to allow the meat’s natural flavor to shine. The grilling technique involves slow cooking the meat over wood or charcoal, which infuses it with a smoky flavor that’s hard to replicate.
The result is tender, juicy meat with a perfect crust. Gather your loved ones and prepare to savor the unique taste of Argentine asado that will leave your guests raving about the experience.
Ingredients (Serves 4-6):
- 2 lbs beef short ribs
- 2 lbs pork sausage (chorizo)
- 1 lb flank steak
- 1 lb short loin steak (bife de chorizo)
- 1 lb lamb chops (optional)
- 1 cup chimichurri sauce (store-bought or homemade)
- Salt (to taste)
- Black pepper (to taste)
- 1 loaf of crusty bread (for serving)
- Grilled vegetables (bell peppers, zucchini, and onions) for sides
Cooking Instructions:
- Prepare the Grill: Start by lighting your charcoal or wood fire. If using charcoal, let it burn until it becomes gray and ashy, indicating it’s ready for cooking. If using wood, allow it to burn down until you have hot coals. The key is to maintain a consistent medium heat for even cooking.
- Season the Meat: While the grill is heating, season your cuts of meat generously with salt and black pepper. This basic seasoning enhances the meat’s natural flavors and is traditional in Argentine asado. You can also let the meat sit at room temperature for about 30 minutes to guarantee even cooking.
- Start with the Sausages: Place the pork sausages on the grill first, as they take a bit longer to cook. Grill them for about 15-20 minutes, turning occasionally until they’re browned and cooked through. Remove them from the grill and let them rest while you cook the beef.
- Grill the Beef Cuts: Next, place the beef short ribs and flank steak on the grill. Cook the ribs for about 20-25 minutes, turning them occasionally, and cook the flank steak for approximately 6-8 minutes on each side for medium-rare. For the short loin steak, grill for about 4-5 minutes on each side, depending on your preferred doneness.
- Add the Lamb Chops and Vegetables: If you’re including lamb chops, add them to the grill about halfway through the cooking time of the beef. Season them with salt and pepper and grill for about 4-5 minutes per side. You can also place vegetables like bell peppers, zucchini, and onions on the grill to cook alongside the meat, assuring they’re tender and slightly charred.
- Rest the Meat: Once all the meat is cooked to your liking, remove it from the grill and let it rest for about 10 minutes. This resting period allows the juices to redistribute throughout the meat, guaranteeing it’s flavorful and juicy when sliced.
- Serve: Slice the meats and serve them on a large platter with chimichurri sauce drizzled on top or served on the side. Accompany with crusty bread and grilled vegetables for a complete meal.
Extra Tips:
When preparing asado, the type of wood or charcoal you use can greatly affect the flavor of the meat. If possible, opt for hardwoods like oak or mesquite for a deeper smokiness.
Additionally, don’t rush the cooking process; patience is key to achieving tender meat. Keep an eye on the heat, and adjust the grill height if necessary to prevent charring. Finally, asado is best enjoyed with good company and a glass of Argentine Malbec, so set the mood for a memorable gathering!
Empanadas: Savory Pastry Pockets

Empanadas are a beloved staple in Argentinian cuisine, known for their flaky crust and delicious fillings. These savory pastry pockets can be enjoyed as a snack, appetizer, or even a main course. The beauty of empanadas lies in their versatility; they can be filled with a wide variety of ingredients, including meats, cheeses, vegetables, or even fruits. This recipe focuses on a classic beef filling, infused with spices that highlight the rich flavors of Argentinian cooking.
Making empanadas from scratch may seem intimidating, but the process is quite straightforward and rewarding. With a little time and care, you’ll have a batch of golden-brown empanadas that are bound to impress your family and friends. Serve them with chimichurri sauce or a simple salad for a delightful meal that captures the essence of Argentina.
Ingredients (Serves 4-6):
- 2 cups all-purpose flour
- 1/2 teaspoon salt
- 1/2 cup unsalted butter, chilled and cubed
- 1/4 cup cold water
- 1 tablespoon white vinegar
- 1 tablespoon olive oil
- 1 pound ground beef
- 1 medium onion, finely chopped
- 1 bell pepper, finely chopped
- 2 cloves garlic, minced
- 1 teaspoon ground cumin
- 1 teaspoon paprika
- 1/2 teaspoon black pepper
- Salt to taste
- 1 egg, beaten (for egg wash)
Cooking Instructions:
1. Prepare the Dough: In a large bowl, combine the flour and salt. Add the cubed butter and mix with your fingers or a pastry cutter until the mixture resembles coarse crumbs.
In a separate bowl, mix the cold water and vinegar, then slowly add it to the flour mixture, mixing until a dough forms. Knead the dough briefly on a floured surface until smooth. Wrap in plastic wrap and refrigerate for at least 30 minutes.
2. Cook the Filling: In a large skillet over medium heat, add the olive oil and sauté the chopped onion and bell pepper until they’re soft, about 5 minutes.
Add the minced garlic and cook for an additional minute. Stir in the ground beef, breaking it up with a spatula, and cook until browned. Season the mixture with cumin, paprika, black pepper, and salt. Once cooked, remove from heat and let it cool.
3. Roll out the Dough: After chilling, remove the dough from the refrigerator. On a lightly floured surface, roll out the dough to about 1/8-inch thick.
Use a round cutter or a glass to cut out circles of dough, approximately 4-5 inches in diameter.
4. Fill the Empanadas: Place a tablespoon of the beef filling in the center of each dough circle. Be careful not to overfill.
Fold the dough over to create a half-moon shape and press the edges together to seal. Use a fork to crimp the edges for an extra secure seal and decorative touch.
5. Bake the Empanadas: Preheat your oven to 400°F (200°C). Arrange the empanadas on a baking sheet lined with parchment paper.
Brush the tops with the beaten egg to give them a golden color when baked. Bake for 20-25 minutes, or until they’re golden brown.
6. Serve: Once baked, remove from the oven and let the empanadas cool slightly before serving. They can be enjoyed warm or at room temperature.
Extra Tips:
When making empanadas, feel free to experiment with different fillings to suit your taste preferences. You can add diced olives, hard-boiled eggs, or even cheese to the beef mixture for added flavor.
Confirm that your dough isn’t overly wet to maintain its flaky texture. Additionally, for a crispy finish, consider frying the empanadas instead of baking them, which is a popular method in some regions of Argentina. Enjoy your empanadas with a fresh chimichurri sauce or a side salad for a complete meal!
Milanesa: The Argentine Breaded Cutlet

Milanesa is a beloved dish in Argentina, known for its crispy exterior and tender meat. Traditionally made with beef, this breaded cutlet is often served with a side of mashed potatoes, salad, or even as a sandwich. The dish has its roots in European cuisine, particularly Italian and Austrian influences, but has become a staple in Argentine households.
Whether you’re cooking for a family gathering or a cozy dinner, Milanesa is sure to impress with its comforting flavors and delightful crunch.
To prepare Milanesa, the meat is typically pounded thin, seasoned, and then coated in breadcrumbs before being fried until golden brown. While the classic version uses beef, variations can include chicken or pork. The process may seem straightforward, but the key to achieving the perfect Milanesa lies in the quality of the meat and the technique used for breading and frying.
Let’s explore the ingredients and steps to create this delicious Argentine dish for 4-6 people.
Ingredients:
- 1.5 pounds of beef (top round or flank steak)
- 2 cups of breadcrumbs
- 1 cup of all-purpose flour
- 2 large eggs
- 1 teaspoon of garlic powder
- 1 teaspoon of onion powder
- Salt and pepper to taste
- Vegetable oil (for frying)
- Lemon wedges (for serving, optional)
- Fresh parsley (for garnish, optional)
Cooking Instructions:
1. Prepare the Meat: Start by slicing the beef into thin cutlets, about 1/4 inch thick. If needed, use a meat mallet to pound the cutlets to an even thickness. This helps in cooking evenly and achieving tenderness.
Season both sides of the meat with salt, pepper, garlic powder, and onion powder, allowing the flavors to penetrate the meat.
2. Set Up the Breading Station: In three separate shallow dishes, place the flour in one, beaten eggs in another, and breadcrumbs in the third. This setup will help you bread the cutlets easily.
Make sure the eggs are well beaten to guarantee they coat the meat thoroughly.
3. Bread the Cutlets: Begin by dredging each seasoned cutlet in the flour, shaking off any excess. Next, dip it into the beaten eggs, ensuring it’s fully covered, and finally, coat it with breadcrumbs.
Press the breadcrumbs firmly onto the meat to make sure they adhere well. Repeat this process for all cutlets.
4. Fry the Cutlets: In a large skillet, heat about 1/4 inch of vegetable oil over medium-high heat. Once the oil is hot (test by dropping a breadcrumb in; it should sizzle), carefully add the breaded cutlets in batches, making sure not to overcrowd the pan.
Fry each cutlet for about 3-4 minutes per side or until golden brown and cooked through. Adjust the heat as necessary to prevent burning.
5. Drain and Serve: Once cooked, transfer the fried cutlets to a plate lined with paper towels to drain excess oil. Allow them to rest for a minute before serving.
Garnish with fresh parsley and serve with lemon wedges on the side for an extra burst of flavor.
Extra Tips:
For an even crispier Milanesa, consider double-breading the cutlets by repeating the egg and breadcrumb steps.
Additionally, you can customize the breadcrumb mixture by adding grated Parmesan cheese or dried herbs for added flavor. If you prefer a lighter version, try baking the breaded cutlets in the oven at 400°F for about 20-25 minutes, flipping halfway through.
This will yield a deliciously crispy cutlet with less oil. Enjoy your Milanesa with a fresh salad or as a sandwich in crusty bread for a delightful meal!
Choripán: A Street Food Classic

Choripán is one of Argentina’s most beloved street food staples, showcasing the country’s rich culinary heritage and love for grilled meats. This simple yet delicious dish consists of a juicy chorizo sausage served in a crusty bread roll, often topped with various condiments like chimichurri sauce, salsa, and fresh vegetables.
The combination of smoky, spicy sausage with the tangy and aromatic chimichurri creates a flavor explosion that’s both comforting and satisfying. You can find choripán being sold by street vendors in bustling markets, at football matches, and during weekend barbecues, making it a popular choice for gatherings and outdoor events.
Making choripán at home is easier than you might think, and it’s a fantastic way to bring a taste of Argentina to your kitchen. All you need are a few simple ingredients, a good grill, and a little bit of time. Whether you’re hosting a barbecue or just craving a hearty meal, this dish is sure to please a crowd. Gather your friends and family, and enjoy the experience of making and devouring this classic Argentinian delight!
Ingredients (Serves 4-6):
- 4-6 Argentinian chorizo sausages
- 4-6 crusty bread rolls (such as baguette or Italian bread)
- 1 cup chimichurri sauce (homemade or store-bought)
- 1 medium onion, sliced
- 1 medium red bell pepper, sliced
- Olive oil
- Salt and pepper to taste
- Optional toppings: sliced tomatoes, lettuce, or avocado
Cooking Instructions:
- Prepare the Grill: Begin by preheating your grill to medium-high heat. If you’re using charcoal, verify the coals are evenly distributed and glowing. For gas grills, simply turn on the burners and let it warm up.
- Cook the Chorizo: Once the grill is hot, place the chorizo sausages directly on the grill grates. Grill them for about 10-15 minutes, turning occasionally, until they’re browned and cooked through. The internal temperature should reach 160°F (70°C). If you notice flare-ups, move the sausages to a cooler part of the grill to avoid burning.
- Sauté the Vegetables: While the chorizo is grilling, heat a small skillet on the grill or a stovetop burner. Add a drizzle of olive oil and sauté the sliced onions and bell peppers over medium heat until they’re soft and slightly caramelized, about 5-7 minutes. Season with salt and pepper to taste.
- Toast the Bread Rolls: When the chorizo is nearly done, place the bread rolls on the grill for a couple of minutes to toast them lightly. This will add an additional layer of flavor and texture to the dish.
- Assemble the Choripán: Once everything is cooked, remove the chorizo and bread rolls from the grill. Slice the bread rolls open and place a grilled chorizo inside each one. Top with sautéed onions and bell peppers, along with a generous drizzle of chimichurri sauce. You can also add any optional toppings you desire.
- Serve: Serve the choripán hot, accompanied by extra chimichurri and your favorite sides. Enjoy this street food classic with friends and family!
Extra Tips:
When preparing choripán, feel free to experiment with different types of sausages if you can’t find Argentinian chorizo; Spanish chorizo or other grilled sausages work well too.
Additionally, making your own chimichurri can elevate the dish greatly; blend fresh parsley, garlic, red wine vinegar, olive oil, and spices for the perfect topping.
Finally, don’t hesitate to customize your choripán with your favorite toppings, as the beauty of this dish lies in its versatility and the personal touch you can add to each serving. Happy grilling!
Locro: Hearty Argentine Stew
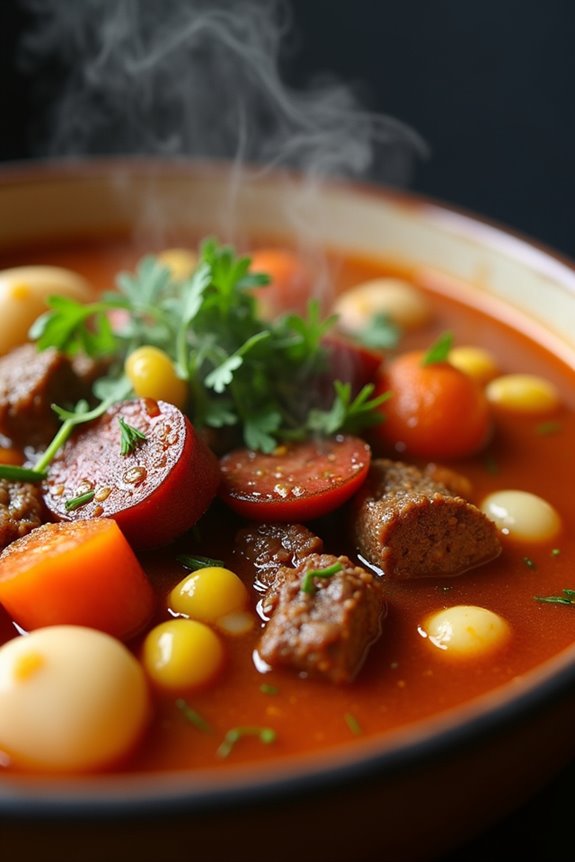
Locro is a traditional Argentine stew that holds a special place in the hearts of many locals. It’s often prepared during national holidays, particularly on May 25th, which marks Argentina’s May Revolution. This hearty dish is rich in flavors and textures, making it a comforting meal suitable for family gatherings or any occasion where you want to impress your guests with a taste of authentic Argentinian cuisine.
The combination of corn, beans, potatoes, and meat creates a wholesome dish that warms both the body and soul. The origins of locro can be traced back to indigenous cultures and Spanish influences, resulting in a dish that reflects the diverse culinary heritage of Argentina. Each region may have its unique variations, but the basic components remain the same.
In this recipe, we’ll explore how to make a classic locro that’s both delicious and satisfying, perfect for sharing with family and friends. Gather your ingredients, and let’s get cooking!
Ingredients (serving size: 4-6 people)
- 1 cup of dried white beans
- 1 cup of corn kernels (fresh or frozen)
- 1 large onion, chopped
- 2 cloves of garlic, minced
- 2 medium potatoes, diced
- 1 large carrot, diced
- 1 lb of beef (such as chuck or brisket), cut into cubes
- 1 lb of pork (such as shoulder or belly), cut into cubes
- 1 chorizo sausage, sliced
- 4 cups of beef or chicken broth
- 2 teaspoons of smoked paprika
- 1 teaspoon of cumin
- Salt and pepper to taste
- Fresh parsley for garnish
Cooking Instructions
- Soak the Beans: Begin by soaking the dried white beans in a large bowl of water overnight. This will help soften the beans and reduce cooking time. If you’re short on time, you can use the quick-soak method by boiling the beans for 2 minutes, then letting them sit for an hour before draining.
- Cook the Meats: In a large pot or Dutch oven, heat a tablespoon of oil over medium heat. Add the cubed beef and pork, browning them on all sides for about 5-7 minutes. This step adds depth to the flavor of the stew. Once browned, remove the meat and set it aside.
- Sauté the Vegetables: In the same pot, add the chopped onion and minced garlic. Sauté for about 3-4 minutes until the onion becomes translucent. Then, add the diced carrots and potatoes, cooking for an additional 5 minutes to soften.
- Combine Ingredients: Return the browned meat to the pot, along with the sliced chorizo, soaked beans, corn, and broth. Add the smoked paprika, cumin, salt, and pepper. Stir to combine all the ingredients well.
- Simmer the Stew: Bring the mixture to a boil, then reduce the heat to low and cover the pot. Let it simmer for about 1.5 to 2 hours, or until the beans and meat are tender. Stir occasionally and add more broth or water if the stew becomes too thick.
- Adjust Seasoning and Serve: Once the locro is cooked, taste and adjust the seasoning with more salt and pepper if needed. Serve the stew hot, garnished with fresh parsley on top, and enjoy it with crusty bread or a side of salad.
Extra Tips
For an even richer flavor, consider adding some smoked bacon or ham hock to the stew while it simmers. This will impart a wonderful smoky aroma to the locro.
Additionally, if you prefer a vegetarian version, you can substitute the meats with additional vegetables, such as zucchini and bell peppers, and use vegetable broth instead. Don’t hesitate to adjust the spice levels to suit your taste, and remember that locro is often best enjoyed the next day, as the flavors continue to meld together.
Provoleta: Grilled Provolone Cheese
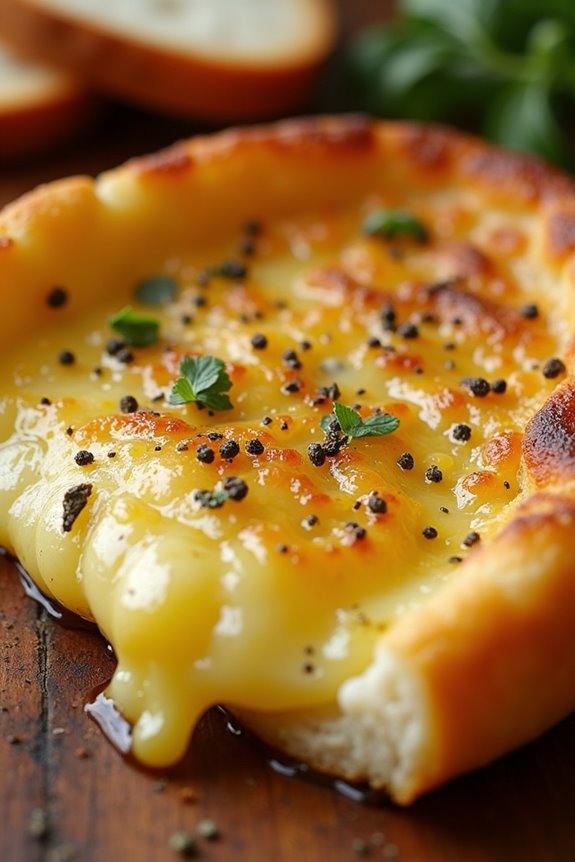
Provoleta is a classic Argentinian dish that brings together the rich, creamy texture of provolone cheese and the smoky flavor of the grill, making it a delightful appetizer or side dish. This dish is typically enjoyed during asados (Argentinian barbecues) and is often served with crusty bread to soak up the delicious melted cheese. The simple yet flavorful ingredients highlight the quality of the cheese, showcasing the authentic tastes of Argentina.
The key to a great provoleta lies in the choice of cheese and the cooking technique. A high-quality provolone cheese is crucial to achieve the perfect melt and flavor. As it cooks, the cheese develops a golden crust, while the inside becomes gooey and irresistible. Pair it with a sprinkle of oregano and a drizzle of olive oil for an added layer of flavor, and you’ll have an unforgettable dish that captures the essence of Argentinian cuisine.
Ingredients (serving size: 4-6 people)
- 1 large wheel of provolone cheese (approximately 1 pound)
- 2 tablespoons of olive oil
- 1 teaspoon of dried oregano
- Freshly ground black pepper (to taste)
- Crusty bread (for serving)
Cooking Instructions
- Prepare the Grill: Start by preheating your grill to medium-high heat. If using a charcoal grill, let the coals burn down until they’re covered in white ash. For a gas grill, simply turn it on and allow it to heat for about 10-15 minutes.
- Prepare the Cheese: While the grill is heating up, take the wheel of provolone cheese and place it on a piece of heavy-duty aluminum foil. If desired, you can also use a cast-iron skillet for grilling. Drizzle the cheese with olive oil, then sprinkle the dried oregano and black pepper on top.
- Wrap the Cheese (if using foil): If you’re using aluminum foil, wrap the cheese snugly but not too tightly. This will help retain heat and allow the cheese to melt evenly while still getting that delicious grilled flavor.
- Grill the Cheese: Place the wrapped cheese (or the cast-iron skillet with cheese) directly on the grill. Grill for about 8-10 minutes, or until the cheese is melted and bubbling. If using a skillet, you may need to check more frequently to confirm even cooking.
- Serve: Once the cheese is perfectly melted and golden, carefully remove it from the grill. Unwrap the foil (be cautious of steam) and transfer the cheese to a serving platter. Serve immediately with slices of crusty bread for dipping.
Extra Tips
For an extra flavor boost, consider adding toppings such as sliced jalapeños or sun-dried tomatoes before grilling. Additionally, serving provoleta with a side of chimichurri sauce can add a fresh and zesty contrast to the richness of the cheese.
Don’t rush the grilling process; allowing the cheese to melt slowly will yield the best texture. Enjoy this delicious Argentinian treat with friends and family for a truly authentic experience!
Alfajores: Sweet Cookie Delights

Alfajores are a beloved treat in Argentina, cherished for their delicate texture and rich flavors. These delectable cookies consist of two soft, crumbly biscuits that sandwich a luscious filling, typically dulce de leche. Coated in a dusting of powdered sugar or rolled in grated coconut, alfajores are perfect for sharing with friends and family during gatherings or enjoying as a delightful afternoon snack with a cup of coffee or tea.
Making alfajores is a delightful experience that combines the warmth of baking with the joy of indulging in something sweet. The key to achieving the perfect alfajor lies in the balance of flavors and textures, from the melt-in-your-mouth cookies to the creamy filling. These cookies aren’t only a staple in Argentine cuisine but also a symbol of cultural heritage. Once you master this recipe, you’ll be able to share a piece of Argentina with your loved ones.
Ingredients (Serves 4-6)
- 1 cup unsalted butter, softened
- 2/3 cup granulated sugar
- 2 large egg yolks
- 1 teaspoon vanilla extract
- 2 cups all-purpose flour
- 1 cup cornstarch
- 1 teaspoon baking powder
- 1 cup dulce de leche
- Powdered sugar, for dusting
- Grated coconut (optional)
Cooking Instructions
- Prepare the Dough: In a large mixing bowl, cream together the softened butter and granulated sugar using an electric mixer until the mixture is light and fluffy. This process incorporates air into the dough, resulting in a tender cookie. Add the egg yolks and vanilla extract, mixing until combined.
- Combine Dry Ingredients: In a separate bowl, whisk together the all-purpose flour, cornstarch, and baking powder. Gradually add the dry mixture to the butter mixture, stirring gently until a soft dough forms. Be careful not to overmix, as this can make the cookies tough.
- Chill the Dough: Wrap the dough in plastic wrap and refrigerate for at least 30 minutes. Chilling the dough makes it easier to roll out and helps the cookies maintain their shape while baking.
- Roll and Cut the Cookies: Preheat your oven to 350°F (175°C). On a lightly floured surface, roll out the chilled dough to about 1/8 inch thick. Use a round cookie cutter (about 2 inches in diameter) to cut out circles. Place the cookies on a baking sheet lined with parchment paper, leaving a little space between each cookie.
- Bake the Cookies: Bake the cookies in the preheated oven for 10-12 minutes, or until the edges are lightly golden. Keep an eye on them to avoid overbaking. Remove the cookies from the oven and let them cool completely on a wire rack.
- Fill the Alfajores: Once the cookies are cool, spread a generous layer of dulce de leche on the bottom side of one cookie and gently press another cookie on top, forming a sandwich. Repeat this process with the remaining cookies.
- Dust and Serve: Finally, dust the filled alfajores with powdered sugar or roll them in grated coconut for an extra touch. Serve them immediately or store them in an airtight container for up to a week.
Extra Tips
When making alfajores, guarantee your butter is softened to room temperature for better integration into the dough. If you want to get creative, try adding flavors like lemon zest or cocoa powder to the dough for a unique twist.
Additionally, allow the cookies to rest after assembling them for a few hours or overnight; this lets the flavors meld together beautifully. Enjoy your alfajores with a warm beverage, and don’t hesitate to share these delightful treats with friends and family!
Mate: The Traditional Argentine Brew

Mate is more than just a drink in Argentina; it’s a cultural ritual that brings friends and family together. This traditional beverage is made from the dried leaves of the yerba mate plant and is typically served in a hollowed-out gourd known as a “mate” and sipped through a metal straw called a “bombilla.”
The preparation of mate is an art in itself, and it varies from region to region in Argentina. It’s commonly enjoyed throughout the day, providing a social experience that transcends generations.
To prepare mate, the choice of yerba mate is vital as it influences the flavor and strength of the brew. While some prefer a more traditional, robust flavor, others may opt for flavored varieties infused with herbs or citrus. The brewing process is relatively simple but requires a little finesse to guarantee the best tasting experience.
Once you master the art of mate preparation, you’ll appreciate the rich tradition and communal aspect of sharing this iconic Argentine beverage.
Ingredients (serving size: 4-6 people)
- 1 cup of yerba mate
- 4-6 cups of hot water (not boiling)
- 1 mate gourd (or any suitable cup)
- 1 bombilla (metal straw)
- Optional: Sweetener (sugar or honey) to taste
- Optional: Fresh mint or lemon for flavoring
Cooking Instructions
- Prepare the Gourd: Begin by filling your mate gourd about half full with yerba mate. You can adjust the amount depending on how strong you want the flavor. Remember, the yerba mate will expand as it gets wet.
- Position the Yerba: Tilt the gourd at an angle (about 45 degrees) so that the yerba mate leaves settle at the bottom. This creates a small well on one side, which is necessary for introducing hot water.
- Add Hot Water: Heat your water until it’s hot but not boiling (around 160-180°F or 70-80°C). Carefully pour a small amount of this hot water into the well you created in the yerba. This initial wetting process helps to release the flavors without burning the leaves.
- Insert the Bombilla: After the yerba has absorbed the initial water, gently insert the bombilla into the yerba, making sure it reaches the bottom of the gourd. This allows you to sip the mate without sucking up any leaves.
- Brew and Sip: Fill the gourd with more hot water, making sure not to pour directly onto the yerba mate to avoid bitterness. Sip through the bombilla. Once the flavor diminishes, you can refill the gourd with hot water several times.
- Share and Enjoy: Traditionally, mate is shared among friends or family. The person who prepares the mate is called the “cebador.” After finishing your drink, pass the gourd to the next person, who’ll refill it for themselves and pass it along.
Extra Tips
When preparing mate, it’s important to remember that the quality of yerba mate can greatly affect the taste. Experiment with different brands and flavors to find your favorite.
Additionally, try using a little bit of fresh mint or a slice of lemon for a revitalizing twist. Always use hot water instead of boiling water to avoid burning the yerba, which can make the brew bitter.
Finally, don’t rush the process; take your time to enjoy the experience and the company of those you share your mate with.
Dulce De Leche: Creamy Caramel Spread
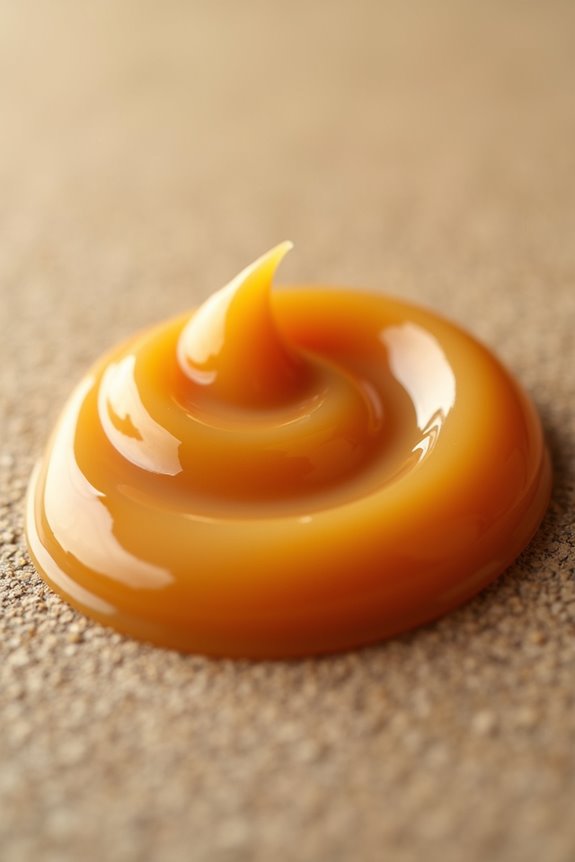
Dulce de leche is a beloved Argentinian treat, often referred to as “milk candy.” This creamy caramel spread is made by slow-cooking sweetened milk, which transforms into a rich, golden-brown concoction. Its versatility makes it a staple in many Argentinian desserts, from filling for pastries to a topping for pancakes and ice cream.
The process requires patience, but the result is a smooth, sweet, and deeply flavorful spread that will elevate any dish.
Making dulce de leche at home is an enjoyable culinary adventure. You’ll need just a few simple ingredients, but the magic happens during the slow cooking process, where the milk caramelizes and thickens. It’s vital to stir regularly to prevent burning and achieve that perfect consistency.
Once you master this delightful recipe, you’ll find countless ways to incorporate dulce de leche into your cooking and baking.
Ingredients (Serves 4-6 people):
- 4 cups whole milk
- 1 cup granulated sugar
- 1/4 teaspoon baking soda
- 1 teaspoon vanilla extract (optional)
- A pinch of salt
Cooking Instructions:
- Combine Ingredients: In a heavy-bottomed saucepan, combine the whole milk, granulated sugar, baking soda, and a pinch of salt. The baking soda helps maintain the color and consistency of the dulce de leche as it cooks.
- Heat Mixture: Place the saucepan over medium heat and stir gently until the sugar is completely dissolved. This step is vital in ensuring a smooth texture in your final product.
- Simmer and Stir: Once the mixture begins to simmer, reduce the heat to low. It’s important to maintain a gentle simmer to avoid burning. Continue to cook, stirring frequently, for about 1 to 1.5 hours. The mixture will gradually thicken and change color to a golden brown.
- Check Consistency: After about an hour, begin to check the consistency of the dulce de leche. It should coat the back of a spoon and have a smooth, creamy texture. If it’s not thick enough, continue cooking and stirring for a bit longer.
- Add Vanilla (Optional): If desired, stir in the vanilla extract just before removing the saucepan from heat. This adds an extra layer of flavor to your dulce de leche.
- Cool and Store: Once the desired consistency is achieved, remove the saucepan from heat and let the dulce de leche cool in the pan for a few minutes. Then transfer it to a clean jar or container. Allow it to cool completely before sealing.
Extra Tips:
When making dulce de leche, patience is key. Stir frequently, but don’t rush the cooking process; the longer it cooks, the deeper the flavor will become.
If you notice any lumps, you can strain the mixture through a fine mesh sieve before storing. Homemade dulce de leche can be stored in the refrigerator for up to a month, making it a perfect treat to have on hand for drizzling over desserts or spreading on toast. Enjoy your delicious creation!
Humita En Chala: Corn-Filled Delicacy

Humita en chala is a beloved traditional dish from Argentina, showcasing the rich flavors of corn in a unique and delightful way. This dish consists of a creamy corn mixture wrapped in corn husks and steamed to perfection. It’s often enjoyed as a snack or light meal, embodying the essence of Argentinian cuisine with its sweet and savory notes.
Humita en chala isn’t only a treat for the taste buds but also a dish steeped in cultural significance, often prepared during family gatherings and special occasions.
The preparation of humita en chala requires fresh ingredients, with corn being the star of the show. The combination of ground corn, cheese, and spices creates a delicious filling that’s both comforting and satisfying. The steaming process guarantees that the flavors meld beautifully, resulting in a dish that’s moist and bursting with flavor.
Whether you’re an experienced cook or trying your hand at Argentinian cooking for the first time, this recipe is approachable and rewarding.
Ingredients (Serving Size: 4-6 People)
- 4 cups of fresh corn kernels (about 6-8 ears of corn)
- 1 cup of milk
- 1 cup of cheese (preferably queso fresco or mozzarella), grated
- 1/2 cup of butter, softened
- 1 small onion, finely chopped
- 1 teaspoon of baking powder
- 1 teaspoon of sugar
- 1/2 teaspoon of salt
- 1/4 teaspoon of black pepper
- 12-15 corn husks, soaked in warm water for 30 minutes
Cooking Instructions
- Prepare the Corn: Start by removing the corn kernels from the cobs. Using a sharp knife, carefully cut down the sides of the ears to extract the kernels. You should have about 4 cups of fresh corn kernels. Reserve a few husks for wrapping the humitas.
- Blend the Mixture: In a blender or food processor, combine the corn kernels, milk, and softened butter. Blend until you have a smooth mixture. This will serve as the base for your filling.
- Cook the Onions: In a small pan over medium heat, sauté the finely chopped onion until it becomes translucent and fragrant, about 5-7 minutes. Once cooked, add the onions to the corn mixture in the blender.
- Add Remaining Ingredients: To the blended corn and onion mixture, add the grated cheese, baking powder, sugar, salt, and black pepper. Blend again until everything is well combined and you achieve a creamy consistency.
- Prepare the Corn Husks: Take the soaked corn husks and pat them dry. Lay one husk flat and add about 1/4 cup of the corn mixture to the center. Fold the sides in and then roll it from the bottom up to form a tight parcel. Repeat this process with the remaining husks and filling.
- Steam the Humitas: Place a steamer basket in a large pot filled with a couple of inches of water. Arrange the wrapped humitas upright in the basket, guaranteeing they don’t touch the water. Cover the pot with a lid and steam for about 45-60 minutes, or until the humitas are firm and cooked through.
- Serve and Enjoy: Once cooked, carefully remove the humitas from the steamer. Let them cool slightly before unwrapping. Serve warm, and enjoy your delicious humita en chala with a sprinkle of cheese or a side of salsa if desired.
Extra Tips
When preparing humita en chala, using fresh corn is key to achieving the best flavor and texture. If fresh corn isn’t available, you can use canned or frozen corn, but be sure to drain and rinse them well.
Additionally, feel free to experiment with different cheeses or add herbs such as basil or cilantro to enhance the flavor even further. Humitas can be made ahead of time and stored in the refrigerator for a few days or frozen for later use, making them a versatile dish for any occasion.
Fugazza: Argentine Focaccia
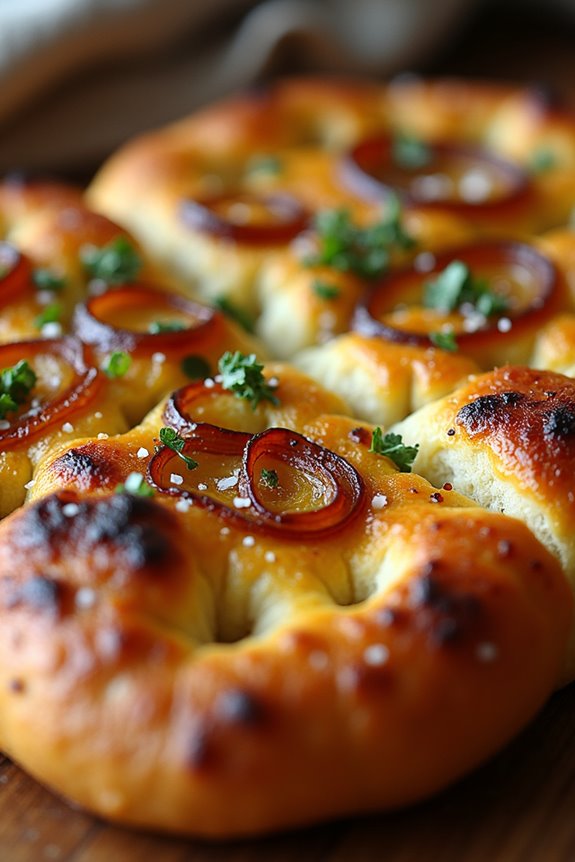
Fugazza is a beloved Argentine variation of focaccia that brings together the rich flavors of olive oil, onions, and fresh herbs, creating a delightful bread perfect for any occasion. This dish isn’t only easy to prepare but also offers a comforting taste of Argentina’s culinary heritage.
Traditionally served as a snack, appetizer, or side dish, fugazza can be enjoyed on its own or paired with various dips, cheeses, or cured meats. The beauty of fugazza lies in its simplicity and the quality of its ingredients.
With a soft and airy texture, this bread is topped with caramelized onions and a generous drizzle of olive oil, allowing for a rich and savory flavor profile. Whether you’re serving it at a family gathering, a casual get-together, or just enjoying a cozy night in, fugazza is sure to impress your guests and bring a touch of Argentina to your table.
Ingredients (Serves 4-6)
- 4 cups all-purpose flour
- 2 teaspoons instant yeast
- 1 teaspoon salt
- 1 teaspoon sugar
- 1 ½ cups warm water (about 110°F)
- ⅓ cup olive oil, plus more for drizzling
- 2 large onions, thinly sliced
- 1 tablespoon fresh oregano (or 1 teaspoon dried oregano)
- Coarse sea salt, for sprinkling
Cooking Instructions
- Prepare the Dough: In a large mixing bowl, combine the warm water, sugar, and instant yeast. Let it sit for about 5 minutes until it becomes frothy. Add the flour, salt, and ⅓ cup of olive oil to the yeast mixture. Mix until a shaggy dough forms.
- Knead the Dough: Transfer the dough to a floured surface and knead for about 8-10 minutes until it becomes smooth and elastic. If the dough is too sticky, add a little more flour as needed.
- First Rise: Place the kneaded dough in a lightly greased bowl, cover it with a damp cloth or plastic wrap, and let it rise in a warm place for about 1-2 hours or until it doubles in size.
- Prepare the Onions: While the dough is rising, heat a tablespoon of olive oil in a skillet over medium heat. Add the sliced onions and a pinch of salt, sautéing until they’re soft and golden brown, about 15-20 minutes. Stir in the fresh oregano and set aside to cool.
- Shape the Dough: Once the dough has risen, punch it down to release the air. Transfer it to a greased baking sheet or a large round pan. Using your fingers, stretch and press the dough into a rectangle or circle, ensuring it covers the bottom of the pan evenly.
- Second Rise: Cover the shaped dough again with a damp cloth and allow it to rise for another 30-45 minutes until puffed.
- Preheat the Oven: Preheat your oven to 425°F (220°C) while the dough is rising for the second time.
- Add Toppings: Once the dough has risen, use your fingers to create dimples in the surface. Evenly distribute the caramelized onions over the top and drizzle with additional olive oil. Sprinkle with coarse sea salt.
- Bake the Fugazza: Place the pan in the preheated oven and bake for 20-25 minutes or until the fugazza is golden brown and sounds hollow when tapped on the bottom.
- Cool and Serve: Once baked, remove the fugazza from the oven and let it cool slightly on a wire rack. Cut into squares or wedges and serve warm or at room temperature.
Extra Tips
For the best results, use high-quality olive oil, as it greatly enhances the flavor of the fugazza. Feel free to customize your toppings by adding other herbs or ingredients like black olives or cheese.
If you’re short on time, you can also use store-bought pizza dough as a convenient alternative. Just remember to adjust the baking time accordingly. Enjoy your fugazza with a glass of Malbec for an authentic Argentine experience!
Sopa Paraguaya: Cornbread With a Twist
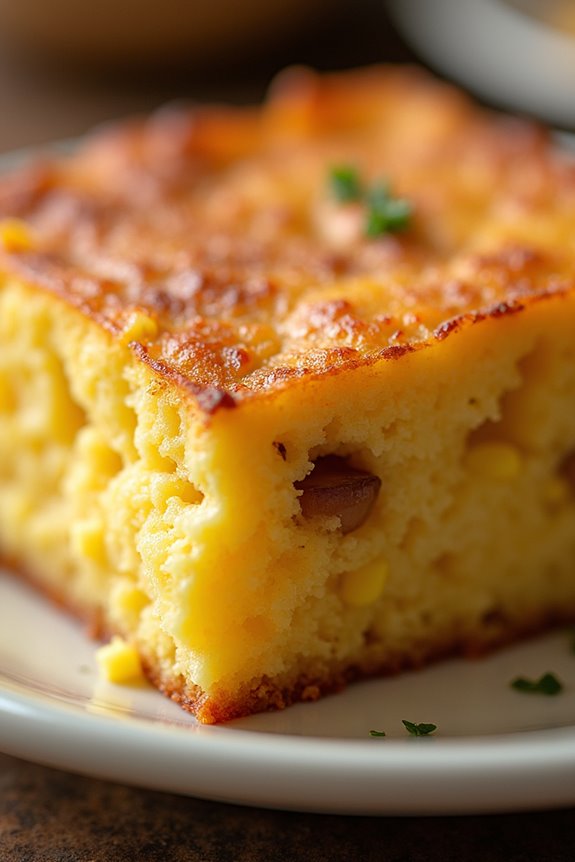
Sopa Paraguaya is a traditional dish from Paraguay that has found its way into the hearts and homes of many across South America, including Argentina. Despite its name, which translates to “Paraguayan Soup,” this dish is actually a cornbread that has a unique texture and flavor profile that sets it apart from regular cornbreads. Made primarily from cornmeal, cheese, eggs, and milk, Sopa Paraguaya is a delightful accompaniment to meals or can be enjoyed on its own as a snack.
The beauty of Sopa Paraguaya lies in its simplicity and versatility. The dish is often served at gatherings and celebrations, showcasing the rich culinary heritage of the region. As it bakes, the batter transforms into a moist and fluffy cornbread with a golden crust, making it an inviting addition to any table. Whether you’re looking to impress guests at a dinner party or simply want to savor a taste of South American cuisine, this recipe for Sopa Paraguaya won’t fail.
Ingredients (Serves 4-6):
- 2 cups cornmeal
- 1 cup milk
- 1 cup cheese (preferably Paraguayan cheese or mozzarella)
- 4 large eggs
- 1 cup onion, finely chopped
- 1/2 cup vegetable oil or melted butter
- 2 teaspoons baking powder
- 1 teaspoon salt
Cooking Instructions:
- Preheat the Oven: Begin by preheating your oven to 375°F (190°C). This guarantees that the Sopa Paraguaya will bake evenly and achieve a nice golden color.
- Sauté the Onions: In a skillet over medium heat, add a splash of oil and sauté the finely chopped onions until they become translucent and slightly caramelized, about 5-7 minutes. This step enhances the flavor of the dish, adding a rich, savory note.
- Mix the Dry Ingredients: In a large mixing bowl, combine the cornmeal, baking powder, and salt. Whisk these ingredients together to ensure an even distribution of the leavening agent.
- Combine Wet Ingredients: In another bowl, beat the eggs and then stir in the milk and melted butter or vegetable oil. Mix well until fully combined.
- Combine Everything: Gradually add the wet mixture to the dry ingredients, stirring continuously to avoid lumps. Once mixed, fold in the sautéed onions and shredded cheese, ensuring that they’re evenly distributed throughout the batter.
- Pour into Baking Dish: Lightly grease a square or rectangular baking dish with oil or butter. Pour the batter into the prepared dish, spreading it evenly.
- Bake: Place the dish in the preheated oven and bake for about 30-40 minutes, or until the top is golden brown and a toothpick inserted in the center comes out clean.
- Cool and Serve: Once finished, remove the Sopa Paraguaya from the oven and allow it to cool for a few minutes before cutting it into squares. Serve warm or at room temperature.
Extra Tips:
For an added twist, consider incorporating herbs like parsley or cilantro into the batter for a fresh touch. Additionally, using a combination of different cheeses can enhance the flavor profile, giving it a richer taste.
If you prefer a spicier kick, adding diced jalapeños or green chilies can elevate the dish. Sopa Paraguaya can also be stored in the refrigerator and reheated, making it a convenient option for meal prepping. Enjoy your culinary journey with this delightful cornbread!