

When I think of South American cuisine, my heart races with excitement at the thought of vibrant appetizers that start every meal with flair. From flaky, savory empanadas to zesty ceviche, each dish paints a picture of rich culture and diverse ingredients. If you’re aiming to impress your guests or simply eager to explore new flavors, these 14 recipes are just what you need to spark your culinary creativity. Let’s explore what makes these appetizers truly special.
Empanadas De Carne

Empanadas de Carne are a classic South American appetizer that perfectly embodies the rich culinary traditions of the region. These savory pastries are filled with a delicious mixture of seasoned ground beef, onions, and spices, all encased in a golden, flaky crust. Whether served as an appetizer at a gathering or as a snack on the go, empanadas de carne are certain to please any crowd with their delightful flavors and satisfying textures.
Making empanadas de carne at home isn’t only rewarding but also allows you to customize the filling to your taste. You can serve them with a side of chimichurri or a spicy dipping sauce for an added kick. With a little patience and practice, you’ll master the art of creating these delectable treats that are perfect for sharing with family and friends.
Ingredients (serving size: 4-6 people)
- 2 cups all-purpose flour
- 1/2 teaspoon salt
- 1/2 cup unsalted butter, chilled and diced
- 1/4 cup cold water
- 1 pound ground beef
- 1 medium onion, finely chopped
- 2 cloves garlic, minced
- 1/2 teaspoon cumin
- 1/2 teaspoon paprika
- 1/4 teaspoon black pepper
- 1/4 teaspoon salt (for the filling)
- 1 hard-boiled egg, chopped (optional)
- 1/4 cup green olives, chopped (optional)
- 1 egg (for egg wash)
Cooking Instructions
- Make the Dough: In a mixing bowl, combine the flour and salt. Add the diced butter and mix until the mixture resembles coarse crumbs. Gradually add the cold water, mixing until the dough comes together. Knead the dough briefly on a floured surface until smooth. Wrap in plastic wrap and refrigerate for at least 30 minutes.
- Prepare the Filling: In a large skillet over medium heat, add the ground beef. Cook until it’s browned, breaking it apart with a spoon. Drain excess fat if necessary. Add the chopped onion and garlic to the skillet, cooking until the onion is translucent. Stir in the cumin, paprika, black pepper, and salt. If using, mix in the chopped hard-boiled egg and olives. Remove from heat and let it cool.
- Roll Out the Dough: Once the dough has chilled, divide it into two pieces. On a floured surface, roll out one piece into a thin sheet, about 1/8 inch thick. Use a round cutter or a small bowl to cut out circles of dough, about 4-5 inches in diameter.
- Fill the Empanadas: Place a tablespoon of the beef filling in the center of each dough circle. Be careful not to overfill. Fold the dough over to create a half-moon shape. Press the edges together to seal, then crimp the edges with a fork or your fingers for a decorative touch.
- Prepare to Bake: Preheat your oven to 400°F (200°C). Line a baking sheet with parchment paper. Place the empanadas on the baking sheet. In a small bowl, beat the egg and brush the mixture over the tops of the empanadas for a golden finish.
- Bake: Bake in the preheated oven for 20-25 minutes, or until the empanadas are golden brown. Remove from the oven and let cool slightly before serving.
Extra Tips
When making empanadas de carne, feel free to experiment with different fillings such as chicken or vegetables to suit your preferences. For a crunchier texture, consider frying the empanadas instead of baking them. Just verify that they’re well-sealed to prevent leaking during frying.
Additionally, serving them with a variety of dipping sauces can elevate the experience, allowing everyone to enjoy their own unique flavor combinations.
Ceviche Peruviano
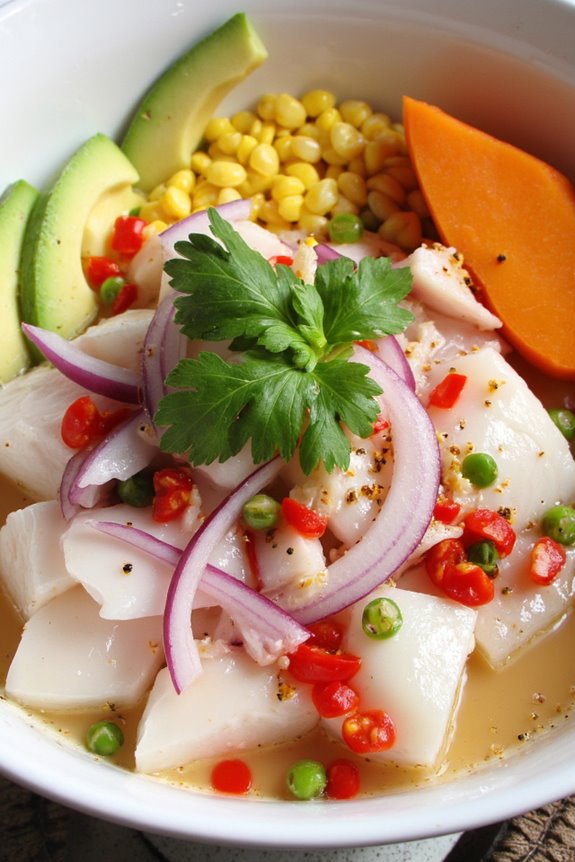
Ceviche Peruviano is a revitalizing and vibrant dish that captures the essence of South American coastal cuisine. Originating from Peru, this classic appetizer features fresh fish marinated in citrus juices, typically lime, which “cooks” the fish while infusing it with bright flavors. The dish is often accompanied by onions, cilantro, and a hint of spice, making it a perfect starter for any meal or a delightful snack on its own.
The key to a successful Ceviche Peruviano lies in the freshness of the fish and the balance of flavors. Traditionally, a firm white fish such as snapper or sea bass is used, but other varieties can also be delicious. The dish is typically served with sides of sweet potato, corn, and sometimes avocado, which complement the acidity of the ceviche beautifully. Enjoy the vibrant colors and revitalizing taste of this iconic Peruvian dish!
Ingredients (Serves 4-6 people):
- 1 pound fresh firm white fish (e.g., snapper or sea bass), diced
- 1 cup fresh lime juice (about 8-10 limes)
- 1 medium red onion, thinly sliced
- 1-2 serrano peppers, finely chopped (adjust for spice preference)
- 1 cup fresh cilantro, chopped
- Salt to taste
- 1 medium sweet potato, boiled and sliced for serving
- 1 cup corn (can be fresh or canned), for serving
- Optional: slices of avocado for garnish
Cooking Instructions:
- Prepare the Fish: Start by selecting the freshest fish available. Rinse it under cold water, and pat it dry with paper towels. Dice the fish into small, uniform pieces, guaranteeing they’re bite-sized to make for easy eating. This step is essential as it guarantees even marination.
- Marinate the Fish: In a large glass or ceramic bowl, combine the diced fish with the fresh lime juice. Make sure the fish is fully submerged in the juice. Cover the bowl with plastic wrap and let it sit in the refrigerator for about 15-20 minutes. The acidity of the lime juice will “cook” the fish, turning it opaque.
- Add Vegetables and Seasoning: After the fish has marinated, add the thinly sliced red onion, chopped serrano peppers, and chopped cilantro to the bowl. Gently fold the ingredients together to combine, ensuring the vegetables are evenly distributed without breaking the fish pieces.
- Season to Taste: Taste the ceviche and add salt as desired. Mix well to guarantee the seasoning is evenly distributed. Remember, you can always add more salt, but it’s difficult to take it out once added.
- Serve: To serve, use a slotted spoon to scoop the ceviche into small serving bowls. Garnish with slices of avocado if desired. Arrange slices of boiled sweet potato and corn on the side for a traditional touch. This adds not only flavor but also a beautiful presentation.
Extra Tips:
When making Ceviche Peruviano, always prioritize the freshness of the fish, as it’s the star of the dish. If you’re unsure about the fish’s freshness, ask your fishmonger for recommendations.
Additionally, feel free to customize your ceviche by adding other ingredients like diced tomatoes or mango for a twist. If you prefer a milder ceviche, you can reduce the number of serrano peppers or remove the seeds.
Finally, serve it immediately after mixing to maintain the fish’s texture and flavor; ceviche is best enjoyed fresh!
Arepas Rellenas

Arepas Rellenas are a delicious South American appetizer originating from Venezuela and Colombia. These stuffed cornmeal cakes are versatile and can be filled with a variety of ingredients, making them perfect for any occasion.
Traditionally, arepas are made using masa harina, a type of corn flour, which is mixed with water and a pinch of salt to form a dough. Once cooked, they can be sliced open and filled with a variety of savory ingredients, creating a delightful burst of flavors with each bite.
The beauty of Arepas Rellenas lies in their adaptability, allowing you to cater to different tastes and dietary preferences. Common fillings include shredded meat, cheese, avocado, or black beans, but the options are endless. Whether you prefer a hearty meat filling or a vegetarian option, these arepas are sure to impress your guests and provide a taste of South American cuisine right at your table.
Ingredients (Serves 4-6):
- 2 cups masa harina
- 1 1/4 cups warm water
- 1 teaspoon salt
- 1 cup shredded cheese (such as queso blanco or mozzarella)
- 1 cup cooked shredded chicken or beef
- 1 avocado, sliced
- 1/2 cup black beans, rinsed and drained
- 1 tablespoon vegetable oil (for cooking)
Cooking Instructions:
- Prepare the Dough: In a large mixing bowl, combine the masa harina and salt. Gradually add the warm water, mixing with your hands or a wooden spoon until the dough is smooth and pliable. If the dough feels too dry, add a little more water; if it’s too wet, sprinkle in a bit more masa harina.
- Shape the Arepas: Divide the dough into 6 equal portions and roll each portion into a ball. Flatten each ball gently between your palms to form a disk about 1/2 inch thick. Confirm the edges are smooth to prevent cracking during cooking.
- Cook the Arepas: Heat a skillet or griddle over medium heat and add the vegetable oil. Once hot, place the arepas in the skillet and cook for about 5-7 minutes on each side, or until they develop a golden brown crust and are cooked through. You can also bake them in a preheated oven at 375°F (190°C) for about 20 minutes, flipping halfway through.
- Prepare the Filling: While the arepas are cooking, prepare your desired fillings. For a traditional approach, mix the shredded meat with some seasoning, and have the cheese, avocado, and black beans ready to go.
- Assemble the Arepas: Once the arepas are cooked, remove them from the skillet and allow them to cool slightly. Using a sharp knife, cut a slit in the side of each arepa to create a pocket. Fill each arepa with your choice of shredded cheese, meat, black beans, and avocado slices.
- Serve: Serve the arepas warm, and enjoy with your favorite sauces or toppings like hot sauce or sour cream.
Extra Tips:
When making Arepas Rellenas, feel free to get creative with your fillings. You can experiment with different meats, such as pork or chorizo, or even go completely vegetarian with grilled vegetables and beans.
Make sure to serve the arepas fresh for the best flavor and texture; reheat any leftovers in a skillet to regain their crispiness. Additionally, you can prepare the arepa dough ahead of time and refrigerate it, but make sure to use it within a day for the best results.
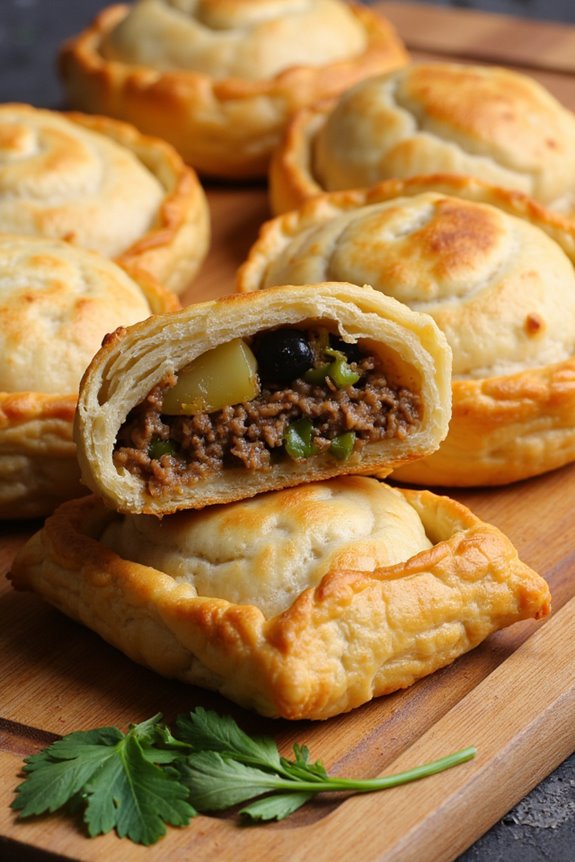
Feijoada Bites

Feijoada is a traditional Brazilian dish that’s deeply rooted in the country’s culinary heritage. Typically a hearty stew made with black beans and various cuts of meat, feijoada is often served with rice, collard greens, and orange slices.
In this appetizer version, we transform the rich flavors of feijoada into bite-sized morsels that are perfect for sharing at gatherings or parties. These Feijoada Bites capture the essence of the classic dish while making it easy to enjoy in a fun and casual way.
In this recipe, we’ll create a savory filling made from black beans, sausage, and spices, which will be encased in a crispy dough. Each bite is packed with flavor and offers a delightful combination of textures that are sure to impress your guests. Serve them with a zesty dipping sauce for an added kick, and you have an irresistible appetizer that reflects the spirit of South American cuisine.
Ingredients (Serves 4-6):
- 1 cup cooked black beans, drained and mashed
- 1/2 cup smoked sausage, diced
- 1/4 cup cooked bacon, crumbled
- 1/4 cup onion, finely chopped
- 2 cloves garlic, minced
- 1 teaspoon cumin
- 1/2 teaspoon paprika
- Salt and pepper to taste
- 1 package of puff pastry sheets (2 sheets)
- 1 egg, beaten (for egg wash)
- Fresh parsley, chopped (for garnish)
Instructions:
- Prepare the Filling: In a skillet over medium heat, add the diced smoked sausage and crumbled bacon. Cook until the sausage is browned and the bacon is crispy, about 5-7 minutes. Remove from heat and set aside to cool slightly.
- Sauté Aromatics: In the same skillet, add the chopped onion and minced garlic. Sauté until the onions are translucent and fragrant, about 3-4 minutes. Combine this mixture with the cooked sausage and bacon.
- Mix the Filling: In a mixing bowl, combine the mashed black beans, sautéed onion and garlic, cumin, paprika, salt, and pepper. Mix well until all ingredients are fully incorporated.
- Prepare the Puff Pastry: Thaw the puff pastry sheets according to package instructions. Roll out each sheet on a lightly floured surface and cut into 3-inch squares.
- Assemble the Bites: Place about a tablespoon of the filling in the center of each puff pastry square. Fold the corners over the filling to form a pocket and pinch the edges to seal tightly.
- Apply Egg Wash: Preheat your oven to 400°F (200°C). Place the assembled bites on a baking sheet lined with parchment paper. Brush the tops of each bite with the beaten egg to give them a golden finish as they bake.
- Bake: Bake in the preheated oven for 15-20 minutes, or until the pastry is puffed and golden brown.
- Garnish and Serve: Remove the bites from the oven and let them cool for a few minutes. Garnish with chopped fresh parsley before serving.
Extra Tips:
When making Feijoada Bites, feel free to customize the filling based on your preferences or what you have on hand. For a vegetarian version, you can replace the meat with sautéed mushrooms or additional beans.
Additionally, serving these bites with a tangy dipping sauce, such as a chimichurri or a spicy salsa, can enhance their flavor even more. Enjoy experimenting with different spices and ingredients to make this recipe your own!
Patacones Con Guacamole

Patacones, also known as tostones, are a popular South American appetizer made from green plantains that are twice-fried to achieve a crispy texture. These delicious bites are often served with a variety of dips, but one of the most beloved accompaniments is guacamole. Guacamole brings a creamy, flavorful contrast to the crunchy patacones, making for a perfect snack or starter for any gathering.
This dish isn’t only easy to prepare, but it also showcases the vibrant flavors of South American cuisine.
To create the perfect patacones con guacamole, you’ll need ripe green plantains and fresh ingredients for the guacamole. The combination of these two elements provides a delightful blend of textures and flavors. Whether you’re hosting a party or simply looking to indulge in a tasty treat, patacones con guacamole is sure to astound your guests and leave them wanting more.
Ingredients (serves 4-6):
- 2 large green plantains
- 1 cup vegetable oil (for frying)
- 1 teaspoon salt (or to taste)
- 2 ripe avocados
- 1 small onion, finely chopped
- 1 medium tomato, diced
- 1 lime, juiced
- 1 clove garlic, minced
- Salt and pepper (to taste)
Cooking Instructions:
- Prepare the Plantains: Start by peeling the green plantains. Cut off both ends of each plantain, then make a lengthwise slit in the skin without cutting into the flesh. Use your fingers to gently remove the skin. Once peeled, cut the plantains into 1-inch thick slices.
- Fry the Plantains: In a large skillet, heat the vegetable oil over medium heat. When the oil is hot, carefully add the plantain slices. Fry them for about 3-4 minutes on each side until they’re golden yellow but not too crispy. Remove them from the oil and place them on a paper towel to drain excess oil.
- Smash the Plantains: Using the bottom of a flat dish or a tostonera (a special tool for making patacones), flatten each fried plantain slice to about half an inch thick. Make sure they’re evenly flattened for even cooking.
- Fry Again: Return the flattened plantains to the hot oil and fry them again for 2-3 minutes on each side until they’re golden brown and crispy. Remove them from the oil, sprinkle with salt, and let them drain on a paper towel.
- Make the Guacamole: While the plantains are frying, prepare the guacamole. In a mixing bowl, mash the ripe avocados using a fork or potato masher. Add the finely chopped onion, diced tomato, minced garlic, lime juice, and season with salt and pepper to taste. Mix until well combined.
- Serve: Arrange the crispy patacones on a serving platter and serve them hot with a generous bowl of guacamole on the side for dipping.
Extra Tips: For the best flavor, make sure to choose firm green plantains rather than ripe ones. This will guarantee that the patacones hold their shape and have the right texture when fried.
Additionally, you can customize your guacamole by adding ingredients like jalapeños for a spicy kick or cilantro for added freshness. Don’t hesitate to experiment with toppings or dips – the beauty of patacones is that they can be paired with a variety of flavors!
Choclo Con Queso
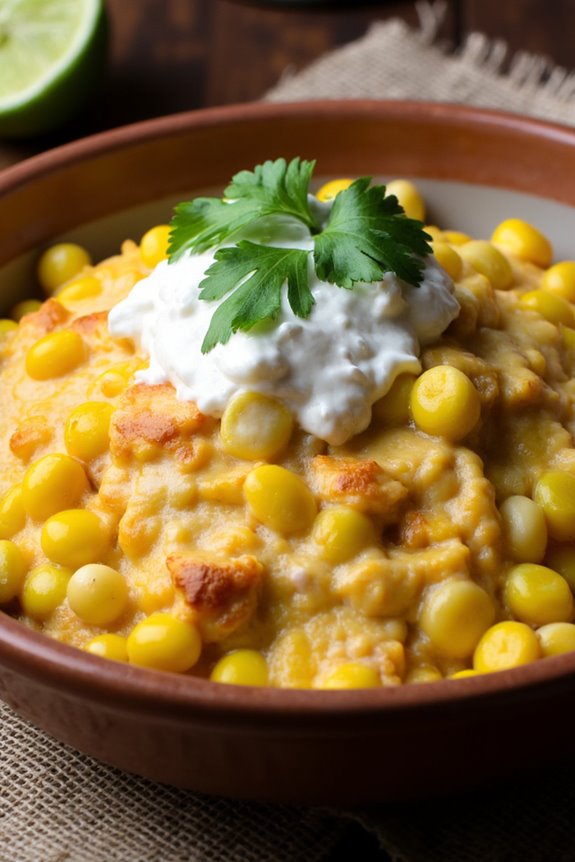
Choclo Con Queso is a delightful South American appetizer that showcases the rich flavors of fresh corn and cheese, making it a perfect start to any meal. This dish is particularly popular in countries like Peru and Bolivia, where the sweet, tender kernels of choclo, or fresh corn, are paired with creamy cheese. The combination isn’t only delicious but also deeply satisfying, giving you a taste of traditional South American cuisine right at home.
This simple yet flavorful dish can be served warm or at room temperature, making it versatile for any gathering. Whether you’re hosting a casual get-together or an elegant dinner party, Choclo Con Queso is sure to impress your guests with its rustic charm. The beauty of this recipe lies in its simplicity, highlighting the quality of the ingredients rather than complex cooking techniques.
Ingredients (Serves 4-6)
- 4 cups fresh choclo (sweet corn) kernels, or canned sweet corn if fresh is unavailable
- 1 ½ cups queso fresco (fresh cheese), crumbled or sliced
- ¼ cup butter, melted
- 2 tablespoons fresh cilantro, chopped
- Salt and pepper to taste
- Lime wedges, for serving (optional)
Cooking Instructions
- Prepare the Choclo: If using fresh choclo, carefully remove the kernels from the cob using a sharp knife. If using canned corn, drain and rinse the kernels under cold water to remove excess sodium. Set aside.
- Melt the Butter: In a small saucepan, melt the butter over low heat. Once melted, remove it from the heat and allow it to cool slightly. This will add richness to the dish.
- Combine Ingredients: In a large mixing bowl, combine the corn kernels with the melted butter, chopped cilantro, salt, and pepper. Toss everything together gently until the corn is well-coated and seasoned.
- Assemble the Dish: In a serving dish, layer half of the corn mixture at the bottom. Evenly distribute half of the crumbled or sliced queso fresco over the corn. Then, add the remaining corn mixture on top, finishing with the rest of the cheese.
- Heat and Serve: Preheat your oven to 350°F (175°C). Place the assembled dish in the oven and bake for about 15-20 minutes, or until the cheese is melted and slightly golden. Remove from the oven and let it cool for a few minutes before serving.
- Garnish and Enjoy: Serve the Choclo Con Queso warm, garnished with additional cilantro if desired, along with lime wedges on the side for an extra zing.
Extra Tips
For an added depth of flavor, consider grilling the corn before mixing it with the other ingredients to enhance its natural sweetness and add a smoky note.
If you can’t find queso fresco, you can substitute it with mozzarella or a mild feta cheese for a similar texture and taste.
Additionally, feel free to experiment with spices and herbs to customize the flavor profile to your liking. Enjoy the dish with a revitalizing drink, and your guests will surely be asking for the recipe!
Pão De Queijo

Pão de Queijo, or Brazilian cheese bread, is a delightful and chewy appetizer that has won hearts across South America and beyond. This gluten-free treat is made primarily with tapioca flour and is known for its crispy exterior and soft, cheesy interior. Traditionally made with cheese from the Minas Gerais region of Brazil, many variations exist that incorporate different cheeses, herbs, and spices to suit personal tastes. Perfect for parties or as a snack, Pão de Queijo is bound to impress your guests with its unique flavor and texture.
The key to achieving the perfect Pão de Queijo lies in the quality of the ingredients used and the proper mixing technique. The dough is typically prepared by first heating the milk, oil, and salt before adding the flour and cheese. The result is a dough that’s both pliable and flavorful, making it easy to shape into small balls before baking. Once they come out of the oven, you’ll be greeted with a wonderful aroma that will have everyone clamoring for more!
Ingredients for Pão De Queijo (Serves 4-6):
- 1 cup of milk
- 1/2 cup of vegetable oil
- 1 teaspoon of salt
- 2 cups of tapioca flour
- 1 cup of grated cheese (e.g., Parmesan, mozzarella, or a mix)
- 2 large eggs
Cooking Instructions:
- Preheat the oven: Begin by preheating your oven to 375°F (190°C). This guarantees that the Pão de Queijo will bake evenly and achieve that perfect golden color.
- Heat the liquid mixture: In a medium saucepan, combine the milk, oil, and salt. Heat this mixture over medium heat until it begins to boil. Stir occasionally to prevent it from burning.
- Combine the flour: Once the milk mixture has reached a boil, remove it from the heat and quickly add the tapioca flour to the saucepan. Stir well with a wooden spoon until the mixture is smooth and combined. The heat from the milk will help to cook the flour and create a dough-like consistency.
- Cool the dough: Allow the dough to cool for about 10 minutes. This step is vital as it prevents the eggs from cooking when added to the warm dough.
- Add eggs and cheese: Once the dough has cooled slightly, add the eggs one at a time, mixing well after each addition. Then, fold in the grated cheese until evenly distributed throughout the dough.
- Shape the dough: With your hands, take small portions of the dough (about the size of a golf ball) and roll them into balls. Place them on a greased or parchment-lined baking sheet, leaving space between each ball to allow for expansion.
- Bake: Place the baking sheet in the preheated oven and bake for about 15-20 minutes or until the tops are lightly golden and puffy.
- Cool and serve: Once baked, remove the Pão de Queijo from the oven and let them cool for a few minutes before serving. They’re best enjoyed warm!
Extra Tips:
For an even more flavorful Pão de Queijo, experiment with different types of cheese or add herbs like oregano or chives to the dough. You can also try using different dairy alternatives for a unique twist.
If you’re preparing them in advance, shape the dough into balls and freeze them before baking. When you’re ready to serve, bake them directly from the freezer, adding a few extra minutes to the cooking time. Enjoy your delicious Pão de Queijo with a side of dipping sauce or as is, straight from the oven!
Humitas En Chala
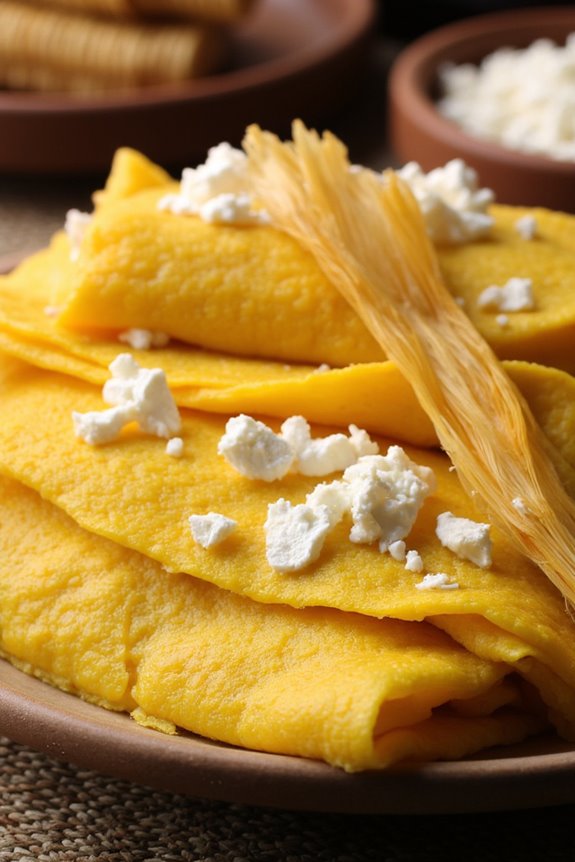
Humitas En Chala is a delightful South American appetizer that showcases the rich and vibrant flavors of corn. Originating from the Andean regions, this dish consists of a mixture of fresh corn, cheese, and spices wrapped in corn husks and steamed to perfection. The combination of sweet and savory elements, along with the tender texture, makes humitas a beloved treat at gatherings and celebrations. They aren’t only delicious but also a wonderful representation of the agricultural bounty of South America.
Making Humitas En Chala is a labor of love that’s well worth the effort. The process involves preparing the corn mixture, wrapping it in corn husks, and steaming it to create a flavorful and moist dish. Whether served as a snack, appetizer, or side dish, these humitas are sure to impress your family and friends with their unique taste and presentation. Let’s explore the recipe to bring this traditional dish to your kitchen.
Ingredients (Serves 4-6):
- 4 cups fresh corn kernels (about 6-8 ears of corn)
- 1 cup crumbled queso fresco or feta cheese
- 1/2 cup milk
- 1/4 cup unsalted butter, melted
- 1/4 cup sugar
- 1 teaspoon baking powder
- 1 teaspoon salt
- 1 teaspoon ground black pepper
- 1 teaspoon cumin (optional)
- 12-15 large corn husks, soaked in warm water for 30 minutes
Cooking Instructions:
- Prepare the Corn Kernels: Start by removing the kernels from the fresh corn cobs. You can do this by standing the cob upright in a large bowl and cutting downwards with a sharp knife to catch the kernels. You should have about 4 cups of kernels.
- Blend the Corn Mixture: In a food processor, combine the fresh corn kernels, milk, melted butter, sugar, baking powder, salt, pepper, and cumin (if using). Blend until you have a smooth and creamy mixture. This will be the filling for your humitas.
- Incorporate the Cheese: Transfer the blended corn mixture to a large mixing bowl. Gently fold in the crumbled queso fresco or feta cheese, making sure it’s well distributed throughout the mixture. The cheese adds a delightful creaminess and flavor to the humitas.
- Prepare the Corn Husks: Take the soaked corn husks and gently pat them dry with a clean towel. Select the largest husks for wrapping. You’ll need about 12-15 husks, depending on their size.
- Assemble the Humitas: Lay a corn husk flat in front of you, with the pointed end facing away. Spoon about 1/4 to 1/3 cup of the corn mixture onto the center of the husk. Fold the sides of the husk over the mixture, then fold up the bottom to completely enclose the filling. Repeat this with the remaining husks and mixture.
- Steam the Humitas: Place the wrapped humitas upright in a steamer basket lined with a clean cloth or additional corn husks. Steam over boiling water for about 40-50 minutes, or until the humitas are firm and set. Make sure to check the water level in the pot periodically to confirm it doesn’t dry out.
- Serve and Enjoy: Once cooked, carefully remove the humitas from the steamer and let them cool for a few minutes. Serve warm, and enjoy them on their own or with a dollop of sour cream or a spicy salsa for added flavor.
Extra Tips:
When making Humitas En Chala, using fresh corn is key for the best flavor and texture, but you can substitute frozen corn if fresh isn’t available. Make sure to soak the corn husks thoroughly to make them pliable for wrapping.
You can also get creative with the filling by adding herbs or spices to suit your taste. Humitas can be prepared in advance and reheated, making them a convenient option for gatherings or meal prep. Enjoy your culinary adventure with this traditional South American dish!
Bolinho De Bacalhau
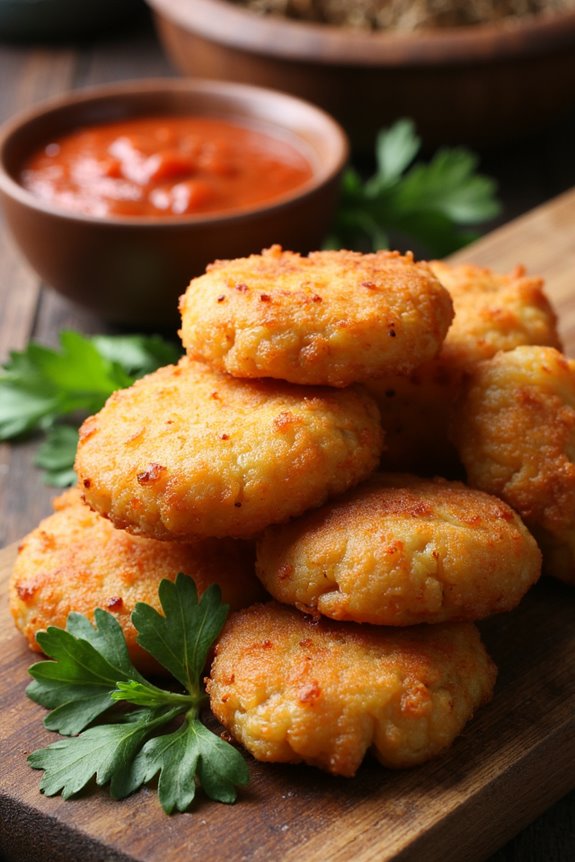
Bolinho De Bacalhau, or codfish fritters, is a beloved appetizer that hails from Brazil but is enjoyed throughout South America. These golden-brown bites are crispy on the outside and soft on the inside, filled with the rich flavors of codfish, potatoes, and aromatic herbs.
Traditionally served with a side of hot sauce or a tangy dipping sauce, Bolinho De Bacalhau is perfect for gatherings, parties, or as a delicious snack to enjoy at any time of the day.
The key to a successful Bolinho De Bacalhau lies in the quality of the salted codfish and the balance of ingredients. Soaking the codfish is crucial to remove excess salt and to rehydrate it, guaranteeing a flavorful and moist filling.
Once prepared, these fritters are deep-fried until they reach the perfect level of crunch. Serve them hot for the best experience and watch them disappear quickly from the plate!
Ingredients (Serves 4-6)
- 1 lb salted codfish
- 2 medium potatoes
- 1 small onion, finely chopped
- 2 cloves garlic, minced
- 2 large eggs
- ¼ cup fresh parsley, chopped
- ¼ cup green onions, chopped
- ½ tsp black pepper
- ½ tsp cayenne pepper (optional)
- 1 cup all-purpose flour
- Vegetable oil for frying
- Salt, to taste
Cooking Instructions
- Prepare the Codfish: Start by rinsing the salted codfish under cold water to remove excess salt. Place it in a bowl, cover with water, and let it soak for 24 hours in the refrigerator, changing the water a few times to guarantee it’s adequately desalted.
- Cook the Potatoes: While the codfish is soaking, peel and cut the potatoes into chunks. Boil them in salted water until they’re tender, about 15-20 minutes. Once cooked, drain and mash the potatoes until smooth, then set aside.
- Shred the Codfish: After the soaking period, drain the codfish and place it in a pot of fresh water. Bring it to a boil, then reduce the heat and simmer for about 10 minutes. Once cooked, drain and let it cool slightly before shredding it into small pieces, removing any skin and bones.
- Mix Ingredients: In a large mixing bowl, combine the shredded codfish, mashed potatoes, chopped onion, minced garlic, eggs, parsley, green onions, black pepper, and cayenne pepper. Mix well until everything is evenly incorporated. Gradually add flour to the mixture, stirring until it holds together but isn’t too stiff.
- Shape the Fritters: With your hands, take small portions of the mixture and shape them into small oval or round fritters, about the size of a golf ball. Place the shaped fritters on a plate lined with parchment paper.
- Fry the Fritters: In a deep skillet or pot, heat vegetable oil over medium-high heat. Once the oil is hot (about 350°F), carefully add a few fritters at a time, being careful not to overcrowd the pan. Fry them for about 3-4 minutes on each side, or until they’re golden brown and crispy. Use a slotted spoon to remove the fritters and place them on paper towels to drain excess oil.
- Serve: Serve the Bolinho De Bacalhau hot with a side of hot sauce or a dipping sauce of your choice. Enjoy!
Extra Tips
To enhance the flavor profile of your Bolinho De Bacalhau, consider adding a pinch of nutmeg to the mixture or substituting some of the cod with shrimp for a coastal twist.
Make sure your oil is at the right temperature before frying, as this will guarantee that the fritters cook evenly and achieve that desirable crispiness.
If you want to prepare the fritters in advance, you can shape them and freeze them before frying; just fry them directly from the freezer, adding a minute or two to the cooking time.
Anticuchos De Corazón
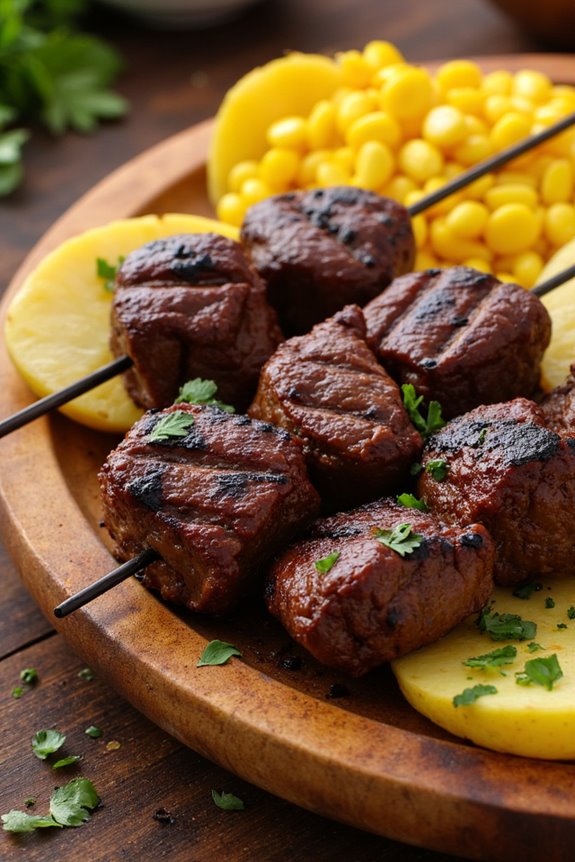
Anticuchos de corazón is a traditional Peruvian dish that features skewered and grilled beef heart marinated in a vibrant blend of spices. This dish, often served as an appetizer or street food, is beloved for its rich flavor and tender texture. The marinade typically includes ingredients such as garlic, vinegar, and aji pepper, infusing the meat with a smoky, spicy profile that’s hard to resist.
Though beef heart may seem unconventional to some, it’s a delicacy that’s packed with nutrients and offers a unique culinary experience.
The preparation of anticuchos de corazón is relatively straightforward, making it an excellent choice for gatherings or informal dinners. Once marinated, the heart is cut into cubes and threaded onto skewers, then grilled to perfection.
Traditionally served with a side of potatoes or corn, these skewers offer a delightful combination of flavors and textures. Whether you’re familiar with Peruvian cuisine or trying something new, anticuchos de corazón is sure to captivate your guests and tantalize your taste buds.
Ingredients (Serves 4-6):
- 1 lb beef heart, cleaned and cut into 1-inch cubes
- 1/4 cup red wine vinegar
- 2 tablespoons aji amarillo paste (or any hot pepper paste)
- 4 cloves garlic, minced
- 1 teaspoon cumin
- 1 teaspoon paprika
- 1 teaspoon salt
- 1/2 teaspoon black pepper
- 2 tablespoons vegetable oil
- 1 tablespoon fresh lime juice
- Wooden or metal skewers (if using wooden skewers, soak in water for 30 minutes)
Cooking Instructions:
- Prepare the Marinade: In a bowl, combine the red wine vinegar, aji amarillo paste, minced garlic, cumin, paprika, salt, black pepper, vegetable oil, and lime juice. Whisk the ingredients together until well incorporated. This marinade will add depth and flavor to the beef heart.
- Marinate the Beef Heart: Place the cleaned and cubed beef heart into the marinade, making certain that each piece is well-coated. Cover the bowl with plastic wrap and refrigerate for at least 2 hours, or ideally overnight. This step allows the flavors to penetrate the meat, resulting in a tastier dish.
- Preheat the Grill: About 15 minutes before you’re ready to cook, preheat your grill to medium-high heat. This guarantees that the skewers will sear properly and develop a nice char.
- Skewer the Meat: Once marinated, remove the beef heart from the marinade. Thread the cubes onto the skewers, leaving a little space between each piece for even cooking. If using wooden skewers, make sure they’re soaked to prevent burning.
- Grill the Anticuchos: Place the skewers on the preheated grill. Cook for about 3-4 minutes on each side, or until the meat reaches your desired level of doneness. The outside should be slightly charred, while the inside remains juicy.
- Serve and Enjoy: Remove the skewers from the grill and let them rest for a couple of minutes. Serve the anticuchos de corazón with a side of boiled potatoes, corn, or a fresh salsa for an authentic Peruvian experience.
Extra Tips:
When preparing anticuchos de corazón, be sure to clean the beef heart thoroughly to remove any excess fat or membranes, which can affect the texture and taste.
Additionally, feel free to experiment with the marinade by adding herbs such as oregano or cilantro for an extra layer of flavor. If you enjoy extra heat, consider adding more aji amarillo paste or even a splash of hot sauce before grilling. Serve with a side of tangy dipping sauce for a delicious twist!
Salteñas
Salteñas are a beloved Bolivian appetizer that combines a savory filling with a delicate, flaky crust. These delicious pastries are often compared to empanadas but have a unique twist due to their slightly sweet dough and juicy filling. Traditionally filled with a mix of meat, potatoes, peas, and spices, salteñas are perfect for a snack or as part of a larger meal. They’re often enjoyed with a spicy sauce on the side, making them an exciting addition to any gathering.
Making salteñas can be a labor of love, but the end result is well worth the effort. The dough is made with a blend of flour, sugar, and lard, giving it a rich flavor and texture. The filling is simmered until the flavors meld beautifully, creating a warm, comforting bite. Once you master this recipe, you’ll impress your friends and family with your culinary skills and transport them to the streets of Bolivia with every bite.
Ingredients (Serves 4-6)
- For the Dough:
- 4 cups all-purpose flour
- 1/2 cup unsalted butter or lard
- 1/2 cup sugar
- 1 teaspoon salt
- 1 large egg
- 1 cup warm water
- 1 tablespoon baking powder
- For the Filling:
- 1 pound ground beef or chicken
- 1 medium onion, finely chopped
- 2 cloves garlic, minced
- 1 cup diced potatoes
- 1/2 cup frozen peas
- 1/4 cup green olives, chopped
- 1/2 teaspoon cumin
- 1/2 teaspoon paprika
- Salt and pepper to taste
- 1/2 cup beef or chicken broth
- 1 tablespoon vegetable oil
- For Assembly:
- 1 egg, beaten (for egg wash)
Cooking Instructions
1. Prepare the Dough: In a large mixing bowl, combine the flour, sugar, salt, and baking powder. Add the butter or lard and mix until the mixture resembles coarse crumbs.
In a separate bowl, whisk together the egg and warm water. Gradually add this mixture to the dry ingredients, mixing until a soft dough forms. Knead lightly on a floured surface until smooth. Cover with plastic wrap and let it rest for 30 minutes.
2. Make the Filling: In a skillet, heat the vegetable oil over medium heat. Add the chopped onion and garlic, cooking until softened and fragrant, about 3-4 minutes.
Stir in the ground meat, breaking it apart with a spatula. Cook until browned, about 5-7 minutes. Add the diced potatoes, peas, olives, cumin, paprika, salt, and pepper. Pour in the broth and let it simmer for 10-15 minutes, or until the potatoes are tender and the mixture is slightly thickened. Allow to cool.
3. Assemble the Salteñas: Preheat your oven to 375°F (190°C). On a floured surface, roll out the dough to about 1/8-inch thick. Use a round cutter (or a bowl) to cut out circles, about 4-5 inches in diameter.
Place a spoonful of the filling in the center of each circle. Fold the dough over to create a half-moon shape and crimp the edges to seal tightly. Place the filled salteñas on a baking sheet lined with parchment paper.
4. Bake the Salteñas: Brush the tops of the salteñas with the beaten egg for a golden finish. Bake in the preheated oven for 20-25 minutes, or until the pastries are golden brown and flaky.
Remove from the oven and let cool slightly before serving.
5. Serve and Enjoy**: Serve** the salteñas warm with a side of spicy sauce or your favorite dipping sauce. Enjoy the crispy outside and the flavorful, juicy filling!
Extra Tips
To enhance the flavor of your salteñas, consider adding spices like oregano or chili powder to the filling mix. For added moisture, you can include a bit of the broth from the cooked meat mixture.
If you want a vegetarian option, simply substitute the meat with lentils or a mix of your favorite vegetables. When sealing the salteñas, make sure to crimp them well to avoid any leaks during baking. Enjoy experimenting with different fillings and sauces to find your perfect combination!
Tacos De Pescado
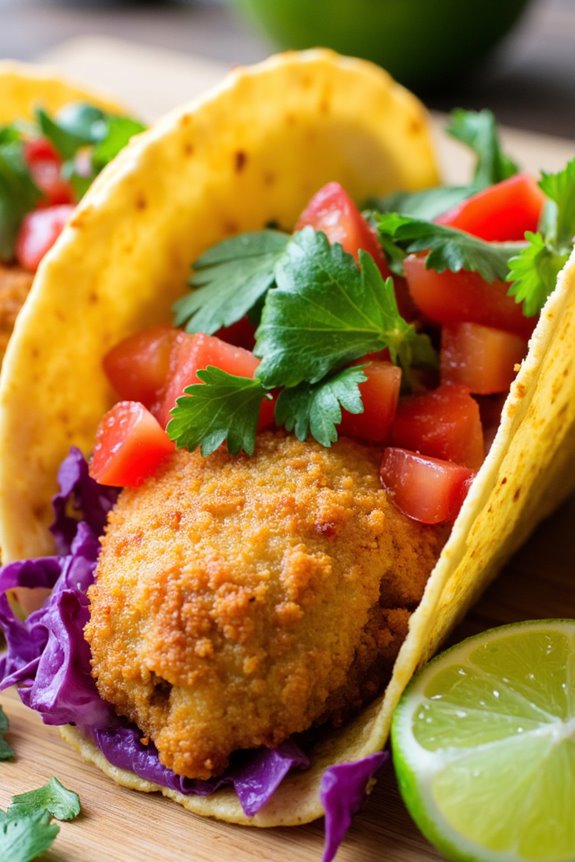
Tacos de Pescado, or fish tacos, are a delightful and flavorful South American appetizer that captures the essence of coastal cuisine. These tacos are traditionally made with fresh fish, seasoned and battered, then fried to crispy perfection. Topped with a tangy slaw and a zesty sauce, they provide a perfect balance of textures and flavors that will transport your taste buds straight to a sunny beach in Mexico or along the shores of the Pacific coast.
To prepare tacos de pescado, you can use a variety of fish, but white fish like cod or tilapia is commonly preferred due to its mild flavor and flaky texture. The key to a successful fish taco lies in the freshness of the ingredients and the perfect balance of seasoning. This dish isn’t only a crowd-pleaser but also a great way to introduce new flavors to your family and friends. Serve these tacos with a side of lime wedges and your favorite hot sauce for an added kick!
Ingredients (Servings: 4-6)
- 1 pound white fish fillets (such as cod or tilapia)
- 1 cup all-purpose flour
- 1 cup cornmeal
- 1 teaspoon paprika
- 1 teaspoon garlic powder
- 1 teaspoon cumin
- 1 teaspoon salt
- ½ teaspoon black pepper
- 1 cup buttermilk
- Vegetable oil (for frying)
- 8-12 small corn or flour tortillas
- 1 cup shredded cabbage
- ½ cup diced tomatoes
- ½ cup diced onions
- ½ cup chopped cilantro
- Lime wedges (for serving)
- Hot sauce (optional)
Cooking Instructions
- Prepare the Fish: Start by rinsing the fish fillets under cold water and pat them dry with paper towels. Cut the fish into strips or pieces, making them suitable for filling the tacos. Season the fish with salt, pepper, and a sprinkle of lime juice to enhance the flavor.
- Make the Breading: In a shallow bowl, mix together the flour, cornmeal, paprika, garlic powder, cumin, salt, and black pepper. This mixture will create a crispy coating for the fish.
- Coat the Fish: Dip each piece of fish into the buttermilk, ensuring it’s fully coated. Then, dredge the fish in the flour and cornmeal mixture, pressing gently to adhere the breading well.
- Heat the Oil: In a large skillet, heat about 1 inch of vegetable oil over medium-high heat. To test if the oil is ready, drop a small piece of the breading into the oil; if it sizzles and bubbles, the oil is hot enough for frying.
- Fry the Fish: Carefully add the coated fish pieces to the hot oil in batches, being cautious not to overcrowd the pan. Fry for about 3-4 minutes on each side, or until the fish is golden brown and cooked through. Remove the fish and place them on a paper towel-lined plate to drain excess oil.
- Warm the Tortillas: While the fish is frying, heat the tortillas in a dry skillet over medium heat for about 30 seconds on each side or until they’re warm and pliable.
- Assemble the Tacos: To assemble the tacos, place a few pieces of fried fish onto each tortilla. Top with shredded cabbage, diced tomatoes, onions, and cilantro. Squeeze fresh lime juice over the top and add hot sauce if desired.
- Serve: Serve the tacos immediately, garnished with extra lime wedges on the side. Enjoy your homemade tacos de pescado fresh off the skillet!
Extra Tips
For an even more flavorful experience, consider marinating the fish in a mixture of lime juice, garlic, and spices for about 30 minutes before cooking. This infuses the fish with added flavor and enhances its moisture.
Additionally, feel free to customize the toppings based on your preferences—avocado slices, jalapeños, or a creamy sauce can elevate your tacos de pescado even further. Enjoy experimenting with different flavor combinations!
Chipa

Chipa is a delightful and traditional South American appetizer hailing from Paraguay. These cheese-filled bites are made primarily from cassava flour, which gives them a unique texture and flavor. Often enjoyed during festivities or simply as a snack, chipa is a favorite among both locals and visitors alike. The combination of cheese, eggs, and the distinct flavor of cassava flour creates a savory treat that’s bound to impress.
This recipe isn’t only straightforward but also allows for customization by adding herbs or spices according to your preference. Chipa can be served fresh out of the oven, providing a warm, cheesy experience that pairs wonderfully with a variety of drinks. For a serving size of 4-6 people, let’s gather the ingredients and prepare to indulge in this tasty South American appetizer.
Ingredients:
- 2 cups cassava flour (or tapioca flour)
- 1 cup grated cheese (Paraguayan cheese or mozzarella)
- 2 large eggs
- 1/2 cup milk
- 1/2 cup vegetable oil
- 1 teaspoon baking powder
- 1 teaspoon salt
- Optional: 1 teaspoon of herbs (like parsley or oregano) for added flavor
Cooking Instructions:
- Preheat the Oven: Begin by preheating your oven to 375°F (190°C). This guarantees that your chipa bakes evenly and achieves a nice golden color.
- Mix Dry Ingredients: In a large mixing bowl, combine the cassava flour, baking powder, and salt. Whisk them together to guarantee that the baking powder is evenly distributed throughout the flour mixture.
- Incorporate Cheese: Add the grated cheese into the dry ingredients. Mix thoroughly, ensuring that the cheese is well-coated with the flour mixture. This will help it distribute evenly throughout the chipa.
- Prepare Wet Ingredients: In a separate bowl, whisk together the eggs, milk, and vegetable oil until fully combined. This mixture will add moisture and richness to the chipa.
- Combine Mixtures: Gradually add the wet mixture into the dry ingredients, stirring continuously until a dough forms. If you’re using herbs, incorporate them at this stage for an extra flavor boost.
- Shape the Chipa: With your hands, take small portions of the dough and shape them into balls or small patties. You can also use cookie cutters for a fun shape. Place them on a baking sheet lined with parchment paper, leaving some space between each piece.
- Bake: Place the baking sheet in the preheated oven and bake for about 15-20 minutes, or until the chipa are golden brown and puffed up. Keep an eye on them to avoid over-baking.
- Cool and Serve: Once baked, remove the chipa from the oven and allow them to cool slightly before serving. Enjoy them warm for the best flavor and texture.
Extra Tips:
When making chipa, using fresh cheese enhances the flavor considerably, so opt for quality cheese if possible. If you can find Paraguayan cheese, it gives the best authentic taste, but mozzarella works well as a substitute.
You can also experiment with different cheeses or add spices to create a unique twist on this classic recipe. For an extra crispy exterior, consider brushing the tops with a bit of melted butter before baking. Enjoy your chipa warm, and pair it with a rejuvenating drink for the ultimate experience!
Langostinos a La Parrilla
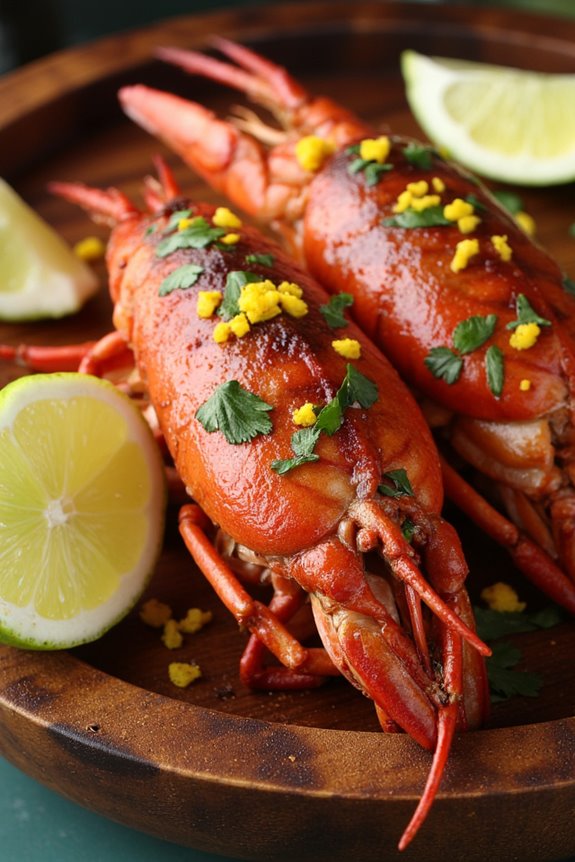
Langostinos a La Parrilla is a popular South American appetizer that showcases the rich flavors of grilled langoustines, often served with a zesty marinade and fresh herbs. This dish isn’t only a feast for the eyes with its vibrant colors but also a delightful experience for the palate, combining the sweetness of the seafood with the smokiness from the grill.
Perfect for a gathering, these grilled langostines are sure to impress your guests and transport them to the sunny coasts of South America.
The key to a successful Langostinos a La Parrilla lies in the freshness of the seafood and the marinade. A mixture of garlic, citrus, and herbs elevates the langoustines, while grilling them adds a depth of flavor that’s simply irresistible.
Serve them alongside a fresh salad or crusty bread to soak up the delicious juices, and you have a perfect appetizer that’s both elegant and easy to prepare.
Ingredients (Serves 4-6):
- 16 large langostinos, cleaned and deveined
- 4 cloves of garlic, minced
- 1/4 cup olive oil
- Juice of 2 limes
- Zest of 1 lime
- 1 tablespoon fresh parsley, chopped
- 1 tablespoon fresh cilantro, chopped
- 1 teaspoon smoked paprika
- Salt and pepper to taste
- Lime wedges, for serving
Cooking Instructions:
- Prepare the Marinade: In a medium-sized bowl, combine the minced garlic, olive oil, lime juice, lime zest, chopped parsley, chopped cilantro, smoked paprika, salt, and pepper. Whisk until well blended. This marinade will infuse the langostinos with vibrant flavors.
- Marinate the Langostinos: Add the cleaned langostinos to the bowl with the marinade. Make sure they’re well coated. Cover the bowl with plastic wrap and let them marinate in the refrigerator for at least 30 minutes. This step allows the flavors to penetrate the seafood.
- Preheat the Grill: While the langostinos are marinating, preheat your grill to medium-high heat. If using a charcoal grill, verify the coals are glowing red. A hot grill is essential for achieving a nice char on the langostinos.
- Grill the Langostinos: Once the grill is ready, place the langostinos directly on the grill grates. Grill them for about 3-4 minutes on each side, or until they turn opaque and slightly charred. Be careful not to overcook them, as they can become tough.
- Serve: Remove the langostinos from the grill and arrange them on a serving platter. Garnish with additional herbs if desired, and serve with lime wedges on the side for an extra burst of freshness.
Extra Tips:
For the best results, choose the freshest langostinos available, as their quality greatly impacts the final dish. If you don’t have access to fresh langostinos, frozen ones can be used, but confirm they’re fully thawed before marinating.
Additionally, feel free to customize the marinade by adding other herbs or spices to suit your taste. Pair this dish with a chilled white wine or a light beer to enhance the dining experience. Enjoy your culinary journey to South America!