

Exploring the vibrant culinary landscape of South America is such a joy. The fresh, bold flavors that vegetables bring to each dish are truly amazing. From Brazil’s hearty moqueca to the zesty pebre for grilled skewers, every recipe tells a story. These dishes celebrate rich traditions while offering a fresh take on healthy eating. Curious about how to elevate your meal with these exciting recipes?
Quinoa Salad With Black Beans and Avocado
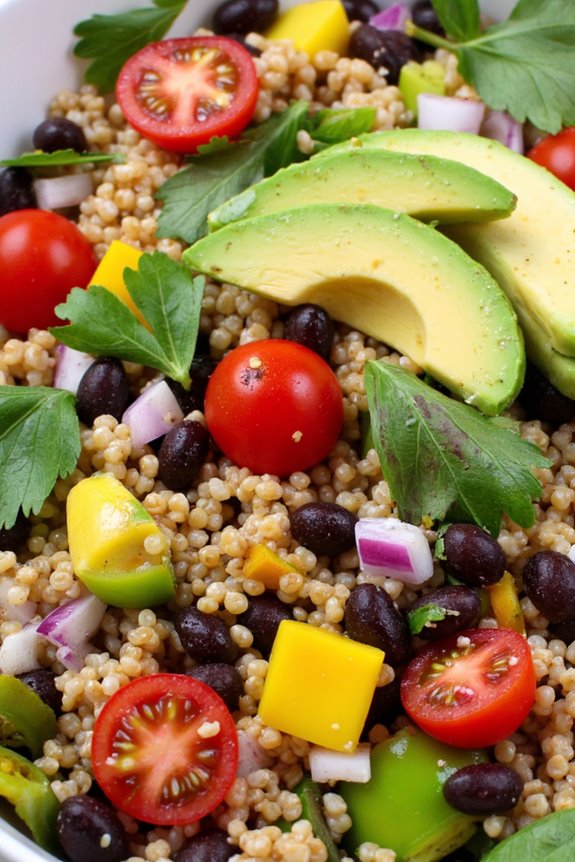
Quinoa Salad with Black Beans and Avocado is a vibrant, nutritious dish that embodies the spirit of South American cuisine. This invigorating salad combines the nutty flavor of quinoa with the hearty texture of black beans and the creamy richness of avocado. It’s a perfect option for a light lunch or as a side dish for dinner, offering a delightful medley of flavors and textures that’s sure to please everyone at the table.
Packed with protein, fiber, and healthy fats, this salad isn’t only delicious but also incredibly wholesome. The addition of fresh vegetables and zesty lime dressing enhances its appeal, making it a go-to recipe for those looking to enjoy a healthy meal.
Whether you’re preparing a quick weeknight dinner or a festive gathering, this Quinoa Salad with Black Beans and Avocado is a fantastic choice that will leave your guests satisfied.
Ingredients (Serves 4-6):
- 1 cup quinoa
- 2 cups water or vegetable broth
- 1 can (15 oz) black beans, rinsed and drained
- 1 medium avocado, diced
- 1 cup cherry tomatoes, halved
- 1 bell pepper (red or yellow), diced
- 1/4 cup red onion, finely chopped
- 1/4 cup fresh cilantro, chopped
- Juice of 2 limes
- 3 tablespoons olive oil
- Salt and pepper to taste
Cooking Instructions:
- Rinse the Quinoa: Begin by rinsing the quinoa under cold water in a fine-mesh strainer. This step is important as it removes the natural coating called saponin, which can impart a bitter taste.
- Cook the Quinoa: In a medium saucepan, combine the rinsed quinoa and water (or vegetable broth). Bring it to a boil over medium-high heat. Once boiling, reduce the heat to low, cover, and let it simmer for about 15 minutes, or until the quinoa is fluffy and all the liquid is absorbed. Remove from heat and let it sit covered for an additional 5 minutes.
- Prepare the Vegetables: While the quinoa is cooking, prepare the other ingredients. Dice the avocado, halve the cherry tomatoes, and chop the bell pepper and red onion. Place all the prepared vegetables in a large mixing bowl.
- Combine Ingredients: Once the quinoa has finished cooking, fluff it with a fork and add it to the bowl with the vegetables. Add the rinsed black beans and chopped cilantro to the bowl as well.
- Make the Dressing: In a small bowl, whisk together the lime juice, olive oil, salt, and pepper. Pour the dressing over the quinoa and vegetable mixture, and gently toss to combine everything thoroughly.
- Serve: Taste the salad and adjust seasoning if necessary. You can serve it immediately or refrigerate it for 30 minutes to allow the flavors to meld. Garnish with additional cilantro if desired.
Extra Tips: When selecting avocados for this salad, look for ones that are slightly soft to the touch but not overly ripe. You can also customize this salad by adding other vegetables like corn or cucumber, or even some diced jalapeño for a spicy kick.
This dish can be stored in the refrigerator for up to 3 days, making it a great option for meal prep!
Brazilian Vegetable Moqueca
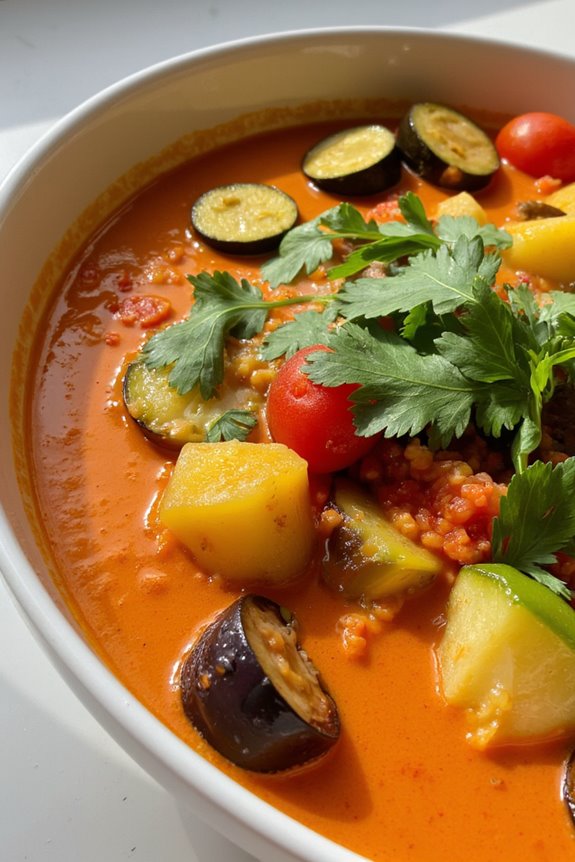
Brazilian Vegetable Moqueca is a vibrant and flavorful dish that celebrates the rich culinary traditions of Brazil, particularly from the coastal regions. This plant-based version of the traditional seafood moqueca is packed with colorful vegetables, aromatic spices, and the essential creaminess of coconut milk. The combination of textures and flavors makes it not only a feast for the taste buds but also a visually stunning dish that will entice anyone at the dinner table.
The beauty of Brazilian Vegetable Moqueca lies in its versatility. You can customize the vegetables according to your preference or what you have on hand, making it a great option for using seasonal produce. Serve this hearty stew over fluffy rice or with crusty bread to soak up the luscious sauce. This dish is perfect for family gatherings, celebrations, or a comforting weeknight meal.
Ingredients (serving size: 4-6 people):
- 2 tablespoons olive oil
- 1 large onion, diced
- 4 cloves garlic, minced
- 1 bell pepper (red or yellow), diced
- 1 zucchini, sliced
- 1 medium eggplant, diced
- 1 cup cherry tomatoes, halved
- 1 can (14 oz) coconut milk
- 2 cups vegetable broth
- 1 tablespoon lime juice
- 1 tablespoon paprika
- 1 tablespoon ground cumin
- 1 tablespoon fresh cilantro, chopped (plus extra for garnish)
- Salt and pepper to taste
Cooking Instructions:
- Sauté the Aromatics: In a large pot, heat the olive oil over medium heat. Add the diced onion and sauté for about 5 minutes until it becomes translucent. Then, add the minced garlic and cook for an additional minute until fragrant.
- Add the Vegetables: Stir in the diced bell pepper, zucchini, and eggplant to the pot. Cook for about 8-10 minutes, stirring occasionally, until the vegetables start to soften.
- Incorporate the Tomatoes: Add the halved cherry tomatoes to the pot, mixing them in with the other vegetables. Allow them to cook for about 5 minutes until they begin to break down and release their juices.
- Pour in the Coconut Milk: Carefully add the can of coconut milk and vegetable broth to the pot. Stir well to combine all the ingredients and bring the mixture to a gentle simmer.
- Season the Moqueca: Add the lime juice, paprika, ground cumin, and chopped cilantro to the pot. Season with salt and pepper to taste. Let the moqueca simmer for about 20-25 minutes, uncovered, allowing the flavors to meld and the sauce to thicken slightly.
- Serve and Garnish: Once the moqueca is ready, remove it from the heat. Serve it hot over a bed of rice or with crusty bread. Garnish with additional fresh cilantro for a pop of color and flavor.
Extra Tips: For an even richer flavor, consider adding a splash of lime zest or a pinch of crushed red pepper flakes for some heat. Feel free to experiment with different vegetables or even add some beans for added protein. This dish can be made ahead of time; in fact, it tastes even better the next day as the flavors continue to develop!
Peruvian Roasted Vegetable Anticuchos

Peruvian Roasted Vegetable Anticuchos are a delightful twist on the traditional meat skewers that are a staple in Peruvian cuisine. These vibrant skewers celebrate the rich flavors of South American vegetables, making them a perfect dish for vegetarians and anyone looking to add more plant-based meals to their diet. The combination of marinated roasted vegetables, combined with a touch of Peruvian spices, brings a burst of flavor that will tantalize your taste buds.
The dish isn’t only colorful and appealing but is also incredibly easy to prepare, making it a great option for gatherings or a relaxing family dinner.
The beauty of Peruvian Anticuchos lies in their versatility; you can use a variety of seasonal vegetables to suit your preference or availability. Common choices include bell peppers, zucchini, mushrooms, and red onions, all of which can be enhanced with a flavorful marinade.
Grilled to perfection, these skewers can be served with a tangy dipping sauce or alongside a fresh salad. Whether you’re serving them as a main course or a side dish, these roasted vegetable anticuchos will surely be a hit!
Ingredients (Serves 4-6)
- 2 medium zucchinis, sliced into thick rounds
- 1 large red bell pepper, cut into bite-sized pieces
- 1 large yellow bell pepper, cut into bite-sized pieces
- 1 cup of cherry tomatoes
- 1 red onion, cut into wedges
- 1 cup of mushrooms, halved
- 1/4 cup olive oil
- 2 tablespoons soy sauce
- 2 tablespoons red wine vinegar
- 2 teaspoons ground cumin
- 2 teaspoons smoked paprika
- 1 teaspoon garlic powder
- 1 teaspoon salt
- 1/2 teaspoon black pepper
- Skewers (soaked in water if wooden)
Cooking Instructions
- Prepare the Marinade: In a large bowl, combine the olive oil, soy sauce, red wine vinegar, ground cumin, smoked paprika, garlic powder, salt, and black pepper. Whisk together until well blended. This marinade will infuse the vegetables with flavor during grilling.
- Chop the Vegetables: Cut the zucchinis, bell peppers, red onion, and mushrooms into appropriate sizes for skewering. The cherry tomatoes can be left whole. Aim for uniformity in size to guarantee even cooking.
- Marinate the Vegetables: Add the chopped vegetables to the bowl with the marinade. Toss gently to coat each piece evenly. Cover the bowl with plastic wrap and let it marinate in the refrigerator for at least 30 minutes, allowing the flavors to meld.
- Preheat the Grill: While the vegetables are marinating, preheat your grill to medium-high heat. If using a grill pan, preheat it on the stovetop over medium-high heat.
- Assemble the Skewers: Once the vegetables are marinated, take the skewers and thread the vegetables onto them, alternating between different types for a colorful presentation. Leave a little space between each piece to guarantee even cooking.
- Grill the Skewers: Place the skewers on the preheated grill. Cook for about 10-15 minutes, turning occasionally, until the vegetables are tender and have nice grill marks. Keep an eye on them to prevent burning.
- Serve: Once cooked, remove the skewers from the grill and let them rest for a couple of minutes. Serve them hot, either on their own or with a dipping sauce, such as a spicy ají sauce or a yogurt-based dressing.
Extra Tips
For an extra layer of flavor, consider adding fresh herbs like cilantro or parsley to the marinade. Additionally, feel free to customize the vegetables based on what’s in season or your personal preferences.
If you want to add some protein, tofu or tempeh can be marinated and skewered along with the vegetables. Finally, if you’re preparing these ahead of time, you can marinate the vegetables a few hours in advance or even the day before to intensify the flavors. Enjoy your cooking!
Colombian Ajiaco With Seasonal Vegetables
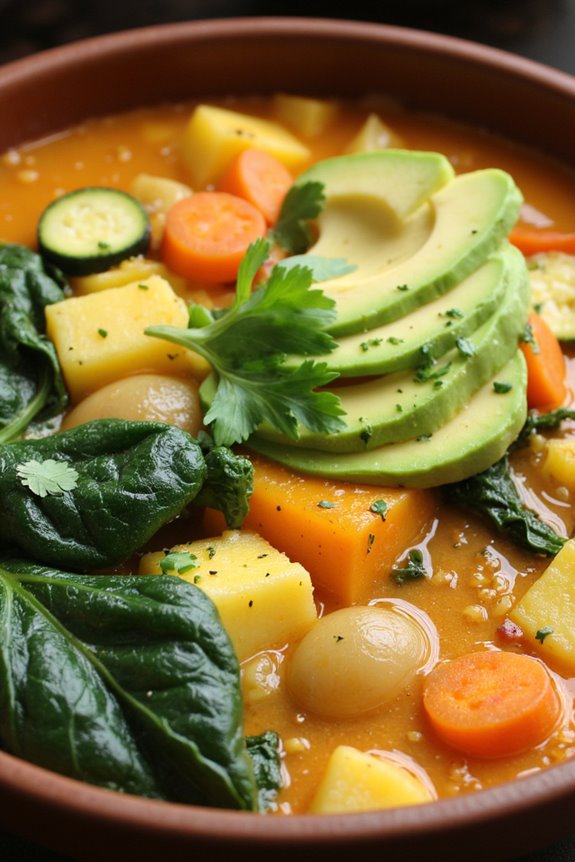
Colombian Ajiaco is a hearty and comforting soup that showcases the vibrant flavors of South America, particularly from Colombia. This dish is traditionally made with chicken, potatoes, and a variety of herbs, but by incorporating seasonal vegetables, it becomes a delightful and nutritious vegetarian option.
Ajiaco is known for its unique blend of ingredients that create a rich and aromatic broth, making it perfect for chilly evenings or as a nutritious meal any time of the year. The beauty of Ajiaco lies not just in its taste but also in its adaptability.
This version allows you to experiment with an assortment of seasonal vegetables, making it both colorful and nutritious. Whether you use butternut squash, zucchini, or fresh greens, the result is a delightful medley that pairs beautifully with the traditional guascas herb, providing a unique taste that’s sure to impress your family and friends.
Ingredients (Serves 4-6)
- 1 tablespoon olive oil
- 1 medium onion, chopped
- 3 cloves garlic, minced
- 2 medium carrots, sliced
- 1 cup corn kernels (fresh or frozen)
- 1 medium potato, peeled and diced
- 2 medium yellow potatoes, peeled and diced
- 1 medium butternut squash, peeled and diced
- 1 zucchini, chopped
- 6 cups vegetable broth
- 1 cup fresh spinach or kale, chopped
- 1 tablespoon dried guascas (or substitute with oregano)
- Salt and pepper to taste
- 1 cup heavy cream (optional)
- Avocado slices for serving
- Fresh cilantro for garnish
Cooking Instructions
1. Prepare the Base:
Heat the olive oil in a large pot over medium heat. Add the chopped onion and minced garlic, sautéing until the onions become translucent and fragrant, around 5 minutes. This step builds the aromatic foundation of your Ajiaco.
2. Add the Vegetables:
Stir in the sliced carrots and corn kernels, cooking for an additional 3-4 minutes. Then, add the diced potato, yellow potatoes, butternut squash, and zucchini. Sauté for another 5 minutes, allowing the vegetables to slightly soften and mingle their flavors.
3. Introduce the Broth:
Pour in the vegetable broth, bringing the mixture to a boil. Once boiling, reduce the heat to a simmer and add in the chopped spinach or kale along with the dried guascas. Simmer for about 20-25 minutes, or until all the vegetables are tender. Stir occasionally to guarantee even cooking.
4. Season and Finalize:
After the vegetables are tender, taste the soup and season with salt and pepper as needed. If you wish to make the soup creamier, stir in the heavy cream at this stage and let it heat through for about 2-3 minutes.
5. Serve:
Ladle the Ajiaco into bowls and garnish with fresh avocado slices and cilantro. Serve hot, and enjoy the vibrant flavors of this hearty Colombian dish.
Extra Tips
When preparing Colombian Ajiaco, feel free to customize the vegetables based on what’s in season or what you have available. You can also adjust the consistency of the soup by adding more or less broth, depending on your preference.
If you want to enhance the flavor further, consider adding a splash of lime juice before serving, which adds a revitalizing brightness to the dish. Enjoy your cooking experience and the delightful taste of South America!
Argentine Grilled Vegetable Skewers
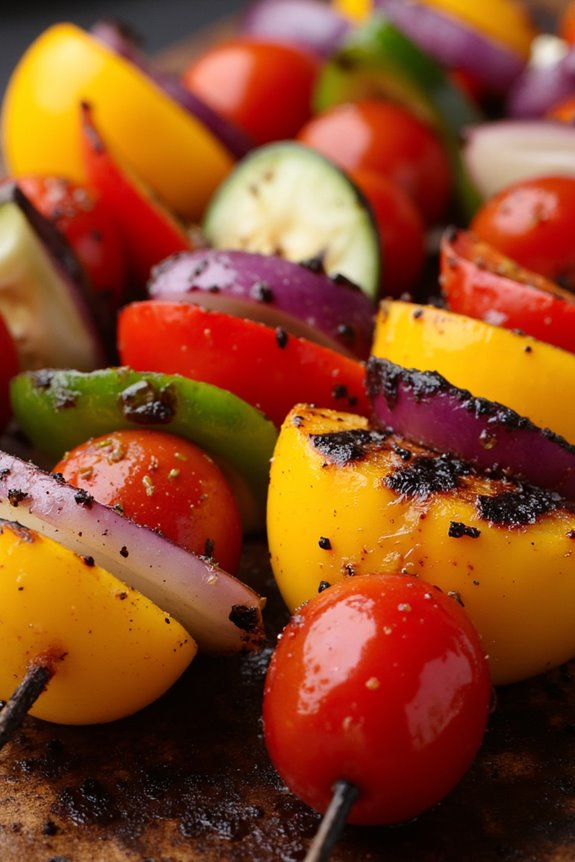
Argentine Grilled Vegetable Skewers are a vibrant and delicious way to enjoy fresh vegetables, showcasing the rich flavors of Argentina’s culinary traditions. This dish isn’t only visually appealing but also packed with nutrients, making it a perfect addition to any meal or as a standalone vegetarian option.
The smoky char from the grill paired with a drizzle of olive oil and herbs elevates the natural sweetness of the vegetables, creating a delightful flavor experience. Grilling vegetables on skewers is a popular practice in Argentina, often served alongside traditional asados (barbecues).
With a variety of seasonal vegetables available, you can customize your skewers to your preference. This recipe serves 4-6 people, making it a great option for gatherings or family dinners. Let’s fire up the grill and get ready to enjoy some scrumptious Argentine flavors!
Ingredients
- 2 bell peppers (red and yellow), cut into 1-inch pieces
- 1 zucchini, sliced into thick rounds
- 1 red onion, cut into wedges
- 8 cherry tomatoes
- 1 cup mushrooms, halved
- 1/4 cup olive oil
- 2 tablespoons balsamic vinegar
- 2 cloves garlic, minced
- 1 teaspoon dried oregano
- 1 teaspoon smoked paprika
- Salt and pepper, to taste
- Skewers (wooden or metal)
Cooking Instructions
1. Prepare the Skewers: If you’re using wooden skewers, soak them in water for at least 30 minutes to prevent them from burning on the grill. If using metal skewers, you can skip this step.
2. Marinate the Vegetables: In a large bowl, combine the olive oil, balsamic vinegar, minced garlic, oregano, smoked paprika, salt, and pepper. Add all the prepared vegetables into the bowl and toss them gently to coat them evenly with the marinade.
Cover the bowl and let the vegetables marinate for at least 15 minutes to absorb the flavors.
3. Skewer the Vegetables: After marinating, thread the vegetables onto the skewers, alternating them to create a colorful presentation. Leave a little space between each piece to guarantee even cooking.
4. Preheat the Grill: Preheat your grill to medium-high heat. If using a charcoal grill, make sure the coals are hot and glowing. If you’re using a gas grill, let it heat for about 10-15 minutes.
5. Grill the Skewers: Once the grill is hot, place the vegetable skewers on the grill. Cook for about 10-12 minutes, turning occasionally, until the vegetables are tender and have grill marks.
The cooking time may vary depending on the size of the vegetable pieces and the heat of the grill.
6. Serve and Enjoy: Remove the skewers from the grill and let them cool for a couple of minutes. Serve warm as a side dish or as a main vegetarian dish.
You can also sprinkle some fresh herbs or a squeeze of lemon juice on top for added flavor.
Extra Tips
For added flavor, consider including other vegetables such as asparagus, eggplant, or corn on the cob. You can also experiment with different herbs and spices according to your taste preferences.
Grilled vegetable skewers can be served with chimichurri sauce on the side for a traditional Argentine touch. If you have leftovers, they can be stored in an airtight container in the refrigerator and enjoyed cold in salads or sandwiches the next day. Enjoy your grilling!
Chilean Pebre With Fresh Vegetables

Chilean Pebre is a vibrant and flavorful condiment that embodies the essence of Chilean cuisine. This fresh salsa is typically made with a combination of finely chopped vegetables, herbs, and spices, bringing a burst of flavor to any dish.
Often served alongside grilled meats, bread, or even as a topping for sandwiches, Pebre is a must-try for anyone looking to explore the rich culinary traditions of South America. Its invigorating ingredients make it a perfect addition to summer barbecues or casual gatherings.
Making Pebre is straightforward and allows for customization based on personal taste preferences. The key to a great Pebre lies in the freshness of the ingredients, especially the herbs and vegetables. This recipe will guide you through creating a delicious Pebre with fresh vegetables that serves 4-6 people, guaranteeing that you’ll have enough to enjoy with your favorite dishes or simply as a dip with chips.
Ingredients
- 1 cup fresh cilantro, finely chopped
- 1 medium red onion, finely diced
- 2 medium tomatoes, diced
- 1 medium green bell pepper, finely chopped
- 1 medium jalapeño pepper, seeded and finely chopped (optional, for heat)
- 2 cloves garlic, minced
- 2 tablespoons olive oil
- 2 tablespoons red wine vinegar
- Salt and pepper to taste
- Juice of 1 lime
Cooking Instructions
- Prepare the Vegetables: Begin by washing and drying all the vegetables thoroughly. Finely chop the cilantro, dice the red onion and tomatoes, and chop the green bell pepper. If you prefer a spicy kick, also chop the jalapeño pepper, but remember to remove the seeds to control the heat level.
- Combine Ingredients: In a large mixing bowl, combine the chopped cilantro, red onion, tomatoes, green bell pepper, and jalapeño (if using). Use a wooden spoon or spatula to gently mix the ingredients together to guarantee even distribution.
- Add Seasoning: Next, add the minced garlic to the bowl. Pour in the olive oil and red wine vinegar. Squeeze the juice of one lime over the mixture. Season with salt and pepper according to your taste preferences. Stir everything together until well combined.
- Let it Rest: Allow the Pebre to sit for at least 15-20 minutes at room temperature before serving. This resting period lets the flavors meld together, enhancing the overall taste of the dish.
- Serve: Present your Chilean Pebre in a serving bowl alongside grilled meats, crusty bread, or tortilla chips. Enjoy the fresh burst of flavors that will elevate any meal!
Extra Tips
When preparing Chilean Pebre, the quality of your ingredients can greatly influence the final flavor of the dish. Opt for organic or locally sourced vegetables whenever possible, and don’t hesitate to adjust the balance of herbs and spices to match your personal taste.
If you prefer a more robust flavor, let the Pebre sit longer or refrigerate it for a few hours before serving. This will further enhance the mingling of flavors, resulting in an even tastier condiment!
Venezuelan Arepas Stuffed With Veggies

Venezuelan arepas are versatile cornmeal cakes that can be enjoyed as a meal or a snack. They’re naturally gluten-free and can be filled with a variety of delicious ingredients. In this recipe, we’ll focus on a colorful stuffing made from a medley of vegetables, providing both nutrition and flavor.
The beauty of arepas lies in their adaptability; you can customize the filling to match your taste preferences and what you have available in your kitchen.
To create the perfect arepas, you’ll start with a simple dough made from masa harina, which is a special corn flour. Once the dough is ready, you’ll shape it into patties and cook them until they’re golden brown and slightly crispy on the outside. The veggie filling, which can include bell peppers, onions, spinach, and cheese, will add a burst of flavor and texture.
This dish serves 4-6 people, making it ideal for family dinners or gatherings.
Ingredients:
- 2 cups masa harina
- 2 ½ cups warm water
- 1 teaspoon salt
- 1 tablespoon vegetable oil (for cooking)
- 1 red bell pepper, diced
- 1 green bell pepper, diced
- 1 medium onion, diced
- 2 cups fresh spinach, chopped
- 1 cup shredded cheese (mozzarella or queso blanco)
- 1 teaspoon cumin
- 1 tablespoon olive oil (for sautéing)
- Fresh cilantro (for garnish, optional)
Cooking Instructions:
- Prepare the Arepa Dough: In a large mixing bowl, combine the masa harina and salt. Gradually add the warm water, mixing with your hands until a smooth dough forms. Let the dough rest for about 5-10 minutes to allow it to hydrate.
- Shape the Arepas: Divide the dough into 8 equal portions. Roll each portion into a ball, then flatten it into a disc about ½ inch thick. Make sure the edges are smooth and the thickness is uniform for even cooking.
- Cook the Arepas: Heat the vegetable oil in a non-stick skillet over medium heat. Once hot, add the arepas and cook for about 5-7 minutes on each side, or until they’re golden brown and slightly crispy. You can also bake them in a preheated oven at 375°F (190°C) for an additional 10-15 minutes for a fluffier texture.
- Prepare the Veggie Filling: In another skillet, heat the olive oil over medium heat. Add the diced onions and bell peppers, and sauté for about 3-4 minutes until they become soft. Stir in the chopped spinach, cumin, and salt, cooking for an additional 2 minutes until the spinach wilts.
- Assemble the Arepas: Carefully slice each cooked arepa in half to create a pocket. Stuff each arepa with the sautéed vegetable mixture and sprinkle shredded cheese inside. Allow the heat from the filling to melt the cheese slightly.
- Serve: Garnish with fresh cilantro if desired, and serve the arepas warm with your favorite dipping sauces or toppings, such as avocado or hot sauce.
Extra Tips: When making arepas, it’s important to guarantee that the dough is neither too wet nor too dry. If the dough feels sticky, add a little more masa harina; if it’s too crumbly, add a small amount of water.
Additionally, for a touch of flavor, you can incorporate herbs and spices into the dough itself, or experiment with different types of cheese for a unique twist. Don’t hesitate to get creative with your fillings; leftover roasted vegetables, beans, or guacamole can all make delightful additions!
Ecuadorian Locro De Papa (Potato Soup)

Ecuadorian Locro De Papa is a hearty and comforting potato soup that captures the essence of Ecuadorian cuisine. This dish isn’t only a staple in Ecuadorian households but also a beloved comfort food that showcases the rich flavors of the Andes. Creamy and flavorful, Locro De Papa is traditionally made with potatoes, cheese, and avocado, making it a perfect meal to warm you up on a chilly day. The combination of ingredients creates a rich and satisfying soup that’s sure to delight your taste buds.
The beauty of Locro De Papa lies in its simplicity and the ability to customize it to your liking. You can add various toppings such as fresh herbs, or even a drizzle of homemade aji sauce for a spicy kick. This recipe is perfect for serving 4 to 6 people, making it an ideal dish for family gatherings or cozy dinners with friends. Grab your ingredients and let’s immerse ourselves in this delicious Ecuadorian classic!
Ingredients (serving size: 4-6 people)
- 4 large potatoes, peeled and diced
- 1 onion, finely chopped
- 2 cloves of garlic, minced
- 4 cups vegetable broth
- 1 cup milk
- 1 cup queso fresco (or any fresh cheese), crumbled
- 1 avocado, diced
- 2 tablespoons vegetable oil
- 1 teaspoon cumin
- Salt and pepper, to taste
- Fresh cilantro, for garnish
Cooking Instructions
- Sauté the Aromatics: In a large pot, heat the vegetable oil over medium heat. Add the finely chopped onion and sauté for about 5 minutes until translucent. Add the minced garlic and cumin, and cook for an additional minute, allowing the flavors to meld together.
- Cook the Potatoes: Add the diced potatoes to the pot and stir well to coat them with the onion and garlic mixture. Pour in the vegetable broth, ensuring the potatoes are fully submerged. Bring the mixture to a boil, then reduce the heat to low and let it simmer for about 20-25 minutes, or until the potatoes are tender and can be easily pierced with a fork.
- Blend the Soup: Once the potatoes are cooked, use an immersion blender to puree the soup until smooth and creamy. If you don’t have an immersion blender, you can transfer the soup in batches to a countertop blender. Be cautious with hot liquids while blending.
- Add Milk and Cheese: After blending, return the soup to the pot (if using a countertop blender) and stir in the milk and crumbled queso fresco. Allow the soup to heat through for about 5 minutes, adjusting the consistency with more broth or milk if desired. Season with salt and pepper to taste.
- Serve: Ladle the Locro De Papa into bowls and top with diced avocado and fresh cilantro for garnish. You may also add a drizzle of aji sauce if you prefer some heat.
Extra Tips
When making Locro De Papa, feel free to experiment with different types of potatoes for varying textures and flavors. Yukon Gold potatoes add a buttery taste, while russets create a fluffier consistency.
Additionally, if you want to make the soup heartier, you can include other vegetables like carrots or corn. Finally, serve the soup with crusty bread or a fresh salad to make it a complete meal. Enjoy your culinary journey through Ecuador!
Uruguayan Vegetable Torta

Uruguayan Vegetable Torta, or “Torta de Verduras,” is a delightful savory pie that showcases the rich bounty of vegetables found in South America. This dish isn’t only delicious but also versatile, allowing for a variety of seasonal vegetables to be used based on availability.
The combination of fresh vegetables, eggs, and a flaky crust creates a satisfying meal that can be served warm or at room temperature, making it perfect for gatherings or as a light dinner option.
The preparation of this dish is straightforward, making it accessible for cooks of all skill levels. Whether you’re looking to impress guests at a dinner party or simply want to enjoy a comforting meal at home, the Uruguayan Vegetable Torta is sure to be a hit.
It’s often enjoyed with a side salad, which adds a revitalizing contrast to the rich flavors of the torta.
Ingredients (Serves 4-6):
- 1 pre-made pie crust (or homemade if preferred)
- 2 tablespoons olive oil
- 1 onion, finely chopped
- 2 cloves garlic, minced
- 1 bell pepper, diced
- 1 zucchini, grated
- 1 carrot, grated
- 1 cup spinach, chopped
- 4 large eggs
- 1 cup ricotta cheese
- 1 cup grated cheese (such as mozzarella or Parmesan)
- Salt and pepper, to taste
- 1 teaspoon dried oregano
- 1 teaspoon paprika
Cooking Instructions:
1. Preheat the Oven: Begin by preheating your oven to 375°F (190°C). This guarantees that the torta cooks evenly and achieves a lovely golden crust.
2. Sauté the Vegetables: In a large skillet, heat the olive oil over medium heat. Add the chopped onion and minced garlic, sautéing until the onion becomes translucent, about 3-4 minutes.
Next, add the diced bell pepper, grated zucchini, and carrot. Cook for an additional 5-7 minutes until the vegetables are tender. Finally, stir in the chopped spinach and cook until wilted, about 2 minutes. Remove from heat and let the mixture cool slightly.
3. Prepare the Filling: In a large bowl, whisk together the eggs, ricotta cheese, grated cheese, salt, pepper, oregano, and paprika until well combined. Add the sautéed vegetable mixture to the bowl and stir until everything is evenly mixed.
4. Assemble the Torta: Roll out the pie crust and fit it into a 9-inch pie dish, trimming any excess dough hanging over the edges. Pour the vegetable and cheese filling into the prepared crust, spreading it evenly.
5. Bake: Place the torta in the preheated oven and Bake for about 30-35 minutes, or until the crust is golden brown and the filling is set. You can check for doneness by inserting a knife into the center; it should come out clean.
6. Cool and Serve: Once baked, remove the torta from the oven and allow it to cool for at least 10 minutes before slicing. This helps the filling set further, making it easier to cut clean slices.
Extra Tips:
For added flavor, consider incorporating herbs such as fresh basil or parsley into the filling.
You can also experiment with different vegetables based on what you have on hand or what’s in season, such as mushrooms, leeks, or broccoli. If you’re looking for a heartier version, adding cooked quinoa or lentils can boost the nutritional value and texture.
Enjoy your Uruguayan Vegetable Torta warm or cold, and it can even be stored in the refrigerator for a couple of days for convenient leftovers!
Paraguayan Sopa Paraguaya

Sopa Paraguaya is a traditional dish from Paraguay that’s often mistaken for a soup due to its name, but it’s actually a cornbread-like dish that’s dense, savory, and packed with flavor. This recipe combines cornmeal, cheese, milk, and onions to create a deliciously moist and fluffy dish that’s perfect as a side or a main course. The dish is usually served warm and is a staple in Paraguayan cuisine, often enjoyed during celebrations or family gatherings.
What makes Sopa Paraguaya special is its unique combination of textures and flavors, marrying the sweetness of corn with the savory punch of cheese and onions. This dish isn’t only simple to make but also a great way to showcase the richness of South American ingredients. Whether you’re looking to explore new culinary territories or simply want a hearty and comforting meal, this Sopa Paraguaya won’t fail to impress.
Ingredients (Serves 4-6)
- 2 cups of cornmeal
- 1 cup of milk
- 1 cup of water
- 1 cup of cheese (preferably Paraguayan cheese or a mild cheese like mozzarella)
- 1 medium onion, finely chopped
- 4 large eggs
- 1 teaspoon of baking powder
- ½ cup of vegetable oil
- Salt to taste
Cooking Instructions
- Preheat the Oven: Begin by preheating your oven to 350°F (175°C). This will guarantee that your Sopa Paraguaya cooks evenly and develops a nice golden crust.
- Sauté the Onions: In a skillet over medium heat, add a tablespoon of vegetable oil and sauté the finely chopped onions until they become translucent and fragrant, about 5-7 minutes. This step will enhance the flavor of the onions, making them sweeter and more aromatic.
- Mix the Dry Ingredients: In a large mixing bowl, combine the cornmeal, baking powder, and a pinch of salt. Stir these dry ingredients well to guarantee that the baking powder is evenly distributed throughout the cornmeal.
- Combine Wet Ingredients: In another bowl, whisk together the eggs, milk, water, and the remaining vegetable oil until well combined. This will create a smooth mixture that helps integrate all the ingredients.
- Combine the Mixtures: Slowly pour the wet mixture into the bowl with the dry ingredients while stirring continuously. This will help prevent lumps from forming.
- Add Cheese and Onions: Fold in the sautéed onions and cheese into the batter, mixing gently until everything is evenly incorporated.
- Bake: Pour the mixture into a greased baking dish, smoothing the top with a spatula. Bake in the preheated oven for about 30-40 minutes or until the top is golden brown and a toothpick inserted into the center comes out clean.
- Cool and Serve: Once baked, remove the Sopa Paraguaya from the oven and allow it to cool for a few minutes. Cut into squares or wedges and serve warm.
Extra Tips
To enhance the flavor of your Sopa Paraguaya, consider using a combination of cheeses for added depth, such as a blend of mozzarella and a sharper cheese like cheddar. Additionally, you can experiment by adding herbs such as parsley or cilantro for a fresh twist.
If you prefer a spicier kick, a diced jalapeño or bell pepper can be added to the onion mixture. Sopa Paraguaya can also be made ahead of time and reheated, making it a convenient option for gatherings. Enjoy your culinary journey into Paraguayan cuisine!
Bolivian Salteñas With Vegetable Filling

Bolivian salteñas are a delightful pastry that combines a flavorful filling with a tender, golden-brown crust. Traditionally, these savory treats are filled with meat, but they can be easily adapted to suit a vegetarian palate with a vibrant mix of vegetables. The result is a satisfying dish that highlights the rich culinary traditions of Bolivia while offering a healthy option for those who prefer plant-based meals.
Salteñas are perfect for a snack, appetizer, or even a main dish, making them an excellent choice for gatherings or family dinners. The process of making salteñas involves preparing a flavorful vegetable filling, followed by crafting the dough that encases it. While they may seem intricate, the steps are straightforward, and the final product is well worth the effort.
With a combination of spices, herbs, and fresh vegetables, these salteñas are bursting with flavor and will impress anyone lucky enough to try them.
Ingredients (serving size: 4-6 people)
- 3 cups all-purpose flour
- 1/2 cup vegetable shortening
- 1/2 cup warm water
- 1 teaspoon salt
- 1 teaspoon baking powder
- 2 tablespoons sugar
- 1 tablespoon olive oil
- 1 onion, finely chopped
- 2 cloves garlic, minced
- 1 carrot, diced
- 1 cup potato, diced
- 1 cup bell pepper, diced (any color)
- 1 cup peas
- 1 teaspoon cumin
- 1 teaspoon paprika
- 1/2 teaspoon chili powder (optional, for heat)
- Salt and pepper to taste
- 1/4 cup fresh cilantro, chopped
- 1 tablespoon vinegar
Cooking Instructions
1. Prepare the Dough: In a large mixing bowl, combine the flour, salt, baking powder, and sugar. In a separate bowl, melt the vegetable shortening and mix it with the warm water. Gradually add the shortening mixture to the dry ingredients, mixing until a dough forms. Knead the dough on a floured surface for about 5-7 minutes until smooth.
Cover with a damp cloth and let it rest while you prepare the filling.
2. Make the Vegetable Filling: In a skillet, heat the olive oil over medium heat. Add the chopped onion and garlic, sautéing until softened and fragrant, about 3-4 minutes. Next, add the diced carrot, potato, and bell pepper. Cook for an additional 5-7 minutes until the vegetables start to soften.
Stir in the peas, cumin, paprika, chili powder, salt, and pepper. Cook for another 2-3 minutes, then remove from heat and stir in the chopped cilantro and vinegar. Allow the filling to cool before assembling the salteñas.
3. Assemble the Salteñas: Preheat your oven to 400°F (200°C). Divide the rested dough into equal portions (about 10-12 pieces). Roll each piece into a circle about 4-5 inches in diameter. Place a generous spoonful of the vegetable filling in the center of each circle.
Gently fold the dough over the filling, creating a half-moon shape, and pinch the edges to seal tightly. You can crimp the edges for a decorative touch if desired.
4. Bake the Salteñas: Place the assembled salteñas on a baking sheet lined with parchment paper. Bake in the preheated oven for 25-30 minutes or until golden brown. Keep an eye on them to prevent burning.
Once done, remove from the oven and let them cool slightly before serving.
5. Serve and Enjoy: Serve warm with your favorite dipping sauce or enjoy them plain. These salteñas are perfect for sharing and can be paired with a revitalizing salad or a side of salsa.
Extra Tips
When making Bolivian salteñas with vegetable filling, consider using seasonal vegetables for the filling to enhance flavors and freshness. You can also experiment with different spices to tailor the salteñas to your taste preferences.
For a more savory filling, consider adding some cheese or beans for additional protein. If you have leftover filling, it can be stored in the refrigerator and used for other dishes, such as tacos or burritos.
Finally, verify the dough is well-sealed to prevent leaks during baking, as this will help retain the delicious flavors inside.
Surinamese Vegetable Curry
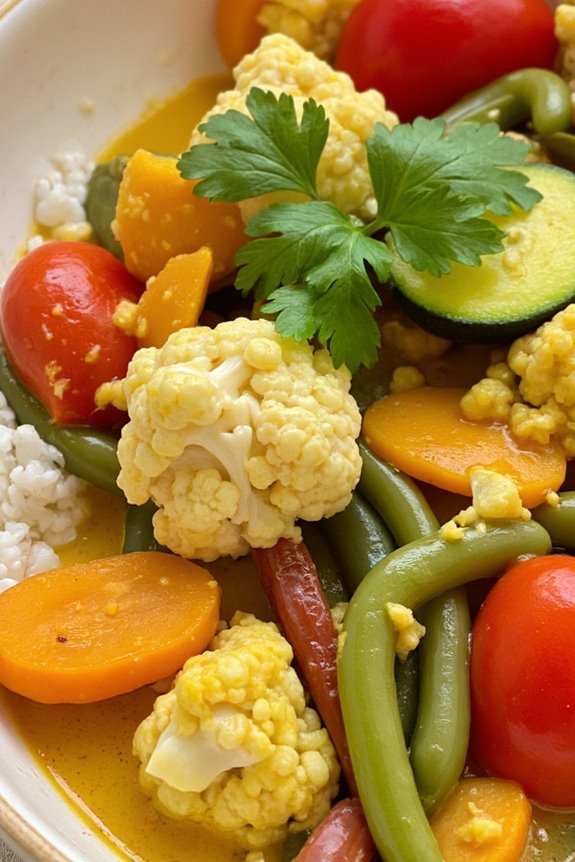
Surinamese Vegetable Curry is a vibrant and flavorful dish that showcases the rich culinary heritage of Suriname, a small country on the northeastern coast of South America. This curry is an excellent choice for anyone looking to enjoy a hearty, plant-based meal that’s packed with nutrition. The combination of fresh vegetables, aromatic spices, and creamy coconut milk creates a delightful balance of flavors that will transport your taste buds to the lush landscapes of Suriname.
Whether you’re a vegetarian or simply looking to incorporate more vegetables into your diet, this curry is bound to satisfy. In Suriname, curries are typically served with rice or roti, making them a filling and satisfying option for family meals or gatherings. The beauty of this recipe lies in its versatility; you can easily swap out vegetables based on what’s in season or what you have on hand.
This Surinamese Vegetable Curry isn’t only delicious, but it’s also a great way to explore the unique flavors and ingredients of South American cuisine. Gather your ingredients and let’s get cooking!
Ingredients (Serves 4-6):
- 2 tablespoons vegetable oil
- 1 large onion, chopped
- 3 cloves garlic, minced
- 1 tablespoon fresh ginger, grated
- 1 red bell pepper, chopped
- 2 medium carrots, sliced
- 1 cup green beans, trimmed and cut into 1-inch pieces
- 1 medium zucchini, chopped
- 1 cup cauliflower florets
- 1 can (14 oz) coconut milk
- 2 tablespoons curry powder
- 1 teaspoon turmeric
- 1 teaspoon cumin
- Salt and pepper to taste
- Fresh cilantro for garnish
- Cooked rice or roti for serving
Cooking Instructions:
- Heat the Oil: In a large pot or Dutch oven, heat the vegetable oil over medium heat. This step is crucial as it helps to infuse the oil with flavor from the spices and aromatics that will follow.
- Sauté Aromatics: Add the chopped onion, garlic, and ginger to the pot. Sauté for about 5 minutes, stirring occasionally, until the onions are translucent and fragrant. This mixture forms the base of your curry, providing depth of flavor.
- Add Vegetables: Stir in the red bell pepper, carrots, green beans, zucchini, and cauliflower. Cook the vegetables for another 5-7 minutes, allowing them to soften slightly. This step guarantees that the vegetables cook evenly and absorb the aromatic flavors from the sautéed onion, garlic, and ginger.
- Incorporate Spices: Sprinkle in the curry powder, turmeric, and cumin. Stir well to coat the vegetables in the spices, and let them cook for an additional 1-2 minutes. This process activates the flavors of the spices, enhancing the overall taste of your curry.
- Pour in Coconut Milk: Add the can of coconut milk to the pot, stirring to combine all the ingredients. Bring the mixture to a gentle simmer. The coconut milk will create a creamy sauce that binds the curry together.
- Simmer and Season: Allow the curry to simmer for 15-20 minutes, stirring occasionally. Season with salt and pepper to taste. This step helps the flavors to meld and intensify, while the vegetables become tender.
- Serve and Garnish: Once the vegetables are cooked through, remove the pot from heat. Serve the Surinamese Vegetable Curry over cooked rice or with roti. Garnish with fresh cilantro for an added burst of flavor and color.
Extra Tips: When making Surinamese Vegetable Curry, feel free to customize it by adding your favorite vegetables or legumes, such as chickpeas or spinach. If you prefer a spicier curry, you can add red pepper flakes or fresh chili peppers during the cooking process.
Additionally, for added depth, consider including a splash of lime juice just before serving to brighten the flavors. Enjoy your culinary journey through South America!
Guyanese Vegetable Chow Mein
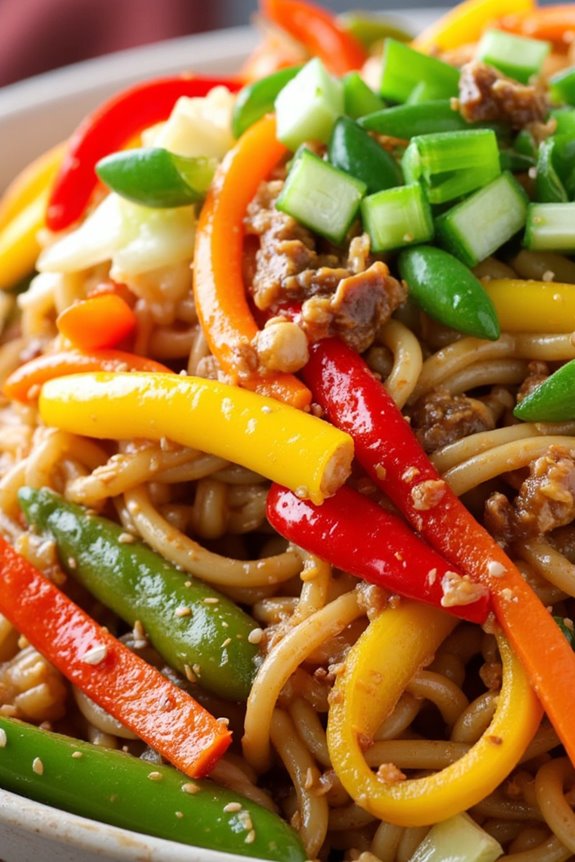
Guyanese Vegetable Chow Mein is a vibrant and satisfying dish that combines the rich flavors of South American cuisine with a blend of fresh vegetables and savory noodles. This dish isn’t only simple to prepare but also offers a wonderful way to incorporate a variety of colorful veggies into your meal.
The combination of soy sauce and seasoning creates a deliciously addictive flavor that will have everyone coming back for seconds. This recipe typically serves 4-6 people, making it perfect for family gatherings or casual weeknight dinners.
The dish is versatile, allowing you to modify the ingredients based on what you have on hand or your personal preferences. With its delightful crunch from fresh vegetables and the comforting texture of chow mein noodles, this dish is sure to become a favorite in your culinary repertoire.
Ingredients:
- 8 oz chow mein noodles
- 2 tablespoons vegetable oil
- 1 medium onion, sliced
- 2 cloves garlic, minced
- 1 cup bell peppers, sliced (red, yellow, or green)
- 1 cup carrots, julienned
- 1 cup cabbage, shredded
- 1 cup snap peas or green beans
- 3 tablespoons soy sauce
- 1 tablespoon oyster sauce (optional)
- 1 teaspoon sesame oil
- Salt and pepper to taste
- 2 green onions, chopped (for garnish)
Cooking Instructions:
- Prepare the Noodles: Begin by cooking the chow mein noodles according to the package instructions. Once cooked, drain and rinse them under cold water to stop the cooking process. Set aside.
- Heat the Oil: In a large wok or skillet, heat the vegetable oil over medium-high heat. Confirm the oil is hot enough before adding the vegetables to get a nice stir-fry effect.
- Sauté Aromatics: Add the sliced onion and minced garlic to the hot oil. Stir-fry for about 2 minutes until the onion becomes translucent and fragrant.
- Add Vegetables: Incorporate the sliced bell peppers, julienned carrots, shredded cabbage, and snap peas or green beans into the wok. Stir-fry the mixture for about 5-7 minutes until the vegetables are tender-crisp.
- Combine Noodles and Sauce: Add the cooked chow mein noodles to the vegetable mixture. Pour in the soy sauce, oyster sauce (if using), and sesame oil. Toss everything together gently to combine, confirming that the noodles are well coated with the sauces.
- Season and Serve: Taste the chow mein and adjust the seasoning with salt and pepper as desired. Cook for an additional 2-3 minutes to heat everything through. Once ready, remove from heat and garnish with chopped green onions before serving.
Extra Tips:
To enhance the flavors of your Guyanese Vegetable Chow Mein, consider adding some protein such as tofu, shrimp, or chicken if desired.
Additionally, feel free to experiment with different vegetables based on seasonal availability or personal preferences. For a bit of heat, you can also incorporate chili flakes or fresh chili peppers.
Ultimately, serve the chow mein immediately for the best texture and taste, as it’s best enjoyed fresh from the pan!
South American Ceviche De Champiñones (Mushroom Ceviche)
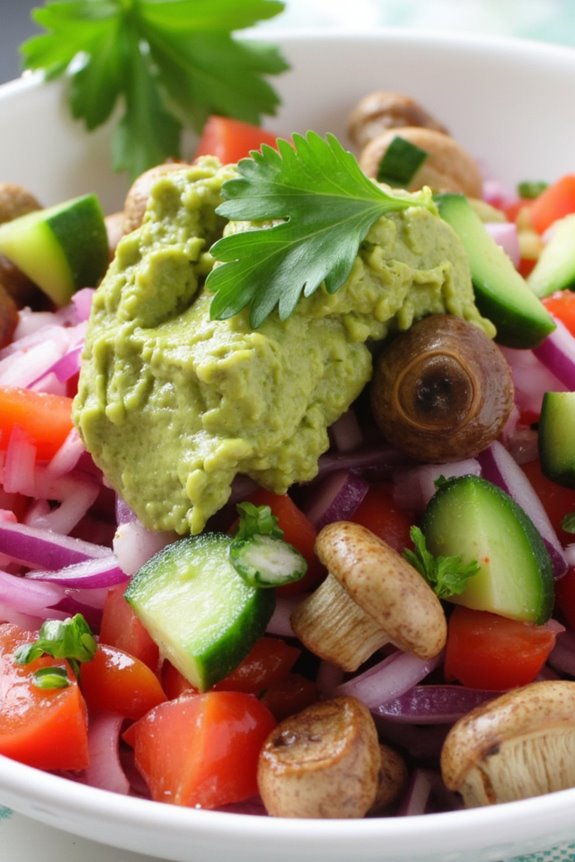
Ceviche de champiñones, or mushroom ceviche, is a delightful and revitalizing dish originating from South America that showcases the versatility of mushrooms. This vibrant dish is a vegetarian twist on the traditional seafood ceviche, making it a perfect option for those who prefer plant-based meals or are looking to explore new flavors.
The combination of fresh mushrooms marinated in citrus juices, herbs, and spices creates a tangy and savory appetizer that’s sure to impress your guests. The key to a successful ceviche de champiñones lies in the quality and freshness of the ingredients.
This dish typically features button or cremini mushrooms, which absorb the zesty marinade beautifully. Served chilled, it’s great for warm weather gatherings or as a starter for any meal. With its eye-catching presentation and revitalizing taste, this mushroom ceviche isn’t only a treat for the palate but also a visual feast.
Ingredients (Serves 4-6):
- 500g fresh button or cremini mushrooms, sliced
- 1 red onion, thinly sliced
- 1 cup fresh lime juice
- 1 cup diced tomatoes
- 1 cup diced cucumber
- 1/4 cup chopped fresh cilantro
- 1 jalapeño pepper, minced (optional)
- Salt, to taste
- Black pepper, to taste
- 1 avocado, diced (for garnish)
Cooking Instructions:
- Prepare the Mushrooms: Start by cleaning the mushrooms with a damp cloth to remove any dirt. Slice them thinly and place them in a large mixing bowl. This helps guarantee even marination and allows the mushrooms to absorb the flavors from the marinade.
- Add Red Onion: Add the thinly sliced red onion to the bowl with the mushrooms. The onion adds a sharp flavor that complements the earthiness of the mushrooms. Mix them gently to combine.
- Make the Marinade: In a separate bowl, whisk together the fresh lime juice, salt, and black pepper. The acidity from the lime juice is essential as it “cooks” the mushrooms and infuses them with flavor. Pour the marinade over the mushroom and onion mixture.
- Mix in Vegetables: Add the diced tomatoes, cucumber, and minced jalapeño (if using) to the mushroom mixture. These ingredients add freshness and texture, balancing the dish’s flavors. Stir to combine all the ingredients gently.
- Marinate: Cover the bowl with plastic wrap and refrigerate for at least 30 minutes to 1 hour. This allows the mushrooms to marinate and absorb the flavors of the lime juice and vegetables. Stir occasionally to guarantee even marination.
- Garnish and Serve: Once marinated, taste the ceviche and adjust the seasoning with additional salt and pepper if needed. Serve the ceviche chilled in individual bowls or a large serving dish, garnished with diced avocado and chopped cilantro for a fresh touch.
Extra Tips:
For the best results, choose fresh, firm mushrooms and avoid over-marinating, as they can become too soft. You can also experiment with different herbs, such as parsley or mint, to add your own twist to the dish.
Serve with crispy tortilla chips or plantain chips for added crunch, and enjoy this revitalizing mushroom ceviche at your next gathering!