

When I think of South American cuisine, vibrant colors and bold flavors instantly come to mind. Each dish tells a story, celebrating fresh ingredients and diverse culinary traditions. From the hearty Quinoa Salad With Roasted Vegetables to the comforting Ajiaco stew, there’s so much to explore. These recipes not only nourish the body but also elevate the dining experience. Curious about how to bring these vibrant tastes to your own kitchen? Let’s plunge into it!
Quinoa Salad With Roasted Vegetables

Quinoa Salad With Roasted Vegetables is a vibrant and nutritious dish that embodies the essence of South American cuisine. This salad isn’t only packed with protein from the quinoa but also bursting with flavor from a medley of roasted vegetables. It makes for a perfect side dish or a satisfying main course, especially for those who follow a vegetarian or plant-based diet.
The combination of textures and colors in this salad is visually appealing and guarantees a delightful eating experience. Roasting the vegetables enhances their natural sweetness, while the quinoa adds a hearty component to the dish. The dressing, often made with lime juice and olive oil, brings everything together with a zesty kick.
Whether you’re serving it at a family gathering or enjoying it as a meal prep option throughout the week, this quinoa salad is sure to impress and nourish.
Ingredients (Serves 4-6):
- 1 cup quinoa
- 2 cups vegetable broth or water
- 1 red bell pepper, diced
- 1 yellow bell pepper, diced
- 1 zucchini, diced
- 1 red onion, diced
- 1 cup cherry tomatoes, halved
- 2 tablespoons olive oil
- 1 teaspoon salt
- 1/2 teaspoon black pepper
- 1 teaspoon smoked paprika
- 1 avocado, diced
- 1/4 cup fresh cilantro, chopped
- Juice of 1 lime
Cooking Instructions:
1. Preheat the Oven: Preheat your oven to 400°F (200°C). This temperature is ideal for roasting vegetables, allowing them to caramelize and develop rich flavors.
2. Prepare the Quinoa: Rinse the quinoa under cold water to remove any bitterness. In a medium saucepan, combine the rinsed quinoa and vegetable broth (or water). Bring to a boil, then reduce the heat to low, cover, and simmer for about 15 minutes or until the quinoa is fluffy and liquid is absorbed. Remove from heat and let it sit covered for 5 minutes, then fluff with a fork.
3. Roast the Vegetables: In a large bowl, combine the diced red bell pepper, yellow bell pepper, zucchini, red onion, and cherry tomatoes. Drizzle with olive oil, and season with salt, black pepper, and smoked paprika. Toss until the vegetables are evenly coated.
Spread the mixture onto a baking sheet in a single layer and roast for 20-25 minutes, or until the vegetables are tender and slightly caramelized.
4. Combine Ingredients: In a large mixing bowl, combine the cooked quinoa and roasted vegetables. Add the diced avocado and chopped cilantro to the bowl.
5. Dress the Salad: Squeeze fresh lime juice over the salad and gently toss everything together to coat. Adjust seasoning with additional salt and pepper if desired.
6. Serve: Serve the quinoa salad warm or at room temperature. It can be enjoyed immediately or stored in the refrigerator for later.
Extra Tips:
To enhance the flavors even further, consider adding a handful of nuts or seeds, such as pumpkin seeds or walnuts, for an extra crunch.
You can also experiment with different vegetables based on the season or your preferences. If you want a bit of heat, adding a pinch of red pepper flakes or some diced jalapeños works wonderfully. This salad is versatile, so feel free to make it your own!
Ajiaco: Colombian Potato and Corn Stew
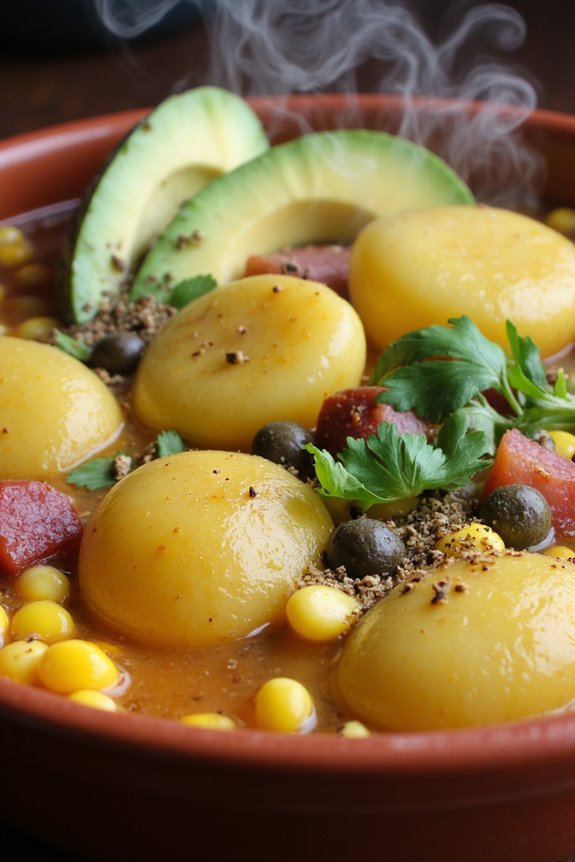
Ajiaco is a beloved traditional Colombian dish that brings together the earthy flavors of potatoes, the sweetness of corn, and the aromatic notes of fresh herbs. This hearty stew is particularly popular in the Andean regions of Colombia, where it’s often enjoyed on chilly days or during family gatherings.
The dish showcases a delightful combination of textures and flavors, making it a perfect vegetarian option that everyone can appreciate. Central to Ajiaco is the use of three different types of potatoes, each contributing its unique creaminess and flavor to the stew.
Additionally, the inclusion of fresh corn and a handful of herbs like guascas gives this dish an unmistakable Colombian flair. Served with avocado and capers on the side, Ajiaco isn’t just a meal; it’s a comforting experience that transports you to the heart of Colombia.
Ingredients (Serves 4-6)
- 2 cups of yellow potatoes, peeled and diced
- 2 cups of russet potatoes, peeled and diced
- 2 cups of red potatoes, peeled and diced
- 4 cups of vegetable broth
- 2 cups of corn kernels (fresh or frozen)
- 1 medium onion, finely chopped
- 2 cloves of garlic, minced
- 1 cup of fresh cilantro, chopped
- 1 tablespoon of dried guascas (or substitute with oregano)
- 1 tablespoon of olive oil
- Salt and pepper to taste
- Avocado, for serving
- Capers, for serving
- Sour cream (optional, for serving)
Cooking Instructions
1. Prepare the Vegetables: Start by peeling and dicing the three types of potatoes into small cubes. This will guarantee they cook evenly and contribute different textures to the stew.
Additionally, chop the onion, garlic, and cilantro, and have the corn ready.
2. Sauté the Aromatics: In a large pot, heat the olive oil over medium heat. Add the chopped onion and sauté until it becomes translucent, about 5 minutes.
Add the minced garlic and cook for an additional minute. This step builds a flavorful base for your stew.
3. Add the Potatoes: Add the diced potatoes to the pot, stirring them with the onion and garlic mixture. Cook for about 5 minutes, allowing the potatoes to absorb some of the flavors before adding the broth.
4. Pour in the Broth: Pour in the vegetable broth, making sure that the potatoes are fully submerged. Bring the mixture to a boil, then reduce the heat to a simmer.
This step allows the potatoes to cook thoroughly and release their starches, thickening the stew.
5. Incorporate Corn and Herbs: After simmering for about 15 minutes, add the corn kernels and chopped cilantro to the pot.
Sprinkle in the dried guascas (or oregano) and stir well. Cook for an additional 10-15 minutes, or until all the potatoes are tender.
6. Season and Serve: Taste the Ajiaco and season with salt and pepper to your liking. Once everything is cooked through, ladle the stew into bowls.
Serve hot, accompanied by slices of avocado, capers, and a dollop of sour cream if desired.
Extra Tips
For an even richer flavor, consider simmering the stew for a longer period, allowing the potatoes to break down slightly and create a creamier texture.
Additionally, feel free to customize your Ajiaco with extra vegetables such as carrots or bell peppers. When serving, encourage your guests to add their desired amount of avocado and capers, as these toppings enhance the overall experience of this comforting dish.
Empanadas De Espinaca: Spinach Empanadas

Empanadas de Espinaca, or Spinach Empanadas, are a delightful and savory dish that showcases the rich culinary traditions of South America. These hand-held pastries are filled with a mixture of fresh spinach, cheese, and spices, all encased in a flaky crust that’s simply irresistible. Perfect for a snack, appetizer, or even a light meal, these empanadas aren’t only vegetarian but also packed with flavor and nutrition.
Making empanadas might seem like a challenging task, but with a little preparation, you can create a dish that will impress your family and friends. The key to a great empanada lies in the freshness of the ingredients and the technique used to seal the pastries. Once you’ve mastered this recipe, feel free to experiment with different fillings, as the empanada dough can be filled with a variety of ingredients, from mushrooms to cheese and beyond.
Ingredients (Serves 4-6):
- 2 cups fresh spinach, chopped
- 1 cup ricotta cheese
- 1 cup feta cheese, crumbled
- 1 small onion, finely chopped
- 2 cloves garlic, minced
- 1 tablespoon olive oil
- Salt and pepper, to taste
- 1 teaspoon cumin
- 1 package of empanada dough wrappers (about 12-14)
- 1 egg, beaten (for egg wash)
- Optional: fresh herbs (e.g., parsley or dill) for added flavor
Cooking Instructions:
1. Prepare the Filling: In a medium skillet, heat the olive oil over medium heat. Add the chopped onion and garlic, sautéing until the onion is translucent and fragrant. This usually takes about 3-4 minutes.
Next, add the chopped spinach to the skillet and cook until wilted, approximately 2-3 minutes. Remove from heat and let it cool slightly.
2. Mix the Ingredients: In a large mixing bowl, combine the sautéed spinach mixture with the ricotta and feta cheeses. Season with salt, pepper, and cumin. Mix everything thoroughly until you have a well-combined filling.
If desired, add finely chopped fresh herbs at this stage for extra flavor.
3. Assemble the Empanadas: Lay out the empanada dough wrappers on a clean surface. Place a tablespoon of the filling in the center of each wrapper. Be careful not to overfill, as this can make sealing difficult.
Moisten the edges of the dough with a little water. Fold the dough over to create a half-moon shape and press the edges together to seal. You can use a fork to crimp the edges for a decorative touch.
4. Prepare for Baking: Preheat the oven to 400°F (200°C). Line a baking sheet with parchment paper. Place the empanadas on the prepared sheet, making sure they’re spaced apart.
Brush the tops with the beaten egg to give them a golden-brown finish when baked.
5. Bake the Empanadas: Bake in the preheated oven for about 20-25 minutes, or until the empanadas are golden brown and crispy. Keep an eye on them to avoid burning, and rotate the baking sheet halfway through for even cooking.
6. Serve and Enjoy****: Once baked, remove the empanadas from the oven and let them cool slightly before serving. They can be enjoyed warm or at room temperature, and pair wonderfully with a tangy dipping sauce or a fresh salad.
Extra Tips:
When making empanadas, feel free to customize the filling based on your preferences or what you have on hand. You can also prepare the filling in advance and store it in the refrigerator for a day or two.
For a gluten-free option, look for gluten-free empanada dough or use alternatives such as rice paper. If you want to get creative, try adding spices like chili flakes for some heat or a squeeze of lemon juice for brightness in the filling.
Brazilian Moqueca With Coconut Milk
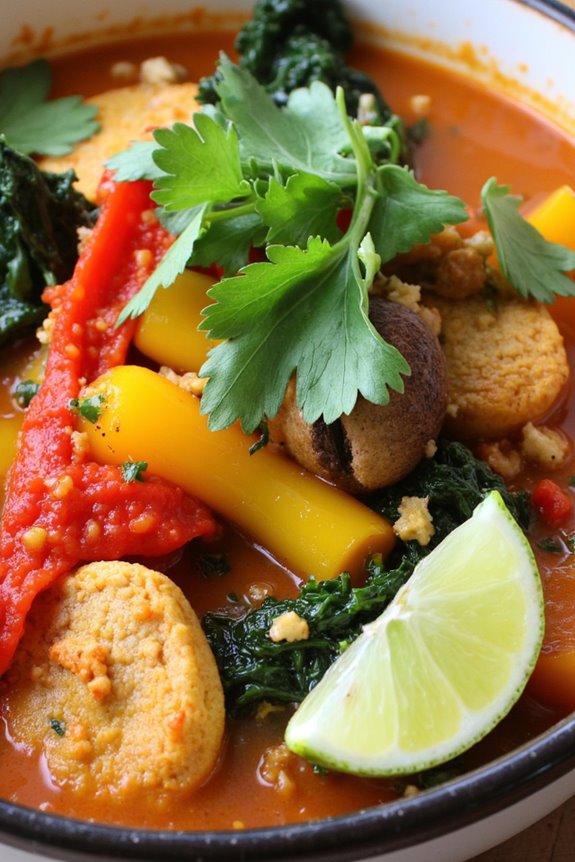
Brazilian Moqueca is a vibrant and aromatic stew traditionally made with fish, but it can be easily adapted to suit a vegetarian or vegan diet by incorporating a variety of vegetables and plant-based proteins. This dish is known for its rich flavors, thanks to the combination of coconut milk, spices, and fresh herbs. The result is a hearty and comforting stew that’s perfect for sharing with family and friends.
The use of palm oil, or dendê oil, adds a distinctive flavor that’s characteristic of Bahian cuisine, but you can substitute it with olive oil if you prefer.
This vegetarian version of Moqueca showcases the colorful produce of South America, such as bell peppers, tomatoes, and onions, all simmered in creamy coconut milk. Serve it with fluffy rice or crusty bread to soak up the delicious sauce. Not only is this dish a feast for the senses, but it’s also packed with nutrients, making it a wholesome choice for any meal.
Ingredients (Serves 4-6)
- 2 tablespoons of olive oil (or palm oil)
- 1 large onion, chopped
- 4 cloves of garlic, minced
- 1 red bell pepper, sliced
- 1 yellow bell pepper, sliced
- 2 medium tomatoes, diced
- 1 can (14 oz) of coconut milk
- 2 cups of vegetable broth
- 1 cup of chopped kale or spinach
- 1 cup of chopped mushrooms (button or cremini)
- 1 tablespoon of lime juice
- 1 teaspoon of paprika
- 1 teaspoon of turmeric
- Salt and pepper to taste
- Fresh cilantro, chopped (for garnish)
- Lime wedges (for serving)
Cooking Instructions
- Heat the Oil: In a large pot or Dutch oven, heat the olive oil over medium heat. Once hot, add the chopped onion and sauté until it becomes translucent, about 5 minutes. This step creates a flavorful base for the stew.
- Add Garlic and Peppers: Stir in the minced garlic, red and yellow bell peppers. Cook for another 5 minutes until the peppers begin to soften and the garlic is fragrant.
- Incorporate Tomatoes: Add the diced tomatoes to the pot and cook for another 3-4 minutes until they start to break down and release their juices, enhancing the stew’s flavor.
- Pour in Coconut Milk and Broth: Next, add the can of coconut milk and vegetable broth. Stir well to combine all the ingredients, bringing the mixture to a gentle simmer.
- Season the Stew: Sprinkle in the paprika, turmeric, salt, and pepper. Stir to guarantee the spices are evenly distributed throughout the stew.
- Add Greens and Mushrooms: Mix in the chopped kale or spinach and mushrooms. Let the stew simmer for about 10-15 minutes, stirring occasionally, until the vegetables are tender and the flavors meld together.
- Finish with Lime Juice: Once the vegetables are cooked, stir in the lime juice for a bright finish. Taste and adjust the seasoning if necessary.
- Serve: Ladle the moqueca into bowls and garnish with freshly chopped cilantro. Serve with lime wedges on the side for an extra zesty kick.
Extra Tips
To elevate the flavors of your Brazilian Moqueca, consider marinating your vegetables in lime juice and spices for an hour before cooking. This allows the ingredients to absorb the flavors more deeply.
You can also add other vegetables like zucchini or eggplant, or even a plant-based protein like tofu, to customize the dish to your liking. Enjoy this delightful stew over rice or with crusty bread to fully savor the rich coconut broth!
Peruvian Causa Rellena: Layered Potato Dish

Causa Rellena is a beloved Peruvian dish that combines vibrant flavors and textures in a beautifully layered presentation. At its core, this dish features creamy mashed potatoes seasoned with lime and aji amarillo, a Peruvian yellow chili pepper that adds color and a subtle heat. Traditionally, it’s made with a filling of shredded chicken or tuna, but in this vegetarian version, we’ll use a delicious mix of avocado, corn, and other fresh vegetables, making it a delightful option for vegetarians and those looking to explore the culinary richness of South America.
This dish not only pleases the palate but also makes for an impressive centerpiece at any gathering. It’s served cold, making it perfect for warm weather and suitable for picnics or potlucks. The vibrant layers of yellow potatoes and colorful filling create a visual feast that will impress your guests while being satisfying and nutritious. So gather your ingredients and get ready to create this delightful Peruvian classic!
Ingredients (Serves 4-6):
- 1 kg yellow potatoes
- 2 tablespoons lime juice
- 2 tablespoons aji amarillo paste (or to taste)
- Salt, to taste
- 1 ripe avocado, mashed
- 1 cup cooked corn kernels
- 1 small red onion, finely chopped
- 1 medium tomato, diced
- Fresh cilantro, chopped (for garnish)
- Olive oil (for drizzling)
Cooking Instructions:
- Prepare the Potatoes: Begin by boiling the yellow potatoes in salted water until they’re fork-tender, usually about 20-25 minutes. Once cooked, drain the potatoes and let them cool slightly. Peel the potatoes while they’re still warm to make mashing easier.
- Mash the Potatoes: In a large mixing bowl, mash the boiled potatoes until smooth. Add the lime juice, aji amarillo paste, and salt to taste. Mix well until the potatoes are well combined and have a vibrant yellow color. Set aside to cool completely.
- Prepare the Filling: In another bowl, combine the mashed avocado, cooked corn kernels, chopped red onion, and diced tomato. Season with salt and a drizzle of olive oil. Mix gently to combine all the ingredients, making sure you maintain the creaminess of the avocado.
- Assemble the Causa: To assemble the dish, you can use a round mold or simply layer it on a serving platter. Start by spreading half of the potato mixture evenly at the bottom, pressing it down to create a firm layer. Next, add the vegetable filling on top of the potato layer, spreading it evenly. Finally, top it with the remaining potato mixture, smoothing it out to create a flat surface.
- Chill and Serve: Cover the assembled causa with plastic wrap and refrigerate for at least 1 hour to allow the flavors to meld and the dish to set. When ready to serve, carefully unmold if using a mold, or cut into slices on the serving platter. Garnish with chopped cilantro and a drizzle of olive oil.
Extra Tips:
When preparing Causa Rellena, using high-quality yellow potatoes is essential, as they provide the right texture and flavor. If you can’t find aji amarillo paste, you can use other chili pastes or fresh peppers, but adjust according to your heat preference.
Additionally, feel free to be creative with the filling—adding ingredients like black olives, diced bell peppers, or even cheese can enhance the flavors and nutritional value.
Finally, make sure the dish is well-chilled before serving, as this enhances the taste and presentation. Enjoy your culinary journey through Peru!
Choclo Con Queso: Corn on the Cob With Cheese

Choclo Con Queso is a delightful South American dish that celebrates the simplicity and richness of fresh corn and cheese. This dish is particularly popular in countries like Peru and Bolivia, where the large, sweet kernels of choclo (Peruvian corn) are a staple. The combination of the tender, juicy corn on the cob with creamy cheese creates a mouthwatering experience that’s perfect for any summer gathering or festive occasion.
The preparation of Choclo Con Queso is straightforward, making it accessible for both novice and experienced cooks. The beauty of this dish lies in its ability to highlight the natural flavors of the ingredients, enhanced by the addition of fresh cheese. Served hot, this dish not only tantalizes the taste buds but also provides a comforting and satisfying vegetarian option that everyone will enjoy.
Ingredients (Serves 4-6):
- 4-6 ears of fresh corn (choclo)
- 200-300 grams of fresh cheese (queso fresco or similar)
- Salt, to taste
- Butter (optional)
- Fresh herbs (like cilantro or parsley) for garnish (optional)
Cooking Instructions:
- Prepare the Corn: Start by husking the ears of corn, removing all the silk and outer leaves. Rinse the corn under cool running water to remove any remaining debris. This guarantees that you have clean corn to work with.
- Boil the Corn: In a large pot, fill it with enough water to submerge the corn. Add a pinch of salt to the water for flavor. Bring the water to a rolling boil over high heat. Once boiling, carefully add the husked corn to the pot. Boil for about 10-15 minutes or until the corn is tender, but not mushy.
- Prepare the Cheese: While the corn is boiling, cut the fresh cheese into thick slices or cubes. If you prefer a creamier texture, you can crumble the cheese instead. Set aside the cheese to be used once the corn is ready.
- Drain the Corn: Once the corn is cooked to your liking, use tongs to carefully remove it from the pot and transfer it to a serving dish. Allow any excess water to drain off.
- Serve with Cheese: While the corn is still hot, sprinkle the cheese generously over the ears of corn. If desired, add a pat of butter on top of each ear for added richness. You can also sprinkle a little more salt to taste.
- Garnish and Enjoy: If using fresh herbs, chop them finely and sprinkle over the cheese-covered corn for a pop of color and flavor. Serve immediately while the corn is hot, and enjoy this simple yet delicious dish!
Extra Tips:
For an even more flavorful experience, consider grilling the corn instead of boiling it. Grilling adds a smoky char that enhances the sweetness of the corn.
Additionally, you can experiment with different types of cheese, such as feta or mozzarella, to find the combination that you enjoy the most. Don’t forget to serve with lime wedges for a zesty kick!
Veggie Arepas With Avocado and Salsa
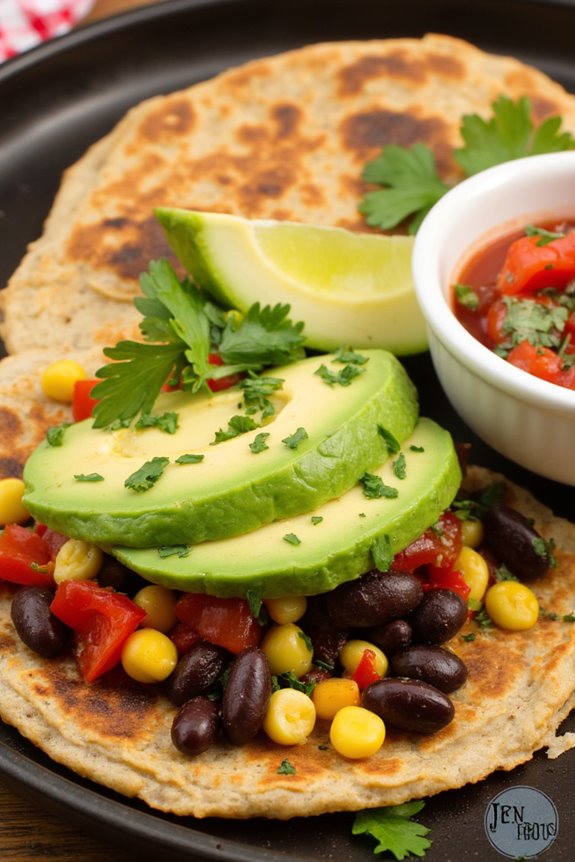
Arepas are a traditional South American dish, particularly popular in Venezuela and Colombia. These cornmeal cakes are incredibly versatile and can be filled or topped with a variety of ingredients. In this recipe, we’ll prepare fluffy veggie arepas that are stuffed with creamy avocado and complemented with a zesty salsa. This dish isn’t only satisfying but also packed with flavor, making it an excellent choice for vegetarians and anyone looking to enjoy a hearty meal.
Making arepas is a straightforward process, and once you get the hang of it, you can experiment with different fillings and toppings. The key to perfect arepas lies in the dough consistency; it should be moist but not sticky. In this recipe, we’ll guide you through each step to create delicious veggie arepas accompanied by fresh avocado and a vibrant salsa.
Ingredients (Serves 4-6):
- 2 cups precooked cornmeal (masarepa)
- 2 ½ cups warm water
- 1 teaspoon salt
- 1 tablespoon olive oil
- 1 cup black beans, cooked and drained
- 1 cup corn kernels (fresh or canned)
- 1 red bell pepper, diced
- 1 small onion, diced
- 1 teaspoon cumin
- 2 ripe avocados, sliced
- 1 lime, juiced
- Fresh cilantro, chopped (for garnish)
- Salsa (store-bought or homemade)
Cooking Instructions:
- Prepare the Arepa Dough: In a large bowl, combine the precooked cornmeal and salt. Gradually add the warm water while mixing with your hands or a spoon until the dough is smooth and pliable. Let the dough rest for about 10 minutes. If it feels too dry, you can add a bit more water; if too sticky, add a little more cornmeal.
- Form the Arepas: Divide the dough into 6-8 equal portions, depending on your preferred size. Roll each portion into a ball and then flatten it gently between your palms to form a disc about ½ inch thick. Make sure the edges are smooth to prevent cracking during cooking.
- Cook the Arepas: Heat a non-stick skillet or griddle over medium heat and add a bit of olive oil. Place the arepas in the skillet and cook for about 5-7 minutes on each side, or until they develop a golden-brown crust. You can also bake them in an oven preheated to 400°F (200°C) for about 10-15 minutes after pan-frying for a crispy texture.
- Prepare the Filling: While the arepas are cooking, heat a small pan over medium heat. Add a splash of olive oil and sauté the diced onion and red bell pepper until softened. Stir in the black beans, corn, cumin, and a pinch of salt, cooking for another 2-3 minutes until heated through.
- Assemble the Arepas: Once the arepas are cooked, remove them from the skillet and let them cool slightly. Slice them open, creating a pocket, and fill each arepa with the sautéed veggie mixture. Add slices of avocado on top, drizzle with lime juice, and garnish with fresh cilantro.
- Serve with Salsa: Serve the filled arepas warm with your choice of salsa on the side for dipping or drizzling.
Extra Tips:
When making veggie arepas, feel free to customize the filling to suit your taste. You can add other vegetables like zucchini, spinach, or mushrooms for added nutrition.
If you prefer a spicier kick, consider adding jalapeños to the vegetable mixture or using a hot salsa. Additionally, for a more authentic experience, you can grill the arepas instead of frying them for a smoky flavor. Enjoy your meal!
Argentine Provoleta With Herbs

Argentine Provoleta is a delightful dish that highlights the rich flavors and textures of provolone cheese, a staple in Argentine cuisine. Traditionally grilled, this melty cheese is infused with aromatic herbs, creating a dish that’s both simple and incredibly satisfying. Perfect for sharing, Provoleta is often served as an appetizer during asados (barbecues) and pairs beautifully with crusty bread and a glass of Malbec.
Making Provoleta is a straightforward process that requires minimal ingredients, yet the result is a cheesy, herb-infused delight that will impress your guests. The key is to achieve the perfect melt while maintaining a crisp, golden crust. With this recipe, you can easily recreate this beloved Argentine classic in your own kitchen.
Ingredients (Serves 4-6)
- 1 large wheel of provolone cheese (about 1 pound)
- 2 tablespoons olive oil
- 2 teaspoons dried oregano
- 1 teaspoon dried thyme
- 1 teaspoon crushed red pepper flakes (optional)
- Freshly cracked black pepper, to taste
- Fresh parsley, chopped, for garnish
- Crusty bread, for serving
Instructions
- Prepare the Cheese: Start by taking the provolone cheese out of its packaging. If it’s in a casing, remove it. Place the wheel of cheese on a heatproof serving dish or a cast-iron skillet, making sure it can withstand high temperatures.
- Preheat the Grill: Preheat your grill to medium-high heat. If using a grill pan on the stove, heat it over medium-high heat until hot. This step is essential as you want the grill to be hot enough to melt the cheese quickly without burning it.
- Season the Cheese: Drizzle the olive oil over the top of the cheese. Then, sprinkle the dried oregano, thyme, and crushed red pepper flakes (if using) evenly over the surface. Finally, add freshly cracked black pepper to your liking. This will infuse the cheese with delicious herb flavors as it cooks.
- Grill the Cheese: Place the cheese on the grill (or in the hot skillet) and close the lid. Grill for approximately 5-7 minutes, or until the cheese starts to bubble and begins to brown on the edges. Keep an eye on it to prevent burning; you want a gooey center with a nicely crispy exterior.
- Serve and Garnish: Once the cheese is perfectly melted and golden, carefully remove it from the grill. Immediately sprinkle with chopped fresh parsley for a burst of color and freshness. Serve hot with slices of crusty bread for dipping.
Extra Tips
When making Argentine Provoleta, make sure that your cheese is at room temperature before grilling, as this helps it melt evenly. If you don’t have a grill, a broiler can work well too—just keep a close watch to prevent overcooking.
Experiment with different herbs and spices to personalize your dish, and don’t hesitate to add a drizzle of balsamic reduction for an extra layer of flavor. Enjoy this dish fresh and hot for the best texture and taste!
Chilean Pebre Sauce With Bread
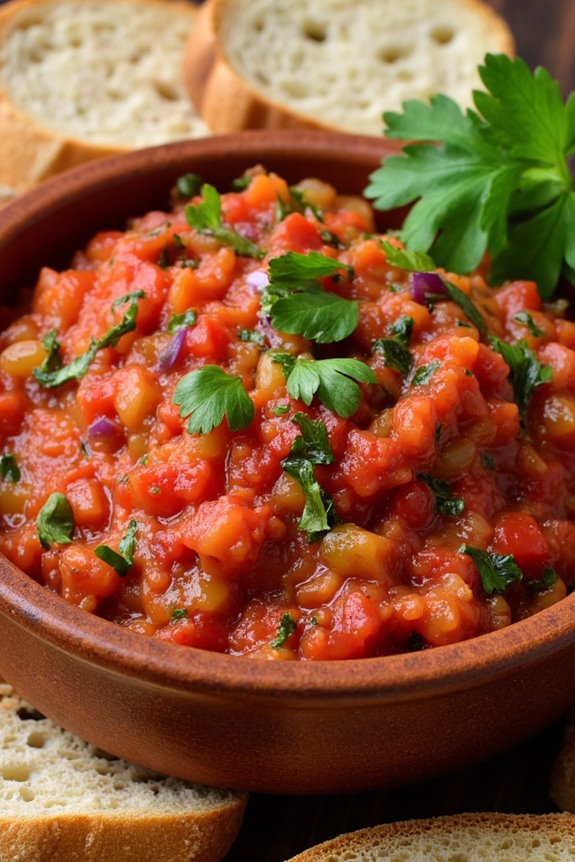
Chilean Pebre is a vibrant and flavorful condiment that embodies the essence of traditional South American cuisine. This zesty sauce is made from fresh ingredients like tomatoes, onions, cilantro, and chili peppers, offering a delightful blend of flavors that elevate any meal.
Pebre is commonly served with bread, making it a perfect appetizer or side dish for gatherings. The harmonious combination of fresh herbs and spices brings a revitalizing kick that pairs beautifully with various dishes, especially grilled vegetables or roasted meats.
Making Pebre isn’t only simple, but it also allows for a bit of creativity, as you can adjust ingredients to suit your taste. Whether you’re looking to spice things up or prefer a milder flavor, this sauce is versatile enough to accommodate your preferences.
Paired with crusty bread, it becomes an irresistible treat that everyone will enjoy. Let’s explore this easy-to-follow recipe for Chilean Pebre Sauce with Bread, perfect for serving 4-6 people.
Ingredients:
- 3 medium tomatoes, diced
- 1 small red onion, finely chopped
- 1 cup fresh cilantro, chopped
- 1-2 fresh green chili peppers, finely chopped (adjust to taste)
- 2 tablespoons olive oil
- 2 tablespoons white vinegar
- Salt and pepper to taste
- Crusty bread, for serving
Cooking Instructions:
- Prepare the Vegetables: Start by washing the tomatoes, cilantro, and chili peppers thoroughly. Dice the tomatoes into small pieces, making sure that the seeds are removed for a smoother texture. Finely chop the red onion and the green chili peppers, adjusting the amount of chili according to your heat preference.
- Mix the Ingredients: In a medium-sized mixing bowl, combine the diced tomatoes, chopped red onion, cilantro, and green chili peppers. Use a spatula or wooden spoon to gently mix the ingredients, making sure they’re evenly distributed.
- Add the Dressing: Drizzle in the olive oil and white vinegar over the mixed ingredients. Season with salt and pepper to taste. Stir the mixture again to confirm that the dressing coats all the components evenly, enhancing their flavors.
- Let It Rest: Allow the Pebre to sit for at least 15 minutes at room temperature. This resting time is essential as it allows the flavors to meld together, resulting in a more robust and harmonious sauce.
- Serve with Bread: While the Pebre rests, prepare your crusty bread by slicing it into thick pieces. You can lightly toast the bread if desired for added texture. Serve the Pebre in a bowl alongside the bread, allowing guests to scoop up the sauce with their bread slices.
Extra Tips:
For an extra layer of flavor, consider adding a squeeze of fresh lime juice or a pinch of cumin to the Pebre sauce. If you enjoy a smoother texture, you can blend the ingredients in a food processor instead of chopping them by hand.
Additionally, Pebre can be stored in the refrigerator for up to a week, making it an excellent option for meal prep or to have on hand for quick snacks. Enjoy experimenting with your Pebre by incorporating seasonal ingredients or adjusting the spice level to make it your own!
Tropical Fruit Salad With Lime Dressing
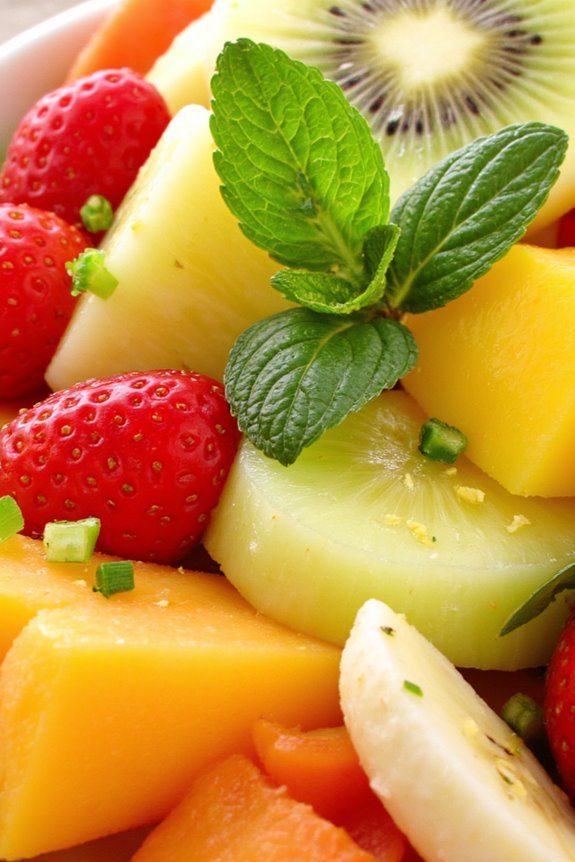
Tropical Fruit Salad With Lime Dressing is a vibrant and invigorating dish that captures the essence of South American flavors. This salad combines a variety of fresh, juicy tropical fruits, making it a perfect accompaniment to any meal or a light dessert on a warm day. The addition of a zesty lime dressing enhances the sweetness of the fruits while adding a tangy twist that elevates the entire dish.
This recipe isn’t only easy to prepare but also packed with nutrients, making it an ideal choice for health-conscious individuals. With its bright colors and delightful flavors, this salad is sure to impress guests at gatherings or serve as a delightful treat for family. It celebrates the rich diversity of fruits found in South America, bringing a taste of the tropics to your kitchen.
Ingredients (Serves 4-6 people):
- 1 cup pineapple, diced
- 1 cup mango, diced
- 1 cup kiwi, peeled and sliced
- 1 cup banana, sliced
- 1 cup strawberries, hulled and halved
- 1 cup papaya, diced
- 1/4 cup fresh mint leaves, chopped
- 1/4 cup lime juice (freshly squeezed)
- 2 tablespoons honey or agave syrup (optional)
- Zest of 1 lime
Cooking Instructions:
- Prepare the Fruits: Begin by washing all the fruits thoroughly. Peel and dice the pineapple, mango, kiwi, and papaya as indicated, and slice the bananas and strawberries. Make sure to cut the fruits into bite-sized pieces to guarantee a pleasant eating experience.
- Combine the Fruits: In a large mixing bowl, gently combine all the prepared fruits—pineapple, mango, kiwi, banana, strawberries, and papaya. Use a spatula or large spoon to stir the fruits together carefully, taking care not to mash them.
- Make the Lime Dressing: In a small bowl, whisk together the freshly squeezed lime juice, honey or agave syrup (if using), and lime zest. This will create a zesty dressing that complements the sweetness of the fruits.
- Dress the Salad: Pour the lime dressing over the mixed fruits in the large bowl. Gently toss the fruits with the dressing until all pieces are evenly coated. This step is essential, as the dressing enhances the flavors of the fruits.
- Garnish and Serve: Finally, sprinkle the chopped fresh mint leaves over the top of the salad for added flavor and a pop of color. Serve the tropical fruit salad immediately for the best taste, or refrigerate it for up to 30 minutes to let the flavors meld together before serving.
Extra Tips:
When preparing Tropical Fruit Salad With Lime Dressing, feel free to mix and match fruits based on seasonal availability or personal preference. Other great additions could include passion fruit, guava, or even pomegranate seeds for a burst of color.
If you prefer a sweeter salad, adjust the amount of honey or agave syrup to suit your taste. Additionally, for a fun twist, consider adding a sprinkle of chili powder on top for a sweet and spicy contrast!